An air fryer is a small kitchen appliance that cooks food using hot circulating air. It gives you that crispy, golden texture — without all the oil that deep frying needs. No wonder it has become one of the most popular kitchen tools in the United States over the last few years.
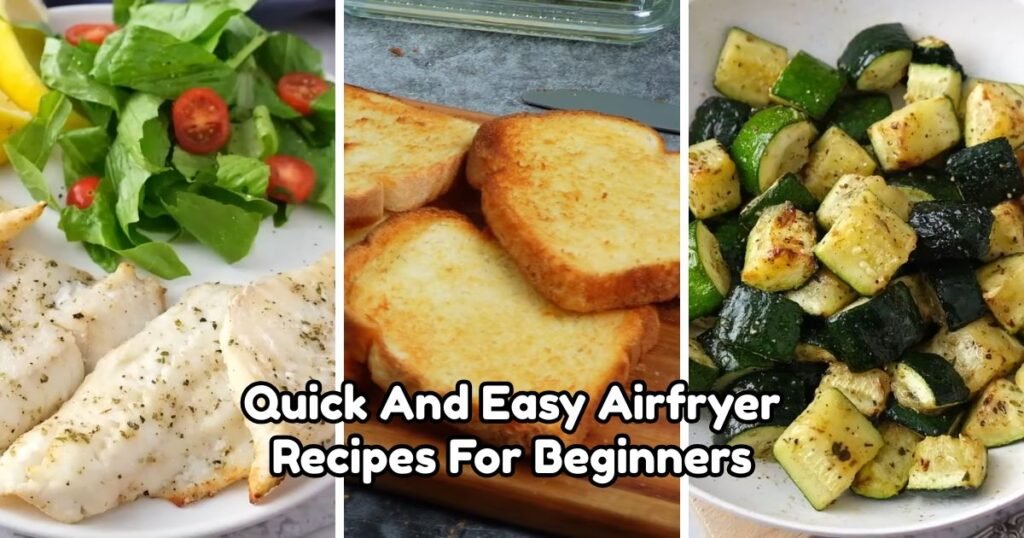
Quick and easy airfryer recipes for beginners are perfect for anyone just starting out in the kitchen. The machine heats up fast, uses very little oil, and cleanup takes only a few minutes. You get crispy results in less time than a regular oven — and the process is almost hands-off.
This guide is for students cooking in a dorm, busy parents squeezing dinner into a tight schedule, or anyone picking up a spatula for the very first time.
The recipes here are simple, the ingredient lists are short, and the steps are easy to follow. Air fryer cooking may seem intimidating or difficult at first — but it’s actually quite the opposite!
Why Choose an Air Fryer for Quick Cooking?
Quick and easy airfryer recipes for beginners work so well because the appliance itself is designed to make cooking easier. Here is why so many people choose it:
1. Faster than a traditional oven. An air fryer preheats in about 3 minutes. A standard oven can take 15–20 minutes just to reach temperature. That time savings adds up fast on busy weeknights.
2. Healthier than deep frying. Most air fryer recipes use a light spray of oil instead of submerging food in a vat of fat. You still get a crispy outside, but with far fewer calories and less grease.
3. Energy-efficient. Because the cooking chamber is small and heats up quickly, an air fryer uses less electricity than a full-size oven. It is a smart choice for anyone watching their energy bill.
4. Beginner-friendly operation. Most models have a simple dial or digital display. Set the temperature, set the timer, and the machine does the work. No complicated techniques needed.
5. Great for small kitchens. An air fryer sits on the counter and does not take up much space. For dorm rooms, small apartments, or kitchens with limited tools, it is an ideal solution.
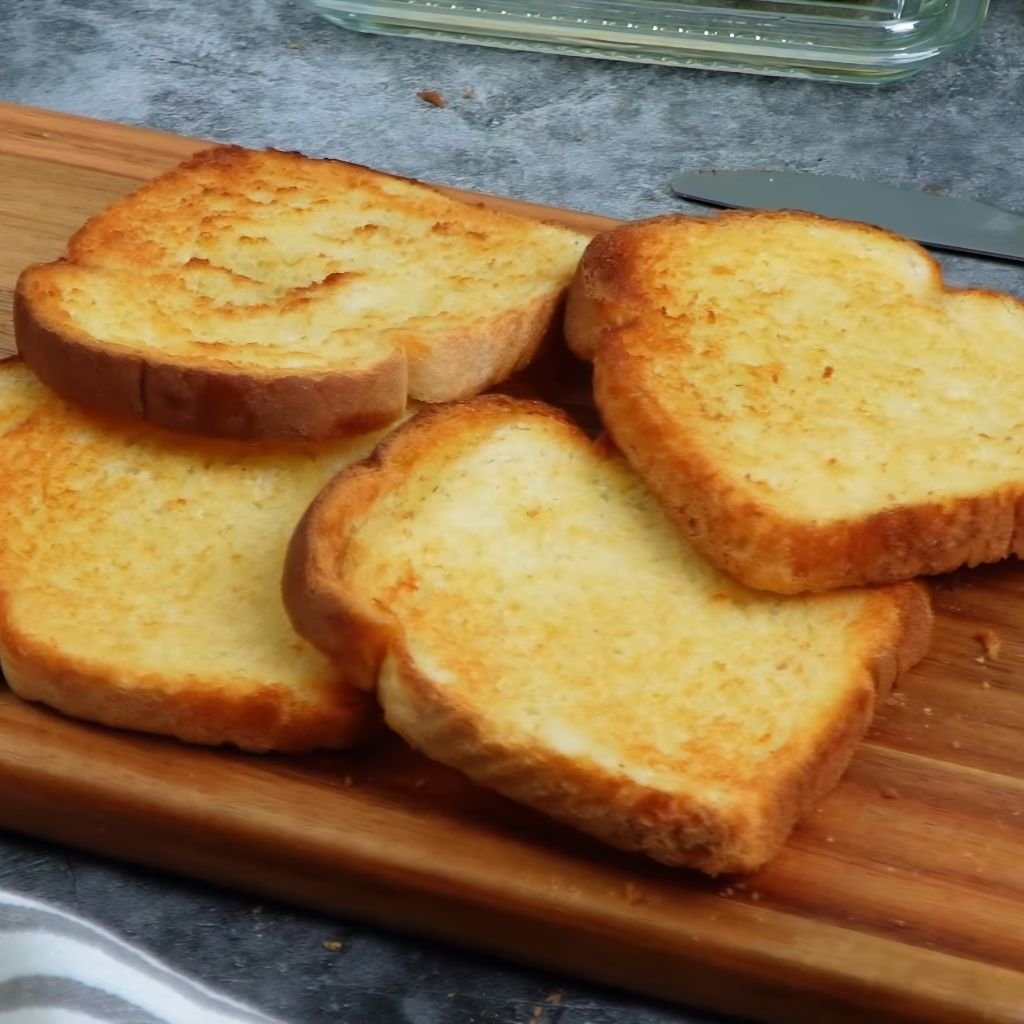
1. Air Fryer Toast
Prep Time: 1 min | Cook Time: 4 min | Serves: 2
Golden, crispy toast made right in the air fryer — no toaster needed. The hot circulating air browns both sides evenly and gives you that perfect crunch every single morning. Great on its own or topped with butter, jam, avocado, or peanut butter for a fast, satisfying start to the day.
Ingredients:
- 2 slices of bread (white, wheat, sourdough, or your choice)
- 1 teaspoon softened butter or cooking spray (optional)
Instructions:
Start by taking your bread slices out of the bag and laying them flat on a clean surface. You can leave them plain or spread a very thin layer of softened butter on one side of each slice. Butter is optional here — plain bread will still toast up nicely, but a little butter gives you a richer, slightly golden color on the surface.
Preheat your air fryer to 370°F (188°C) for about 2 minutes. Preheating helps the bread start cooking immediately when it goes in, which gives you a more even result.
Place the bread slices in a single layer inside the air fryer basket. Make sure they are lying flat and not overlapping or folded. If your air fryer basket is small, cook one slice at a time rather than cramming two in at an angle — this will give you better, more consistent browning.
Cook at 370°F for 2 minutes. When the timer goes off, open the basket carefully (steam and heat will escape) and use a pair of tongs or a heat-safe spatula to flip each slice over. This step is important because the air fryer tends to brown the top surface faster than the bottom, so flipping ensures both sides get equal color and crunch.
After flipping, cook for another 1 to 2 minutes, depending on how dark you like your toast. Check at the 1-minute mark — if the bread looks golden brown and feels firm when you press it lightly with the tongs, it is ready. If you prefer darker toast, give it the full additional 2 minutes.
Use tongs to carefully remove the toast from the basket and place it on a plate. Be careful — the bread will be very hot right out of the air fryer. Let it sit for about 30 seconds before adding toppings so the surface stays crispy rather than getting soggy from steam.
Add your favorite toppings and enjoy immediately. Toast is best eaten right away while it is still warm and crunchy.
2. Air Fryer Boiled Eggs
Prep Time: 1 min | Cook Time: 15 min | Serves: 2–4
Cooking eggs in the air fryer is one of those tricks that sounds odd but works beautifully. You get consistent results every time — soft-boiled, medium, or hard — without watching a pot of boiling water. Perfect for meal prep, quick protein snacks, or a simple breakfast on any morning.
Ingredients:
- 4 large eggs (cold, straight from the refrigerator)
- Ice water for the ice bath
Instructions:
Pull 4 large eggs directly from the refrigerator. Do not let them come to room temperature first — cold eggs actually work better in the air fryer because the gradual heat exposure gives you more control over the final texture.
Preheat your air fryer to 250°F (121°C) for 2 minutes. This lower temperature is intentional. Unlike boiling water, the air fryer uses dry heat, and cooking eggs at too high a temperature will cause the whites to become rubbery and the yolk to dry out.
Once preheated, place the eggs directly in the air fryer basket. There is no need for a rack or any special tool — just set them gently in the basket in a single layer. Make sure they are not rolling around and touching the heating coil. If your basket has large holes, place a small piece of foil on the bottom first to keep the eggs from rolling through.
Cook the eggs at 250°F according to your preferred doneness. For soft-boiled eggs with a runny center, cook for 9 to 10 minutes. For medium eggs with a slightly jammy yolk, cook for 12 minutes. For fully hard-boiled eggs, cook for 14 to 15 minutes.
While the eggs are cooking, fill a medium bowl with cold water and add a generous handful of ice cubes. This ice bath is a critical step — it stops the cooking process the moment the eggs come out of the air fryer, which prevents the yolk from turning that grayish-green color around the edges and keeps the texture exactly where you want it.
When the timer goes off, use tongs to carefully transfer each egg from the air fryer basket directly into the ice bath. Let them sit in the cold water for at least 5 minutes. The shells will also peel much more easily after an ice bath compared to eggs that are peeled while still hot.
After 5 minutes in the ice bath, tap each egg gently on a hard surface to crack the shell. Roll it between your palms to loosen the shell, then peel it starting from the wider end where the air pocket is. The shell should slip right off.
Slice, season with salt and pepper, and serve immediately, or store unpeeled eggs in the refrigerator for up to 5 days.
3. Air Fryer Breakfast Potatoes
Prep Time: 10 min | Cook Time: 20 min | Serves: 3–4
Crispy on the outside, fluffy on the inside — these breakfast potatoes are seasoned simply and cooked to perfection. They pair well with eggs, turkey sausage, or any morning meal. Far less greasy than stovetop hash browns, and so much easier to make on a weekday morning without standing over a pan.
Ingredients:
- 3 medium Yukon gold or russet potatoes
- 1½ tablespoons olive oil
- ½ teaspoon garlic powder
- ½ teaspoon onion powder
- ½ teaspoon smoked paprika
- ½ teaspoon salt
- ¼ teaspoon black pepper
- Fresh parsley for garnish (optional)
Instructions:
Begin by washing your potatoes thoroughly under cold running water. Scrub the skin with a vegetable brush or the rough side of a sponge to remove any dirt. You can leave the skins on for extra texture and nutrition, or peel them if you prefer a smoother result.
Cut each potato into small, even cubes — about ½ inch to ¾ inch per piece. Uniformity is very important here. If some pieces are much larger than others, the smaller ones will burn before the larger ones finish cooking. Take your time with this step and try to keep all the pieces roughly the same size.
Place the cut potatoes into a large mixing bowl. Add the olive oil and toss everything together with a spoon or your hands until every piece is lightly coated. Then add the garlic powder, onion powder, smoked paprika, salt, and black pepper. Toss again until the seasoning is spread evenly across all the potato pieces.
Preheat your air fryer to 400°F (200°C) for 3 minutes. A hot air fryer is essential for getting crispy edges — if you skip preheating, the potatoes will steam rather than crisp up.
Transfer the seasoned potatoes to the air fryer basket. Spread them out as much as possible in a single layer. It is okay if a few pieces are stacked, but avoid piling them too high. If you have a small air fryer, work in two batches rather than cramming everything in — overcrowding traps steam and leads to soft, mushy potatoes instead of crispy ones.
Cook at 400°F for 10 minutes. Then open the basket and shake it firmly or use a spatula to toss the potatoes around. This flipping step exposes new surfaces to the hot air and ensures all sides get crispy rather than just the top layer.
Continue cooking for another 8 to 10 minutes, shaking the basket once more halfway through. The potatoes are done when the edges are golden brown and crispy, and a fork slides through the center of a piece easily. If you want extra crispy edges, add 2 more minutes at 400°F.
Remove from the basket, transfer to a plate, and garnish with fresh parsley if desired. Serve immediately.
4. Air Fryer French Toast Sticks
Prep Time: 8 min | Cook Time: 8 min | Serves: 2–3
These French toast sticks are sweet, slightly crispy on the edges, and soft in the middle — everything a good breakfast should be. Made with thick bread and a simple egg mixture, they cook up quickly in the air fryer and are great for dipping in maple syrup. Kids and adults both love them.
Ingredients:
- 4 thick slices of bread (Texas toast or brioche works best)
- 2 large eggs
- 3 tablespoons whole milk
- 1 teaspoon vanilla extract
- 1 teaspoon ground cinnamon
- 1 tablespoon sugar
- Pinch of salt
- Cooking spray
- Maple syrup for serving
- Powdered sugar for garnish (optional)
Instructions:
Start by cutting each thick slice of bread into 3 long strips. Each strip should be about 1 inch wide and the full length of the bread slice. You should end up with 12 strips total from 4 slices of bread. Using thick bread like Texas toast or brioche is important — thin sandwich bread will absorb the egg mixture too quickly and fall apart.
In a shallow bowl or wide dish, crack the 2 eggs and add the milk, vanilla extract, cinnamon, sugar, and pinch of salt. Whisk everything together vigorously until fully combined and slightly frothy. The mixture should look uniform with no streaks of plain egg white visible.
Spray the air fryer basket lightly with cooking spray and preheat the air fryer to 370°F (188°C) for 2 minutes.
While the air fryer heats up, dip each bread strip into the egg mixture. Hold the strip in the mixture for about 3 to 4 seconds per side — long enough for the bread to absorb some of the egg but not so long that it becomes completely saturated and falls apart. Lift the strip out and let any excess egg mixture drip back into the bowl for a second before placing it aside.
Arrange the soaked bread strips in a single layer in the preheated, greased air fryer basket. Do not stack them or let them overlap — they need space around them for the hot air to circulate and create that slightly crispy edge. Depending on your air fryer size, you may need to cook in two batches.
Cook at 370°F for 4 minutes. Open the basket and carefully flip each strip using tongs. The cooked side should look golden and slightly firm. Cook for another 3 to 4 minutes on the second side until that side matches.
Remove from the air fryer and arrange on a plate. Dust with powdered sugar if desired. Serve immediately with maple syrup on the side for dipping. These are best eaten fresh and hot.
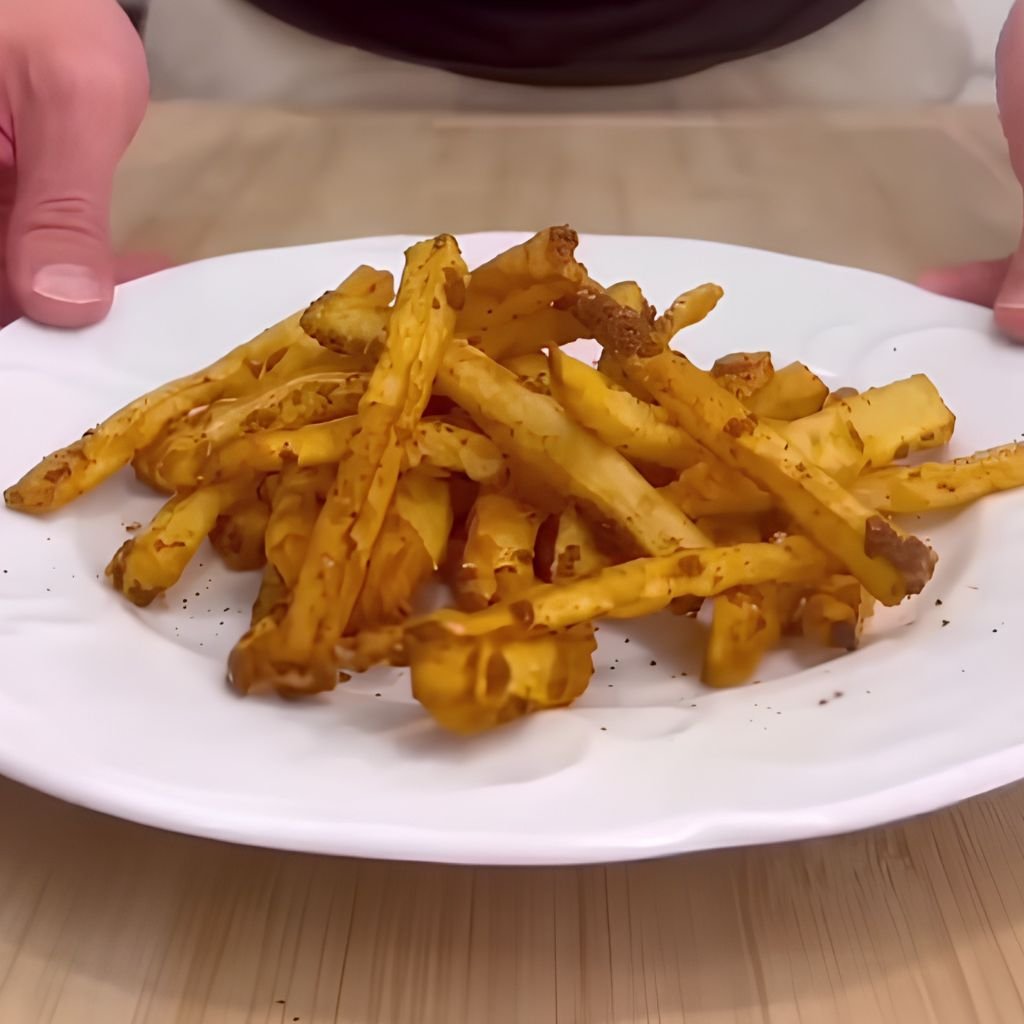
5. Air Fryer French Fries
Prep Time: 15 min | Cook Time: 20 min | Serves: 3–4
Homemade French fries in the air fryer come out incredibly crispy on the outside and fluffy on the inside — with barely any oil. No deep fryer, no splatter, no heavy smell lingering in the kitchen. These are seasoned simply and cooked to golden perfection, and they are a great introduction to quick and easy airfryer recipes for beginners.
Ingredients:
- 3 large russet potatoes
- 1½ tablespoons olive oil or vegetable oil
- 1 teaspoon salt
- ½ teaspoon garlic powder
- ½ teaspoon paprika
- ¼ teaspoon black pepper
Instructions:
Peel the potatoes and cut them into fry shapes. Aim for sticks that are about ¼ inch to ⅓ inch thick and as uniform as possible. Thicker fries will have a fluffy interior; thinner fries will be crispier throughout. Choose based on your personal preference.
Place the cut fries in a large bowl and cover with cold water. Let them soak for at least 15 minutes — 30 minutes is even better. This soaking step draws out excess starch from the potato, which is the main reason homemade fries often come out limp. After soaking, drain the water and spread the fries out on a clean kitchen towel or paper towels. Pat them completely dry. Any remaining moisture will turn to steam in the air fryer and prevent crisping.
Return the dried fries to the bowl. Drizzle the oil over them and toss to coat every piece lightly. Add the salt, garlic powder, paprika, and black pepper. Toss again until every fry is seasoned.
Preheat your air fryer to 380°F (193°C) for 3 minutes. Add the fries to the basket in a single layer. If you have too many to fit in one layer, divide them into two batches — this is the most important rule for crispy fries. Overcrowding causes steaming, not crisping.
Cook at 380°F for 12 minutes, then open the basket and shake vigorously or use tongs to flip the fries. Cook for another 6 to 8 minutes until golden brown and crispy. For extra crispiness, increase the temperature to 400°F for the final 3 minutes.
Remove from the air fryer and season immediately with a little extra salt while still hot. Serve with ketchup, aioli, or your favorite dipping sauce.
6. Air Fryer Chicken Nuggets
Prep Time: 15 min | Cook Time: 12 min | Serves: 3–4
Homemade chicken nuggets that are tender on the inside and golden-crispy on the outside — ready in about 25 minutes. These beat the frozen store-bought version every time, and you know exactly what went into them. A crowd-pleaser for any age group and a must-try for anyone exploring quick and easy airfryer recipes for beginners.
Ingredients:
- 1 lb boneless skinless chicken breast
- ½ cup all-purpose flour
- 2 large eggs, beaten
- 1 cup panko breadcrumbs
- ½ teaspoon garlic powder
- ½ teaspoon onion powder
- ½ teaspoon paprika
- ½ teaspoon salt
- ¼ teaspoon black pepper
- Cooking spray
Instructions:
Cut the chicken breast into nugget-sized pieces — roughly 1½ to 2 inches each. Try to keep them similar in size so they all finish cooking at the same time. Pat the chicken pieces dry with paper towels before breading.
Set up a three-station breading line. In the first shallow bowl, add the flour and season it with a pinch of salt and pepper. In the second bowl, beat the 2 eggs until the yolk and white are fully combined. In the third bowl, mix the panko breadcrumbs with the garlic powder, onion powder, paprika, salt, and black pepper. Stir the breadcrumb mixture well so the seasoning is distributed throughout.
Take one chicken piece at a time. First, coat it in the seasoned flour and shake off any excess. Next, dip it fully into the beaten egg, letting any drips fall off. Finally, press it firmly into the seasoned panko, pressing gently on all sides so the breadcrumbs stick well. Place the breaded nugget on a clean plate or baking sheet and repeat with all remaining pieces.
Preheat your air fryer to 400°F (200°C) for 3 minutes. Lightly spray the air fryer basket with cooking spray. Arrange the breaded nuggets in a single layer, making sure none are touching or overlapping. Lightly spray the top of each nugget with cooking spray as well — this step is what gives them that beautifully golden, crunchy crust.
Cook at 400°F for 6 minutes. Flip each nugget carefully using tongs, then spray the top side lightly again with cooking spray. Cook for another 5 to 6 minutes until the outside is deep golden brown and crispy. To confirm they are fully cooked, use a meat thermometer — the thickest piece should read 165°F (74°C) at the center.
Remove from the air fryer and let rest for 2 minutes before serving. Serve with ketchup, honey mustard, or barbecue sauce.
7. Air Fryer Mozzarella Sticks
Prep Time: 20 min (plus 30 min freeze time) | Cook Time: 8 min | Serves: 3–4
Gooey melted cheese inside a crispy golden shell — these homemade mozzarella sticks are worth every step. The freezing step before cooking is the secret to getting that stretchy pull without the cheese leaking out everywhere. Serve them hot with marinara sauce for a snack that truly delivers.
Ingredients:
- 8 mozzarella string cheese sticks
- ½ cup all-purpose flour
- 2 large eggs, beaten
- 1 cup Italian-style breadcrumbs
- ½ teaspoon garlic powder
- ½ teaspoon dried oregano
- ½ teaspoon salt
- Cooking spray
- Marinara sauce for dipping
Instructions:
Unwrap the mozzarella string cheese sticks and set them aside. In a shallow bowl, add the flour. In a second bowl, beat the eggs. In a third bowl, mix the breadcrumbs with the garlic powder, dried oregano, and salt.
Bread each cheese stick by first rolling it in the flour, then dipping it in the egg, then pressing it firmly into the breadcrumb mixture. For the best results, double-bread them — after the first round of coating, dip the stick back into the egg and roll it through the breadcrumbs one more time. This double layer is what prevents the cheese from leaking through the coating during cooking.
Place all breaded cheese sticks on a flat plate or small baking sheet lined with parchment paper. Put them in the freezer for at least 30 minutes. Do not skip this step. The freezing firms up the cheese so it can warm and melt slowly during cooking without bursting through the coating before the outside gets crispy.
When ready to cook, preheat your air fryer to 390°F (199°C) for 3 minutes. Remove the mozzarella sticks from the freezer. Lightly spray the air fryer basket with cooking spray and place the sticks in a single layer with space between them. Spray the tops of the sticks lightly as well.
Cook at 390°F for 4 minutes. Open and check — the outside should be starting to turn golden. Carefully flip each stick using tongs. Cook for another 3 to 4 minutes. Watch closely during the last 2 minutes. The coating should be deep golden brown and feel firm, but the cheese inside will have softened completely.
Remove immediately from the basket and serve right away with warm marinara sauce. Mozzarella sticks cool quickly and the cheese hardens, so eat them while they are still hot.
8. Air Fryer Popcorn Chicken
Prep Time: 15 min | Cook Time: 14 min | Serves: 3–4
These bite-sized crispy chicken pieces are impossible to stop eating. Seasoned with a savory blend of spices and coated in a crunchy breadcrumb shell, air fryer popcorn chicken comes out of the basket light, golden, and perfectly cooked. A great shareable snack or topper for salads and rice bowls.
Ingredients:
- 1 lb boneless skinless chicken breast or thighs
- ½ cup buttermilk (or regular milk with 1 tsp vinegar, stirred and rested 5 minutes)
- ¾ cup all-purpose flour
- ½ cup panko breadcrumbs
- 1 teaspoon garlic powder
- 1 teaspoon smoked paprika
- ½ teaspoon onion powder
- ½ teaspoon cayenne pepper (optional for heat)
- 1 teaspoon salt
- ½ teaspoon black pepper
- Cooking spray
Instructions:
Cut the chicken into very small, bite-sized chunks — about 1 inch each. The smaller pieces are what give this its “popcorn” character. Rinse the chicken under cold water and pat dry with paper towels.
Place the chicken pieces in a bowl and pour the buttermilk over them. Toss to coat. Let the chicken marinate in the buttermilk for at least 10 minutes while you prepare the coating. The buttermilk tenderizes the chicken and helps the coating stick.
In a shallow bowl or zip-lock bag, combine the flour, panko breadcrumbs, garlic powder, smoked paprika, onion powder, cayenne (if using), salt, and black pepper. Stir or shake well to mix evenly.
Remove chicken pieces from the buttermilk, letting any excess drip off. Add them to the seasoned flour-breadcrumb mixture in batches. Toss or shake to coat every piece thoroughly. Press the coating onto the chicken with your fingers to help it stick. Transfer coated pieces to a clean plate.
Preheat the air fryer to 400°F (200°C) for 3 minutes. Spray the basket with cooking spray. Add the chicken in a single layer — do not pile them on top of each other. Spray the tops generously with cooking spray for maximum crispiness.
Cook at 400°F for 7 minutes. Shake the basket well or flip the pieces. Spray again lightly with oil. Cook for another 5 to 7 minutes until all pieces are deep golden and cooked through (internal temperature of 165°F). Serve immediately with dipping sauce of your choice.
9. Air Fryer Chicken Breast
Prep Time: 10 min | Cook Time: 18 min | Serves: 2
Juicy, perfectly seasoned chicken breast with no dry texture and no guesswork. The air fryer seals in moisture while cooking the outside to a beautifully browned finish. A reliable, protein-rich main dish that pairs with almost anything — salads, rice, pasta, or roasted vegetables.
Ingredients:
- 2 boneless skinless chicken breasts (about 6–8 oz each)
- 1 tablespoon olive oil
- 1 teaspoon garlic powder
- 1 teaspoon paprika
- ½ teaspoon onion powder
- ½ teaspoon dried Italian seasoning
- ½ teaspoon salt
- ¼ teaspoon black pepper
Instructions:
If the chicken breasts are very thick (over 1 inch at the thickest part), place them between two sheets of plastic wrap or in a zip-lock bag and gently pound them with a rolling pin or meat mallet to an even thickness of about ¾ inch. Even thickness is important — thick spots will stay undercooked while thin spots dry out. If you do not have a mallet, simply slice the chicken breast in half horizontally to create two thinner cutlets.
Pat both sides of the chicken dry with paper towels. Moisture on the surface will prevent browning, so getting them dry before seasoning is an important step.
In a small bowl, combine the garlic powder, paprika, onion powder, Italian seasoning, salt, and black pepper. Stir together. Rub the olive oil all over both sides of the chicken breasts, then sprinkle the spice blend generously over every surface. Press the seasoning lightly into the meat with your fingers so it adheres well and does not fall off during cooking.
Preheat your air fryer to 375°F (190°C) for 3 minutes. Place the seasoned chicken breasts in the basket in a single layer. They should not overlap. If cooking more than 2 at a time, work in batches.
Cook at 375°F for 9 minutes. Flip each breast over using tongs. Cook for another 8 to 9 minutes. The exact time depends on the thickness of your chicken. Check for doneness by inserting a meat thermometer into the thickest part of the breast — it must read 165°F (74°C) for safe consumption. If it is not there yet, continue cooking in 2-minute increments until it reaches the correct temperature.
Once fully cooked, remove the chicken from the air fryer and let it rest on a plate or cutting board for 5 minutes before cutting. Resting allows the juices to redistribute throughout the meat, which keeps it moist and flavorful. Slice and serve.
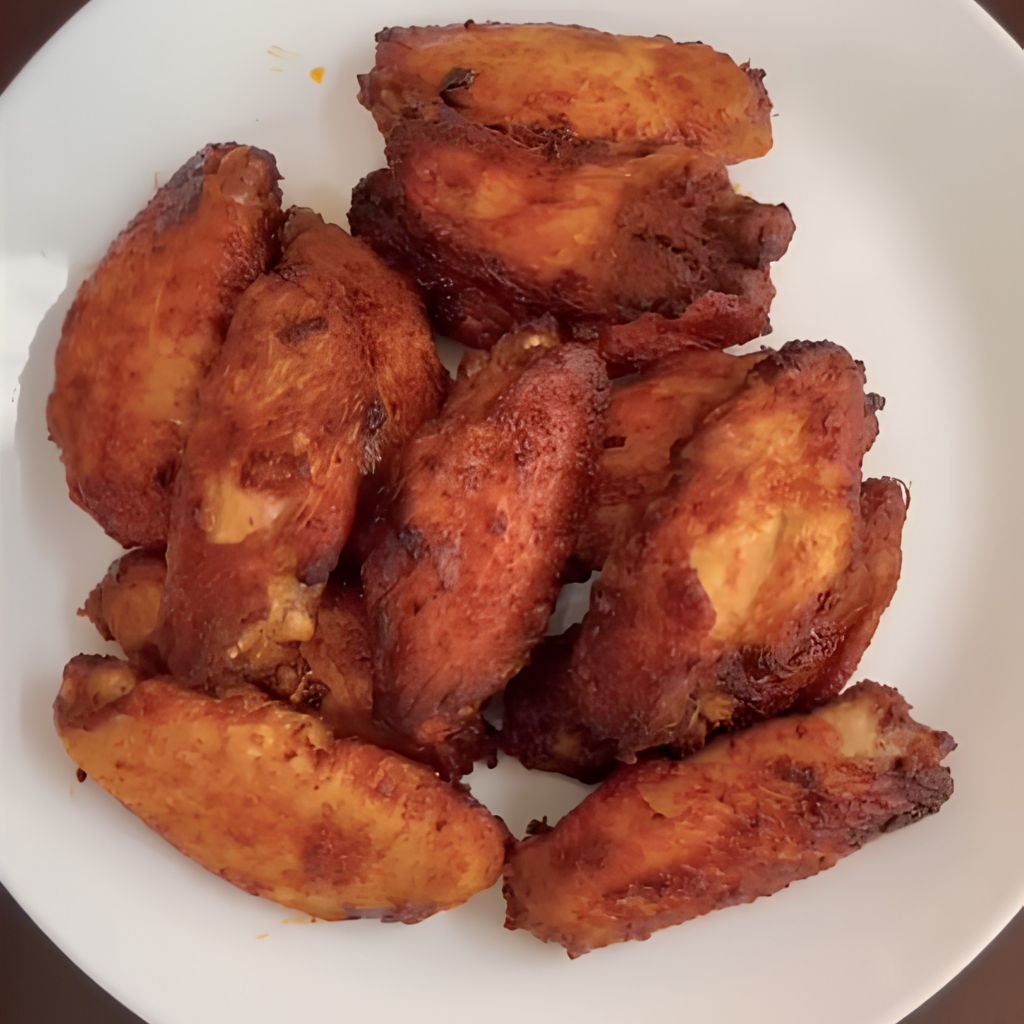
10. Air Fryer Chicken Wings
Prep Time: 10 min | Cook Time: 25 min | Serves: 3–4
Crispy chicken wings with no deep frying and no oven preheating for 20 minutes. The air fryer does all the heavy lifting — it renders the fat from the skin naturally and creates that crackly, golden exterior that makes wings so satisfying. Toss them in any sauce you like or keep them dry-seasoned for a classic result.
Ingredients:
- 2 lbs chicken wings (split into flats and drumettes)
- 1 tablespoon baking powder (NOT baking soda)
- 1 teaspoon garlic powder
- 1 teaspoon onion powder
- 1 teaspoon paprika
- 1 teaspoon salt
- ½ teaspoon black pepper
- Cooking spray
- Optional: ¼ cup buffalo sauce or barbecue sauce for tossing
Instructions:
Pat the chicken wings completely dry with paper towels — this is absolutely essential for crispy wings. Any moisture on the skin will steam rather than crisp in the air fryer. Dry the wings thoroughly, including between the joints.
In a large bowl, combine the baking powder, garlic powder, onion powder, paprika, salt, and black pepper. Add the dry wings to the bowl and toss everything together until every wing is evenly coated with the mixture. The baking powder is the key ingredient here — it draws additional moisture from the surface of the skin during cooking and creates a lighter, crispier crust than breadcrumbs alone.
Preheat your air fryer to 380°F (193°C) for 3 minutes. Lightly spray the basket with cooking spray. Arrange the wings in a single layer with space between each piece — do not pile them up. For 2 lbs of wings, you will likely need to cook in two batches.
Cook at 380°F for 12 minutes. Flip each wing over using tongs. Cook for another 10 minutes. For the final crunch, increase the temperature to 400°F for the last 3 minutes. This final blast of heat is what gives the skin that extra-crispy, golden-brown texture.
Check the wings — they should be deep golden with a visibly crispy skin. The internal temperature should read at least 165°F (74°C). Remove from the air fryer. If tossing in sauce, place the hot wings in a bowl, add your sauce, and toss immediately. Serve right away.
11. Air Fryer Chicken Drumsticks
Prep Time: 10 min | Cook Time: 25 min | Serves: 3–4
Juicy and tender on the inside with golden, lightly crispy skin on the outside. Air fryer chicken drumsticks are one of the easiest protein-packed meals to put together on a weeknight. The seasoning here is classic, but you can swap in any dry rub you already love. They pair well with roasted vegetables, mashed potatoes, or a simple green salad.
Ingredients:
- 6 chicken drumsticks
- 1 tablespoon olive oil
- 1 teaspoon garlic powder
- 1 teaspoon onion powder
- 1 teaspoon smoked paprika
- ½ teaspoon dried thyme
- ½ teaspoon salt
- ¼ teaspoon black pepper
Instructions:
Start by patting the chicken drumsticks completely dry with paper towels. Dry the skin thoroughly — moisture on the surface prevents the skin from crisping. Take a moment to also trim any loose flaps of skin or excess fat using kitchen shears if desired, which will improve the final look and reduce any excess grease.
In a large bowl, combine the olive oil with all of the dry seasonings — garlic powder, onion powder, smoked paprika, dried thyme, salt, and black pepper. Stir to form a loose spice paste. Add the drumsticks to the bowl and turn each one to coat it completely with the oil-spice mixture. Use your hands to rub the seasoning paste under the skin where possible, as this adds flavor directly to the meat and not just the outside coating.
Let the seasoned drumsticks sit at room temperature for 5 to 10 minutes while the air fryer preheats. This brief resting period allows the seasoning to slightly penetrate the surface.
Preheat the air fryer to 380°F (193°C) for 3 minutes. Place the drumsticks in the basket in a single layer, standing them upright along the sides of the basket if needed to fit — this actually works well because it allows the hot air to circulate all the way around each drumstick. If they all need to lie flat, arrange them without touching.
Cook at 380°F for 13 minutes. Flip each drumstick over and reposition them. Cook for another 10 to 12 minutes. The skin should be golden brown and the juices should run clear when you pierce the thickest part with a knife. Confirm with a meat thermometer — the temperature should reach 165°F (74°C) at the bone.
Remove from the air fryer and let rest for 3 minutes before serving.
12. Air Fryer Chicken Tenders
Prep Time: 15 min | Cook Time: 12 min | Serves: 3–4
Crispy, juicy chicken tenders made from real chicken — these are light, golden, and far less greasy than anything from a fast food counter. The panko coating stays crunchy and the inside stays moist. Dip them in honey mustard, ranch, or barbecue sauce. Easy enough for a weeknight, satisfying enough to serve to guests.
Ingredients:
- 1 lb chicken tenderloins (or chicken breast cut into strips)
- ½ cup all-purpose flour
- 2 large eggs, beaten
- 1 cup panko breadcrumbs
- ½ teaspoon garlic powder
- ½ teaspoon onion powder
- ½ teaspoon paprika
- ½ teaspoon salt
- ¼ teaspoon black pepper
- Cooking spray
Instructions:
If using chicken breast instead of pre-cut tenderloins, cut the breast lengthwise into strips about 1 inch wide and 4 to 5 inches long. Pat each piece dry with paper towels before breading.
Set up your three-station breading setup. Place flour in the first shallow bowl. Beat eggs in the second bowl. In the third bowl, combine panko breadcrumbs with garlic powder, onion powder, paprika, salt, and black pepper, and stir until evenly mixed.
Take one chicken tender and drag it through the flour on both sides, shaking off the excess. Then dip it fully into the beaten egg, letting any excess drip off. Finally, press it firmly into the seasoned panko, turning it over and pressing again to make sure the breadcrumbs coat all sides. Set on a clean plate. Repeat with every piece.
Preheat the air fryer to 400°F (200°C) for 3 minutes. Spray the basket with cooking spray. Lay the tenders in a single layer — none should overlap. Spray the top of each tender generously with cooking spray. This oil application is key to getting a golden, crispy crust without deep frying.
Cook at 400°F for 6 minutes. Flip each tender carefully with tongs. Spray the tops lightly again. Cook for another 5 to 6 minutes until the coating is deep golden and the chicken is cooked through. Use a meat thermometer to confirm 165°F (74°C) at the thickest point.
Let rest for 2 minutes and serve hot with your preferred dipping sauce.
13. Air Fryer Roasted Broccoli
Prep Time: 5 min | Cook Time: 10 min | Serves: 3–4
Roasted broccoli from the air fryer comes out with crispy, lightly charred edges and a tender center — a texture that is hard to achieve any other way. A small amount of oil and simple seasoning is all it needs. Even people who do not normally enjoy broccoli tend to love this version of it.
Ingredients:
- 1 large head of broccoli (about 4 cups florets)
- 1½ tablespoons olive oil
- ½ teaspoon garlic powder
- ¼ teaspoon salt
- ¼ teaspoon black pepper
- 1 tablespoon grated Parmesan cheese (optional)
- Lemon wedge for serving (optional)
Instructions:
Cut the broccoli head into evenly-sized florets. Try to keep them a consistent size — about 1½ to 2 inches per piece — so they all cook at the same rate. Rinse the florets under cold water and then dry them thoroughly in a clean towel or with paper towels. Wet broccoli will steam instead of roast in the air fryer, so thorough drying is necessary.
Place the dry broccoli florets in a large mixing bowl. Drizzle the olive oil over them and toss to coat each piece evenly. Add the garlic powder, salt, and black pepper. Toss again until the seasoning is distributed. If you are adding Parmesan cheese, hold off for now — it will go on during the last few minutes of cooking.
Preheat your air fryer to 380°F (193°C) for 2 to 3 minutes. Place the broccoli florets in the basket. Spread them out as much as possible. Some overlap is fine for broccoli since it shrinks during cooking, but try not to pile them more than two layers deep.
Cook at 380°F for 6 minutes. Open the basket and toss the florets around or shake the basket firmly. This exposes new surfaces to the heat and helps all sides cook evenly. If adding Parmesan, sprinkle it over the broccoli now.
Cook for another 3 to 4 minutes until the edges of the florets are visibly dark and crispy. The stems should be tender when pierced with a fork. Remove from the basket and squeeze a little fresh lemon juice over the top before serving — this brightens all the flavors.
14. Air Fryer Carrots
Prep Time: 5 min | Cook Time: 14 min | Serves: 3–4
Roasting carrots in the air fryer concentrates their natural sweetness and caramelizes the edges in a way that plain steaming never achieves. These come out tender with a slight char and a rich, almost honeyed flavor. A simple side dish that requires very little effort and goes with almost any main meal.
Ingredients:
- 4 medium carrots
- 1 tablespoon olive oil
- ½ teaspoon honey or maple syrup (optional)
- ¼ teaspoon garlic powder
- ¼ teaspoon ground cumin
- ¼ teaspoon salt
- Pinch of black pepper
- Fresh parsley or thyme for garnish
Instructions:
Wash and peel the carrots. Cut off the tops and tips. Slice the carrots on a diagonal into pieces about ½ inch thick. Diagonal cuts increase the surface area of each piece, which means more edges in contact with the hot air and more caramelization overall. Try to keep the pieces similar in thickness so they cook evenly.
Place the cut carrots in a bowl. Add the olive oil and honey or maple syrup if using, then toss to coat. Add the garlic powder, cumin, salt, and pepper. Toss again until every piece is evenly seasoned.
Preheat the air fryer to 380°F (193°C) for 2 minutes. Add the carrots to the basket and spread them out as evenly as possible. Carrots can be stacked slightly since they are dense and take longer to cook than softer vegetables.
Cook at 380°F for 7 minutes. Open and toss or shake the basket to redistribute the carrots. Cook for another 6 to 7 minutes. The carrots should be fork-tender in the center and have slightly caramelized, golden-brown edges when done. If you prefer softer carrots, add 2 more minutes.
Remove from the air fryer and garnish with fresh parsley or thyme. Serve warm as a side dish.
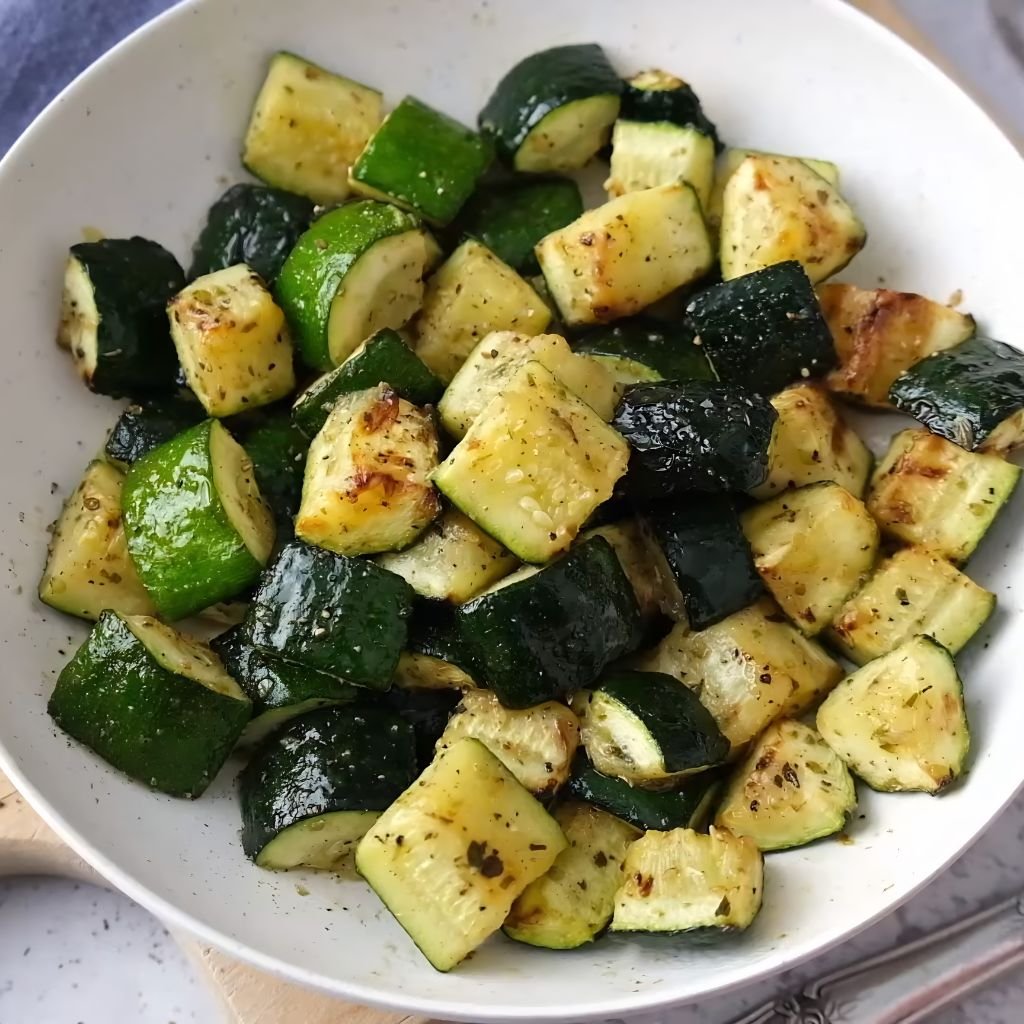
15. Air Fryer Zucchini
Prep Time: 5 min | Cook Time: 10 min | Serves: 3
Light, tender zucchini with golden edges and a simple herbed seasoning. Air fryer zucchini works as a side dish, a light snack, or a topping for grains and pasta. Ready in about 15 minutes from start to finish, with almost no preparation required.
Ingredients:
- 2 medium zucchinis
- 1 tablespoon olive oil
- ½ teaspoon Italian seasoning
- ½ teaspoon garlic powder
- ¼ teaspoon salt
- ¼ teaspoon black pepper
- 2 tablespoons grated Parmesan cheese
- Cooking spray
Instructions:
Wash the zucchinis under cold water and trim off both ends. Cut each zucchini into rounds about ½ inch thick, or cut them in half lengthwise and then slice into half-moon shapes. Both cuts work well — rounds have more surface area for crisping, while half-moons are easier to flip.
Place the zucchini pieces in a mixing bowl. Add the olive oil and toss to coat. Sprinkle in the Italian seasoning, garlic powder, salt, and black pepper. Toss again until all pieces are evenly coated. Add the grated Parmesan and toss one final time so the cheese coats the zucchini.
Preheat the air fryer to 400°F (200°C) for 2 minutes. Lightly spray the basket with cooking spray. Arrange the zucchini pieces in a single layer. They can be snug but should not be piled on top of each other.
Cook at 400°F for 5 minutes. Open the basket and flip each piece using tongs or shake the basket. Cook for another 4 to 5 minutes. The zucchini should have golden, slightly crispy edges and feel tender when you press lightly with a fork. Zucchini cooks fast — do not leave it unattended for the last few minutes.
Remove from the basket and serve immediately as a warm side dish or light appetizer.
16. Air Fryer Mixed Vegetables
Prep Time: 10 min | Cook Time: 14 min | Serves: 4
A colorful mix of roasted vegetables all cooked in one batch — fast, easy, and flexible with whatever is in your refrigerator. This recipe uses bell peppers, onion, and zucchini, but you can swap in mushrooms, cherry tomatoes, or asparagus. A reliable vegetable side for quick and easy airfryer recipes for beginners.
Ingredients:
- 1 medium zucchini, sliced into half-moons
- 1 red bell pepper, chopped into 1-inch pieces
- 1 yellow bell pepper, chopped into 1-inch pieces
- 1 small red onion, cut into wedges
- 1 cup broccoli florets
- 1½ tablespoons olive oil
- ½ teaspoon garlic powder
- ½ teaspoon Italian seasoning
- ½ teaspoon salt
- ¼ teaspoon black pepper
Instructions:
Prepare all the vegetables first. Wash everything, then cut each one into roughly similar-sized pieces — about 1 to 1½ inches. Uniform size is important when cooking mixed vegetables because denser vegetables like broccoli and onion take longer than soft ones like zucchini and bell pepper. Cutting everything to similar dimensions helps them finish at roughly the same time.
Place all the cut vegetables into a large mixing bowl. Drizzle the olive oil over them and toss to coat every piece. Add the garlic powder, Italian seasoning, salt, and black pepper. Toss everything again until the seasoning is evenly spread across all the vegetables.
Preheat the air fryer to 390°F (199°C) for 3 minutes. Add the seasoned vegetables to the basket and spread them into as even a layer as possible. Some stacking is unavoidable with a large mix, but try to keep it to no more than two layers.
Cook at 390°F for 7 minutes. Open the basket and toss all the vegetables with a spoon or shake the basket firmly. Cook for another 6 to 7 minutes, checking near the end. Bell peppers should be tender and slightly charred at the edges, broccoli should have crispy tips, and onions should be soft and translucent.
Remove from the basket and serve warm. This mix is great as a side or added over rice or pasta with a drizzle of olive oil.
17. Air Fryer Frozen Fries
Prep Time: 0 min | Cook Time: 14 min | Serves: 2–3
The best use of a bag of frozen fries you will ever find. The air fryer makes them crispier than any oven and faster than waiting for oil to heat up on the stove. No thawing needed — they go straight from the freezer into the basket. Better texture, less grease, and done in under 15 minutes.
Ingredients:
- 2 cups frozen French fries (any brand, any cut)
- Light cooking spray (optional)
- Salt to taste
Instructions:
Take the frozen fries straight from the freezer — do not thaw them. Thawing makes them limp and they will not crisp up properly. The key to great frozen fries in the air fryer is starting them completely frozen.
Preheat your air fryer to 400°F (200°C) for 3 minutes. While preheating, portion out the fries. For best results, do not overfill the basket. A single layer gives the crispiest results, but fries can be piled up to about 1½ inches deep as long as you shake well during cooking.
Add the frozen fries to the preheated basket. You can spray them lightly with cooking spray for extra crispiness, though most frozen fries already have a light oil coating from the manufacturer and do not strictly need it.
Cook at 400°F for 7 minutes. Shake the basket vigorously. Cook for another 5 to 7 minutes, shaking again at the halfway point. The total cook time varies slightly by fry cut and brand — thin shoestring fries may be done in 12 minutes, while thicker steak fries may need 16. Look for a golden color and firm, crispy texture.
Remove from the basket, season with salt immediately while still hot, and serve right away.
18. Air Fryer Frozen Pizza
Prep Time: 0 min | Cook Time: 10 min | Serves: 1–2
A personal frozen pizza cooked in the air fryer has a crisper bottom crust and melted bubbly cheese — much better than from the microwave, and faster than using a full oven. This method works best for small personal-sized pizzas or pizza slices. No thawing needed.
Ingredients:
- 1 personal-sized frozen pizza (about 6–8 inches)
- Optional toppings: extra cheese, crushed red pepper flakes, dried oregano
Instructions:
Remove the frozen pizza from its packaging. Do not thaw it. Check the diameter of your pizza — it needs to fit flat in your air fryer basket without the edges being folded up the sides. Most personal-sized frozen pizzas fit in a standard 5.8-quart air fryer basket. For larger pizzas, cut them in half and cook each half separately.
Preheat your air fryer to 370°F (188°C) for 3 minutes. Do not use parchment paper underneath the pizza in the air fryer unless your paper has holes in it — solid parchment can block airflow and result in a soggy crust. A bare basket works best here.
Place the frozen pizza directly in the basket. If you want to add extra toppings like additional cheese or red pepper flakes, do so now before cooking begins.
Cook at 370°F for 6 minutes. Open the air fryer and check — the cheese should be starting to melt and bubble and the crust edges should be lightly golden. If the cheese looks fully melted and the crust looks deeply brown already, the pizza may be done early. If not, cook for another 3 to 4 minutes.
Total cook time is typically 8 to 10 minutes for most personal frozen pizzas. The bottom crust should feel firm and crisp when you lift an edge with a spatula. Remove the pizza carefully (it will be very hot), let it rest for 2 minutes on a cutting board, and slice before serving.
19. Air Fryer Frozen Spring Rolls
Prep Time: 0 min | Cook Time: 12 min | Serves: 2–3
Golden, crispy spring rolls in about 12 minutes from frozen — no oil heating, no greasy mess. The air fryer gives them a texture almost identical to deep-fried ones, with a shatteringly crispy shell and hot, savory filling inside. Great as an appetizer or a light dinner paired with sweet chili sauce or soy sauce.
Ingredients:
- 8 frozen spring rolls (vegetable or pork, any brand)
- Cooking spray
- Sweet chili sauce or soy sauce for dipping
Instructions:
Take the spring rolls straight from the freezer. There is no need to thaw them — cooking from frozen gives you a crispier shell because the moisture inside steams the filling gently while the outside crisps quickly in the hot air.
Preheat your air fryer to 390°F (199°C) for 3 minutes. Lightly spray the air fryer basket with cooking spray to prevent sticking. Place the frozen spring rolls in the basket in a single layer, leaving a small gap between each one so the hot air can circulate all the way around them.
Spray the tops of the spring rolls lightly with cooking spray as well — this adds a thin layer of oil to the surface that encourages browning and crisping.
Cook at 390°F for 6 minutes. Open the air fryer and use tongs to flip each spring roll over. Spray the new top side lightly with cooking spray. Cook for another 5 to 6 minutes. The outside should be deep golden brown and feel hard and crispy when you tap it with tongs. The ends of the spring rolls will be especially golden, which is normal.
Remove from the basket and let rest for 1 to 2 minutes before serving. They will be extremely hot inside. Serve with sweet chili sauce, soy sauce, or plum sauce for dipping.
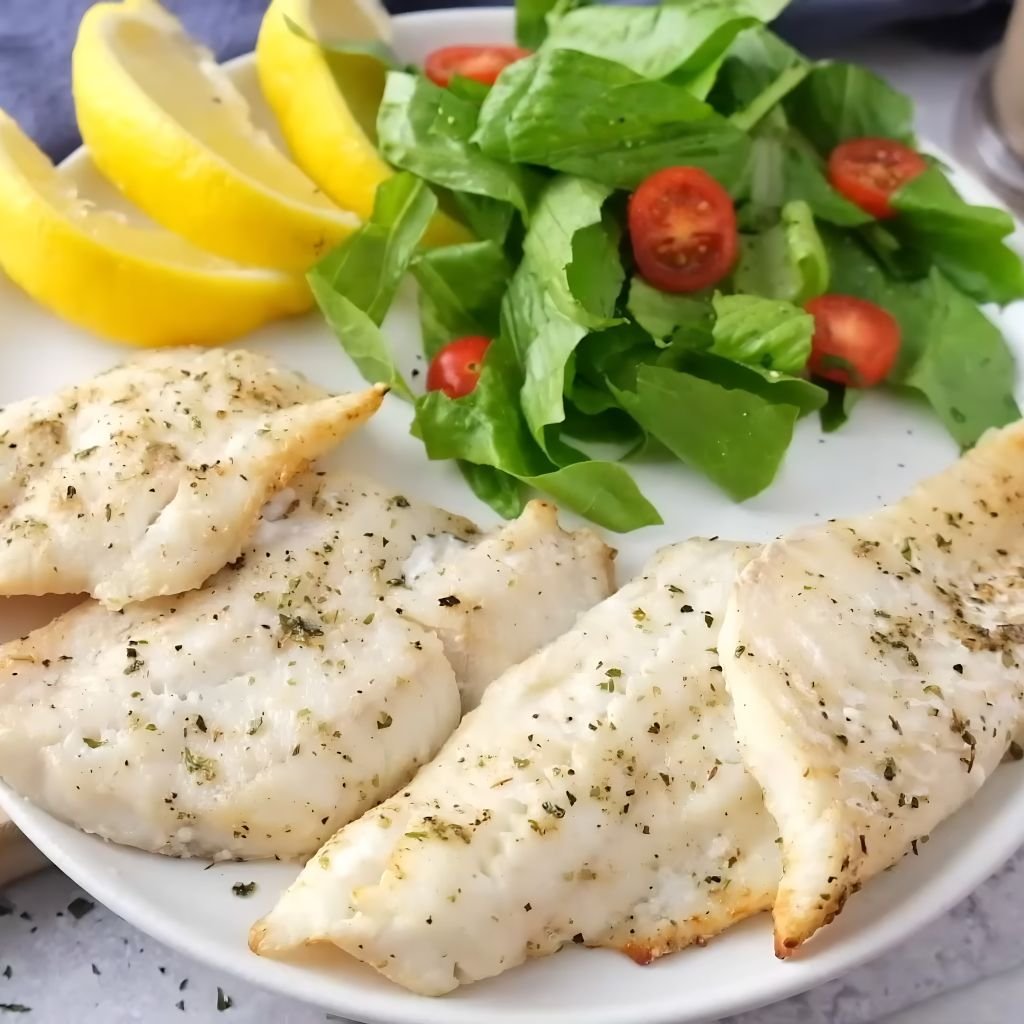
20. Air Fryer Frozen Fish Fillets
Prep Time: 0 min | Cook Time: 14 min | Serves: 2
Frozen breaded fish fillets cooked in the air fryer come out flaky inside with a golden, truly crispy coating — no soggy spots, no excess oil. Ready in about 14 minutes with zero prep. Works with cod, tilapia, pollock, or any breaded fish fillet from the freezer. Serve with tartar sauce and a simple side salad.
Ingredients:
- 4 frozen breaded fish fillets
- Cooking spray
- Lemon wedges for serving
- Tartar sauce for dipping
Instructions:
Remove the frozen fish fillets from the packaging and set them on the counter. Do not thaw — cooking from frozen is the correct method here and produces a better, crispier result.
Preheat your air fryer to 400°F (200°C) for 3 minutes. Lightly spray the basket with cooking spray. Place the frozen fillets in the basket in a single layer. They should not overlap. If you have more fillets than space, cook them in two separate batches.
Spray the tops of the fillets lightly with cooking spray. This step helps the breaded coating get extra crispy and golden rather than staying pale.
Cook at 400°F for 7 minutes. Open the basket and carefully flip each fillet using a wide spatula rather than tongs — fish fillets can break apart if handled roughly, so a spatula gives you more support. Cook for another 6 to 7 minutes. The coating should be deep golden brown and feel crispy when you press it lightly. The fish inside should be fully cooked — it will flake apart easily when you press the center.
Let the fillets rest in the basket for 1 minute before removing so they firm up slightly. Transfer to a plate and serve with lemon wedges and tartar sauce.
21. Air Fryer Salmon
Prep Time: 5 min | Cook Time: 10 min | Serves: 2
Salmon fillets cooked in the air fryer in about 10 minutes, with a lightly crispy exterior and a moist, flaky center. This method is one of the fastest ways to cook salmon at home and requires almost no cleanup. Season simply or marinate briefly for a more complex flavor. A great weeknight dinner option.
Ingredients:
- 2 salmon fillets (about 6 oz each, skin-on or skinless)
- 1 tablespoon olive oil
- 1 teaspoon garlic powder
- ½ teaspoon smoked paprika
- ½ teaspoon salt
- ¼ teaspoon black pepper
- 1 teaspoon soy sauce (optional, adds depth)
- Lemon wedges for serving
- Fresh dill or parsley for garnish
Instructions:
If your salmon has skin on, check for any pin bones by running your finger along the surface of the flesh. Remove any bones you feel using tweezers or your fingers. Pat the salmon fillets dry on all sides with paper towels.
In a small bowl, mix together the olive oil, garlic powder, smoked paprika, salt, black pepper, and soy sauce if using. Brush this mixture generously over the flesh side of each fillet, and lightly on the skin side as well.
Preheat the air fryer to 400°F (200°C) for 3 minutes. Lightly spray the basket with cooking spray. Place the fillets in the basket skin-side down if they have skin. Make sure the fillets are not touching each other.
Cook at 400°F for 8 to 10 minutes. The exact time depends on the thickness of your fillets. For a 1-inch thick fillet, 9 minutes will give you a moist, slightly translucent center — which is how salmon is typically served. For well-done salmon with no pink remaining, cook for the full 10 minutes or an additional 1 to 2 minutes.
The salmon is ready when the flesh flakes apart easily with a fork and the surface looks lightly caramelized. Remove from the basket gently using a wide spatula. Serve with a squeeze of fresh lemon and a garnish of fresh dill or parsley.
22. Air Fryer Burgers
Prep Time: 10 min | Cook Time: 12 min | Serves: 4
Juicy homemade burgers cooked in the air fryer in about 12 minutes — no grill required, no smoke filling the kitchen. The circulating heat cooks the patties evenly on both sides and the outside gets a nice browned crust. Season simply and load with your favorite toppings for a satisfying weeknight dinner.
Ingredients:
- 1 lb ground beef (80/20 fat ratio for best juiciness)
- ½ teaspoon garlic powder
- ½ teaspoon onion powder
- ½ teaspoon Worcestershire sauce
- ½ teaspoon salt
- ¼ teaspoon black pepper
- 4 burger buns
- Toppings: lettuce, tomato, onion, pickles, ketchup, mustard, cheese slices
Instructions:
Place the ground beef in a large bowl. Add the garlic powder, onion powder, Worcestershire sauce, salt, and black pepper. Mix the seasoning into the meat gently using your hands — do not overwork it. Overworking ground beef makes the patties dense and tough. Mix just until the seasoning is evenly distributed.
Divide the meat into 4 equal portions. Roll each into a ball, then flatten into a round patty about ¾ inch thick. Press a small indent into the center of each patty with your thumb — this prevents the burger from puffing up in the middle during cooking and keeps it flat.
Preheat your air fryer to 370°F (188°C) for 3 minutes. Place the patties in the basket in a single layer, leaving space between each. Do not press them against the sides of the basket.
Cook at 370°F for 6 minutes. Flip each patty carefully using a wide spatula. Cook for another 5 to 6 minutes. For medium doneness, the center should reach 155°F (68°C). For well-done, cook until it reaches 165°F (74°C). If you want to melt cheese on top, place a cheese slice on each patty during the last 1 minute of cooking and let the heat of the basket melt it without any extra time needed.
Remove burgers from the air fryer and let rest for 2 minutes. Assemble on toasted buns with your preferred toppings and serve immediately.
23. Air Fryer Stuffed Peppers
Prep Time: 15 min | Cook Time: 18 min | Serves: 4
Bell peppers filled with a savory rice and ground meat mixture, topped with melted cheese, and cooked in the air fryer until the peppers are tender and the tops are golden. A complete, filling meal cooked entirely in one appliance with minimal cleanup. Great for meal prepping ahead of the week.
Ingredients:
- 4 medium bell peppers (any color)
- 1 cup cooked white or brown rice
- ½ lb ground beef or ground turkey (cooked and drained)
- ½ cup tomato sauce or salsa
- ½ teaspoon garlic powder
- ½ teaspoon onion powder
- ½ teaspoon cumin
- ½ teaspoon salt
- ¼ teaspoon black pepper
- ½ cup shredded cheddar or Monterey Jack cheese
- Fresh cilantro for garnish (optional)
Instructions:
Start by preparing the filling. In a large mixing bowl, combine the cooked rice, cooked and drained ground meat, tomato sauce or salsa, garlic powder, onion powder, cumin, salt, and black pepper. Stir everything together until fully combined into a cohesive filling. Taste it and adjust the seasoning if needed. The filling should taste well-seasoned on its own since the plain pepper will dilute the flavor slightly.
Prepare the peppers by cutting the tops off each one — slice about ½ inch below the stem. Remove the tops and set them aside. Use a spoon to scoop out the seeds and white membrane from inside each pepper. Rinse the inside of each pepper with water and shake dry.
Stand the peppers upright in the air fryer basket. If they are wobbly, slice a very thin sliver from the bottom of each pepper to create a flat base — be careful not to cut through to the inside cavity. Spoon the filling into each pepper, pressing gently to compact it and packing it all the way to the top. Mound a tablespoon or two of shredded cheese generously over the top of each pepper.
Preheat the air fryer to 360°F (182°C) if it is not already hot. Cook the stuffed peppers at 360°F for 15 to 18 minutes. Check at the 15-minute mark — the pepper walls should be soft when you press them with tongs, and the cheese on top should be fully melted and lightly browned. If the cheese is not browned yet, cook for the remaining 2 to 3 minutes.
Remove the stuffed peppers from the basket carefully. They will be hot and full of liquid, so use tongs and a spatula together to support each one. Garnish with fresh cilantro if desired and serve warm.
24. Air Fryer Pasta Bake
Prep Time: 10 min | Cook Time: 15 min | Serves: 3–4
A cheesy, comforting pasta bake made in the air fryer using a small oven-safe dish — golden and bubbling on top, creamy on the inside. This recipe starts with pre-cooked pasta, which makes the whole process very manageable. A great option for using leftover pasta and turning it into a whole new meal.
Ingredients:
- 2 cups cooked pasta (penne, rigatoni, or rotini work best)
- 1 cup tomato marinara sauce
- ½ cup ricotta cheese
- ½ cup shredded mozzarella cheese
- 2 tablespoons grated Parmesan cheese
- ½ teaspoon garlic powder
- ½ teaspoon Italian seasoning
- ¼ teaspoon salt
- ¼ teaspoon black pepper
- Cooking spray
- Fresh basil for garnish (optional)
Instructions:
First, check that you have a small oven-safe baking dish or ramekin that fits inside your air fryer basket with at least ½ inch of space around the sides. A 6-inch round cake pan or a small casserole dish typically works well. Spray the inside of the dish with cooking spray.
In a large mixing bowl, combine the cooked pasta with the tomato marinara sauce, ricotta cheese, garlic powder, Italian seasoning, salt, and black pepper. Stir everything together until the pasta is thoroughly coated in sauce and the ricotta is evenly distributed throughout. The mixture should look creamy and saucy — if it seems too thick, add a splash of water or extra marinara and stir again.
Transfer the pasta mixture into the prepared baking dish, spreading it out into an even layer. Scatter the shredded mozzarella evenly over the top, covering the pasta as completely as possible. Sprinkle the grated Parmesan over the mozzarella layer last.
Preheat the air fryer to 360°F (182°C) for 3 minutes. Carefully lower the filled baking dish into the air fryer basket. Use oven mitts or folded kitchen towels to handle the dish since it will get very hot.
Cook at 360°F for 12 to 15 minutes. At the 12-minute mark, check the top of the pasta bake. The cheese should be fully melted and the surface should be golden and lightly bubbly. If you want a deeper golden color on top, increase the temperature to 400°F for the final 2 minutes.
Use oven mitts to carefully remove the dish from the air fryer. Let the pasta bake rest for 3 to 5 minutes before scooping and serving — this allows the cheese to settle and the layers to hold together when plated. Garnish with fresh basil leaves.
25. Air Fryer Donuts
Prep Time: 5 min | Cook Time: 6 min | Serves: 8 donuts
Soft, fluffy donuts made from refrigerated biscuit dough — no yeast, no proofing, no deep fryer required. These come out light and pillowy inside with a golden exterior that holds glaze and cinnamon sugar beautifully. A fun project for the weekend and a treat that comes together in under 15 minutes total.
Ingredients:
- 1 can (16 oz) refrigerated biscuit dough (8 biscuits)
- 2 tablespoons melted butter
- ½ cup powdered sugar
- 1 to 2 tablespoons milk
- ½ teaspoon vanilla extract
- Optional coating: ¼ cup sugar + 1 teaspoon cinnamon (cinnamon sugar method)
- Cooking spray
Instructions:
Open the can of refrigerated biscuit dough and separate the biscuits onto a clean, lightly floured surface. Using a small round cookie cutter (about 1 inch in diameter) or the cap of a large bottle, cut a hole in the center of each biscuit to create the classic donut ring shape. Save the small dough circles you cut out — these are your donut holes and they cook up even faster.
Preheat your air fryer to 350°F (177°C) for 3 minutes. Lightly spray the basket with cooking spray. Place 4 donuts in the basket in a single layer — do not overcrowd. You will cook in two batches.
Cook at 350°F for 3 minutes. Open the air fryer and flip each donut carefully using tongs or a spatula. Cook for another 2 to 3 minutes. The donuts are done when both sides are golden brown and feel firm to the touch. They should spring back slightly when you press them gently in the center. If they still feel doughy, add 1 more minute.
Remove the cooked donuts and let them cool for 2 minutes on a wire rack or plate.
While the second batch cooks, prepare your topping. For a glaze, whisk together the powdered sugar, 1 tablespoon of milk, and vanilla extract. Add the second tablespoon of milk only if the glaze is too thick — it should drip slowly from the spoon. For cinnamon sugar coating, melt the butter and place the cinnamon-sugar mixture in a shallow bowl.
To glaze, dip the top of each cooled donut into the glaze and allow any excess to drip off. Place on the rack and let the glaze set for 2 to 3 minutes before stacking. For cinnamon sugar donuts, brush each donut with melted butter immediately after it comes out of the air fryer while still hot, then roll it in the cinnamon sugar mixture to coat all sides. Serve warm and fresh.
Time-Saving Air Fryer Hacks
Getting the most from your air fryer is about more than just following recipes. These practical tricks will save you time in the kitchen every week:
1. Cook multiple items at once. Many air fryer baskets have enough room for two different foods at the same time — for example, chicken tenders on one side and broccoli florets on the other. Just make sure both items use the same temperature and have a similar cook time. This is one of the best tricks for getting a complete meal on the table faster.
2. Use foil or parchment wisely. A small sheet of perforated parchment paper placed in the basket makes cleanup much faster by catching drips from marinated meats or cheesy dishes. Make sure the paper has holes in it or only covers part of the basket — fully blocking the airflow will give you uneven cooking results. Foil also works well but should be used only for items that do not need air to circulate underneath them.
3. Batch cook for the whole week. Spend one hour on Sunday cooking a large batch of chicken breasts, roasted vegetables, and hard-boiled eggs all in the air fryer. Store them in separate containers in the refrigerator. Having these ready-cooked proteins and vegetables on hand means putting together a fast lunch or dinner on busy weeknights takes only a few minutes of assembly.
4. Reheat leftovers to a better-than-original texture. The air fryer is the best tool for reheating leftovers because it brings back crispiness that a microwave destroys. Leftover pizza, fried chicken, spring rolls, or French fries all come back to life in 3 to 5 minutes at 350°F. The outside becomes crispy again and the inside heats through without drying out. No soggy microwave results.
Conclusion
Quick and easy airfryer recipes for beginners truly live up to their name. This guide has covered everything from basic morning toast and eggs to weeknight dinners like stuffed peppers, salmon, and pasta bake — all made with minimal oil, minimal cleanup, and a machine that does most of the work for you. The air fryer heats up faster than a traditional oven, uses a fraction of the oil of deep frying, and is straightforward enough for anyone to use on the very first attempt.
The best part of air fryer cooking is how much room there is to make it your own. Once you are comfortable with the basic timing and temperature guidelines in this guide, do not hesitate to start adjusting seasoning, trying different spice blends, swapping in new vegetables, or experimenting with sauces and marinades. A recipe is always a starting point — your personal taste is the real guide.
Have you tried any of these recipes yet? Which one turned out the best in your kitchen? Share your results, your tweaks, and your favorite air fryer combinations in the comments. Every cook brings something new to the table, and your experience might be exactly what another beginner needs to read.