
Making single-serve, sugar-free frozen desserts has never been easier. The Dash My Mug Ice Cream Maker is a compact, personal-sized machine designed to churn out one perfect serving of ice cream in about 30 minutes.
No more making huge batches only to have them sit in the freezer, tempting you all week. You just make what you need, right when you want it — and that is exactly why it works so well for anyone following a keto lifestyle.
The Dash My Mug Ice Cream Maker is a small counter-top appliance with a pre-freezable bowl and a simple paddle that churns your mixture as it freezes. The bowl doubles as a serving cup, so cleanup is minimal. Plug it in, churn, eat — that is the whole process.
For keto dieters, this machine is close to perfect. Traditional ice cream recipes call for sugar, corn syrup, and high-carb thickeners. At home, using your own dash my mug ice cream maker keto recipes, you control every single ingredient.
That means swapping sugar for erythritol, using full-fat cream instead of skim milk, and skipping all the fillers that spike blood sugar. Homemade keto ice cream is also fresher, cheaper per serving, and more customizable than anything you find in a store’s freezer section.
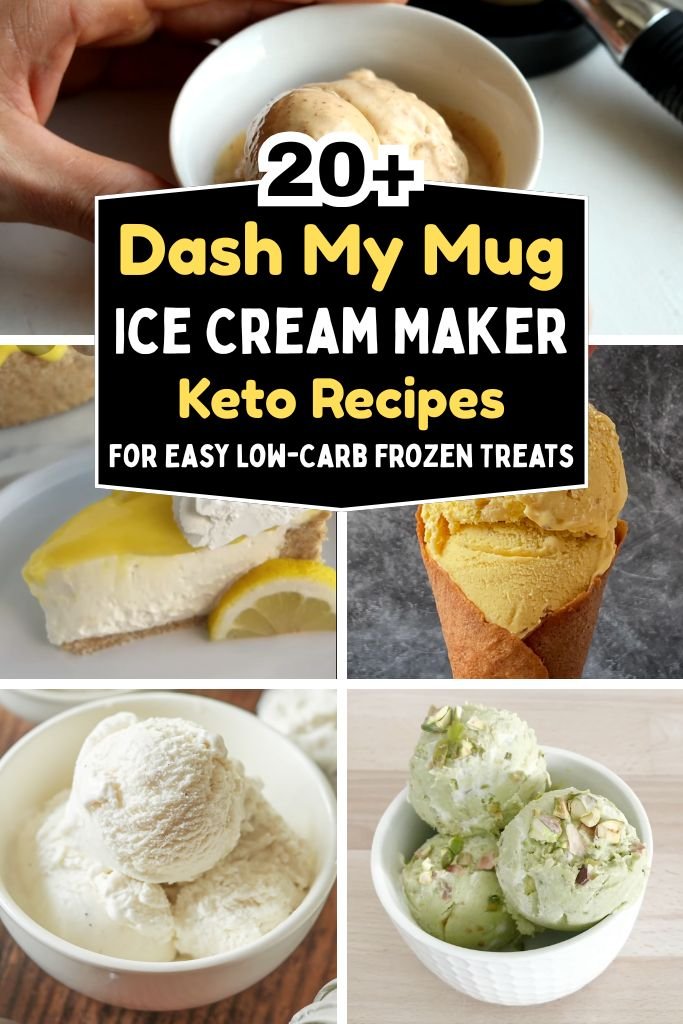
Why the Dash My Mug Ice Cream Maker Is Perfect for Keto Dieters
Here is what makes this little machine such a great fit for anyone eating low-carb:
1. Compact and Easy-to-Use Design. The Dash My Mug sits on your counter and takes up barely any space. There are no complicated settings or dials — freeze the bowl, add your mixture, plug it in, and let it churn. The entire process from prep to serving takes under 35 minutes, and the machine itself weighs less than a pound. It is approachable for first-time users and completely stress-free for experienced home cooks.
2. Ideal Portion Control for Low-Carb Eating. One of the biggest challenges on keto is eating an appropriate amount at one sitting. The Dash My Mug makes exactly one serving at a time — roughly ½ to ¾ cup of finished ice cream. That built-in portion control means you are not left with a giant container to work through. Each scoop stays within your daily macro goals without requiring any willpower after the fact.
3. Faster Than Traditional Ice Cream Makers. Standard ice cream makers take 45 minutes to an hour of churning, plus additional freezer time. The Dash My Mug is designed for speed. Because you are making such a small, single-serve amount, it reaches a soft-serve consistency in just 25 to 30 minutes. No more waiting half a day for dessert.
4. Budget-Friendly Alternative to Premium Machines. High-end ice cream makers can cost $200 or more. The Dash My Mug is available for a fraction of that price, making it accessible for nearly anyone. For people who only want an occasional frozen treat rather than a daily habit, paying premium machine prices makes little sense. The Dash My Mug delivers professional-quality results at an everyday budget.
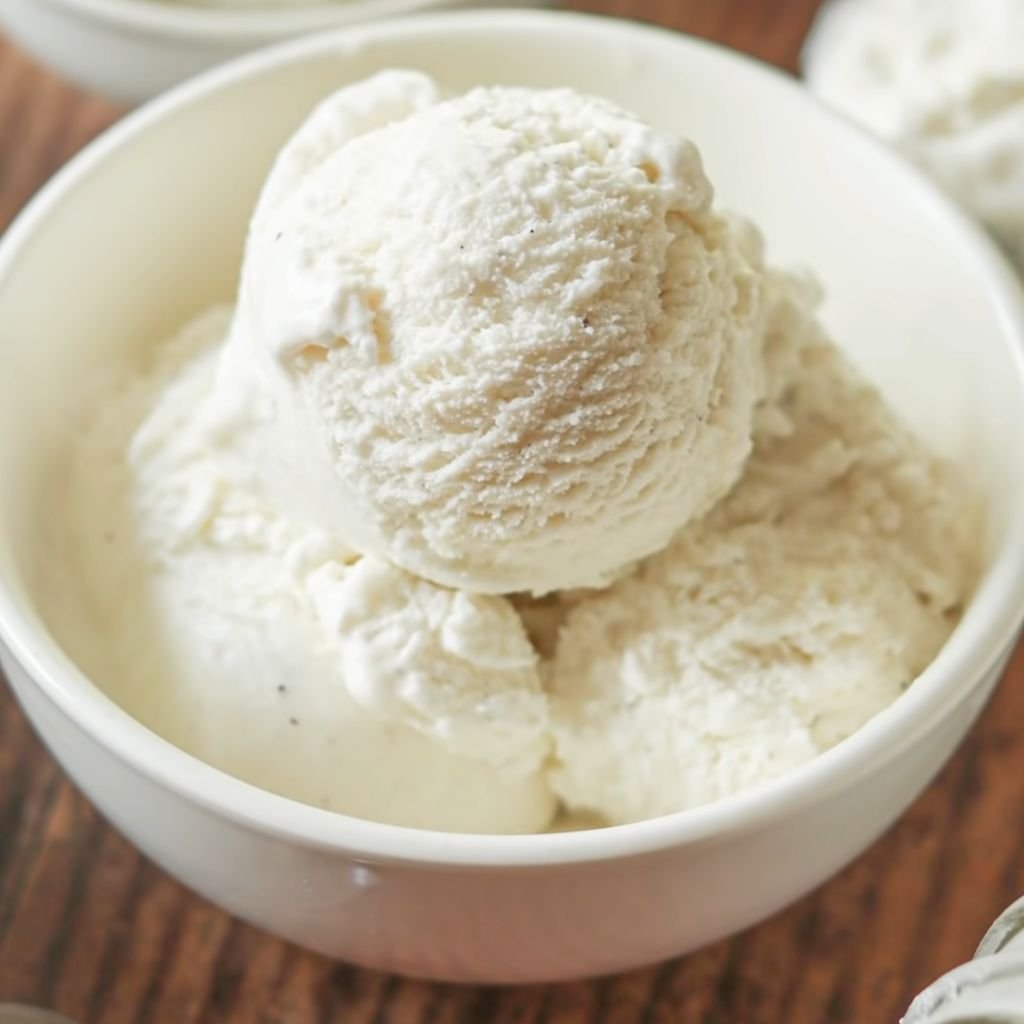
1. Classic Keto Vanilla Ice Cream
Prep Time: 5 min | Churn Time: 30 min | Serves: 1
Creamy, smooth, and loaded with real vanilla flavor — this single-serve scoop checks every box for a satisfying low-carb treat. Made with just a handful of pantry staples, it comes together fast and delivers that rich, classic taste without any sugar spikes.
Ingredients
- ½ cup heavy whipping cream
- 2 tablespoons full-fat cream cheese, softened
- 1 tablespoon powdered erythritol or monk fruit sweetener
- ½ teaspoon pure vanilla extract
- Pinch of salt
Instructions
Start by making sure your Dash My Mug Ice Cream Maker bowl has been frozen for at least 8 hours. A fully frozen bowl is the key to getting that thick, creamy texture. Pull it out of the freezer right before you are ready to start mixing your ingredients.
In a small mixing bowl, add the softened cream cheese first. Use a fork or a small hand whisk to beat it until smooth and lump-free. Cream cheese that still has lumps will not blend well with the cream, so take a moment here to make sure it is completely soft.
Once the cream cheese is smooth, pour in the heavy whipping cream slowly while whisking. Continue to whisk until the mixture begins to thicken slightly and looks uniform. You do not need stiff peaks — just a smooth, blended consistency that holds together.
Add the powdered erythritol or monk fruit sweetener next. Stir it in well and make sure there are no dry pockets of sweetener left at the bottom of the bowl. If your sweetener is grainy, use a spoon to press it against the side of the bowl to help it dissolve.
Pour in the vanilla extract and the pinch of salt. These two ingredients do a lot of work here. The vanilla gives the ice cream its signature classic taste, while the salt enhances all the other flavors and balances out the richness of the cream. Stir the whole mixture one more time until everything is fully combined.
Pour the mixture carefully into the frozen Dash My Mug bowl. Attach the lid and turn on the machine. Let it churn for the full 30 minutes. During this time, the frozen bowl slowly freezes the cream mixture from the outside in while the churning paddle keeps it moving, preventing large ice crystals from forming.
After the churn cycle is done, check the texture. It should look soft and creamy, similar to soft-serve ice cream. At this point, you can eat it right away for a soft texture, or place the bowl in the freezer for an additional 15 to 20 minutes for a firmer scoop.
Serve in the mug bowl itself or scoop it into a small dish. Top with a light sprinkle of crushed nuts or a drizzle of sugar-free syrup. Store any leftovers by covering the bowl and placing it in the freezer. Let it sit out for 5 minutes before scooping again.
Nutrition Information (Per Serving)
Calories: ~280 | Fat: 27g | Net Carbs: 2g | Protein: 3g | Fiber: 0g
2. Rich Keto Chocolate Ice Cream
Prep Time: 5 min | Churn Time: 30 min | Serves: 1
Deep, dark chocolate flavor in a single-serve, sugar-free scoop — that is exactly what this recipe delivers. Using unsweetened cocoa and rich heavy cream, every bite feels indulgent without any guilt. A perfect go-to for chocolate lovers on a low-carb lifestyle.
Ingredients
- ½ cup heavy whipping cream
- 2 tablespoons full-fat cream cheese, softened
- 1 tablespoon unsweetened cocoa powder
- 1½ tablespoons powdered erythritol
- ¼ teaspoon pure vanilla extract
- Pinch of salt
Instructions
Freeze your Dash My Mug Ice Cream Maker bowl at least 8 hours ahead of time. The colder the bowl, the better the final texture of your chocolate ice cream. Do not skip this step, as it directly affects how thick and creamy the end result will be.
Place the softened cream cheese in a small bowl and work it with a spoon or small whisk until completely smooth. Any lumps at this stage will stay lumps in your finished ice cream, so be patient and make sure the cream cheese is fully broken down before moving on.
In a separate small cup, combine the cocoa powder and powdered erythritol together and stir them until they are well mixed. Combining them dry first helps prevent the cocoa from clumping when it meets the wet cream.
Add the cocoa and sweetener mixture to the cream cheese and stir vigorously. The mixture will look dark and thick at this point, which is exactly what you want. Use a fork to press and stir until no dry cocoa streaks remain.
Pour in the heavy whipping cream in a slow, steady stream while continuing to whisk. As the cream incorporates, the mixture will lighten slightly and become more pourable. Keep whisking until everything is combined into a smooth, slightly thick liquid.
Add the vanilla extract and the pinch of salt. The vanilla rounds out the bitterness of the cocoa, and the salt deepens the chocolate flavor. Give the whole mixture a final stir and make sure every ingredient is fully blended.
Pour the finished mixture into your frozen mug bowl. Secure the lid and start the machine. Let it churn for 30 minutes without interruption. The machine will steadily freeze the mixture while keeping it aerated.
When the churn is done, the ice cream will look rich, thick, and creamy. Enjoy it immediately for a soft texture or freeze it for 15 to 20 more minutes for a denser, scoopable consistency. Serve topped with sugar-free chocolate chips or a light dusting of extra cocoa powder.
Nutrition Information (Per Serving)
Calories: ~295 | Fat: 28g | Net Carbs: 3g | Protein: 4g | Fiber: 1g
3. Keto Strawberry Cheesecake Ice Cream
Prep Time: 5 min | Churn Time: 30 min | Serves: 1
Fresh strawberry flavor meets creamy cheesecake filling in this single-serve frozen dream. Low in carbs but big on flavor, it captures everything you love about strawberry cheesecake without the crust or the sugar. A bright, refreshing option that works year-round.
Ingredients
- ½ cup heavy whipping cream
- 3 tablespoons full-fat cream cheese, softened
- 3 tablespoons fresh or frozen strawberries, mashed
- 1 tablespoon powdered erythritol
- ¼ teaspoon vanilla extract
- Few drops of lemon juice
Instructions
Prepare your Dash My Mug bowl by freezing it overnight or for a minimum of 8 hours. Strawberry ice cream can be a little more delicate than plain cream flavors because of the fruit’s water content, so a very cold bowl is especially important here.
If you are using fresh strawberries, wash them, remove the stems, and slice them small. Place the sliced strawberries into a small bowl and mash them well with a fork until you get a chunky puree with some texture remaining. If using frozen strawberries, thaw them just enough to mash, then squeeze out any excess liquid with a paper towel before adding them to your mixture. Too much water in the mix can cause the ice cream to become icy rather than creamy.
In another bowl, beat the softened cream cheese until smooth. Add the powdered erythritol and stir until the sweetener is fully dissolved into the cream cheese. Add the vanilla extract and the few drops of lemon juice. The lemon juice cuts through the richness and brings out the fresh strawberry taste.
Add the mashed strawberries to the cream cheese mixture and stir until fully combined. The mixture will turn a beautiful pinkish color and smell amazing at this stage.
Slowly pour in the heavy whipping cream while stirring continuously. Mix until the whole thing is smooth, uniformly pink, and slightly thickened.
Pour the mixture into the frozen mug bowl and put the lid on. Turn the machine on and let it churn for the full 30-minute cycle. Because of the fruit content, you may notice the mixture takes slightly longer to reach a very firm texture.
When the churning is done, scoop it out into a small bowl or serve directly from the mug. Top with a slice of fresh strawberry or a light drizzle of sugar-free strawberry syrup for a beautiful presentation.
Nutrition Information (Per Serving)
Calories: ~275 | Fat: 26g | Net Carbs: 4g | Protein: 4g | Fiber: 0.5g
4. Low-Carb Cookies and Cream Ice Cream
Prep Time: 5 min | Churn Time: 30 min | Serves: 1
All the crunch and cream of a classic cookies and cream flavor, with zero sugar and very few carbs. Using crushed keto-friendly chocolate sandwich cookies, this recipe gives you that signature black-and-white mix in every spoonful.
Ingredients
- ½ cup heavy whipping cream
- 2 tablespoons cream cheese, softened
- 1 tablespoon powdered erythritol
- ¼ teaspoon vanilla extract
- 2–3 keto chocolate sandwich cookies, crushed
- Pinch of salt
Instructions
Set your Dash My Mug bowl to freeze the night before, or at least 8 to 10 hours ahead. When you plan to add solid mix-ins like crushed cookies, a very cold, fully frozen bowl makes a big difference in how evenly they set into the ice cream.
Crush your keto chocolate sandwich cookies into small pieces. You want a mix of sizes — some fine crumbs and some slightly larger chunks — to mimic the classic cookies and cream texture. Place the crushed cookies in a small separate dish and set aside.
Combine the softened cream cheese and powdered erythritol in a small bowl. Work them together with a fork until smooth and fully blended. Make sure the sweetener is completely mixed in and no graininess remains.
Add the vanilla extract and the pinch of salt to the cream cheese base. Stir until incorporated. The vanilla is especially important in this flavor because it gives the cream portion its classic sweet, rich taste that contrasts with the dark cookie pieces.
Pour the heavy whipping cream into the cream cheese mixture slowly, whisking as you pour. The mixture should come together into a smooth, slightly thick liquid. Do not over-whisk at this stage — you just want everything blended, not whipped to stiff peaks.
Pour the base mixture into the frozen mug bowl. Before putting the lid on, scatter about half of the crushed cookies over the top of the mixture. The machine will churn them in as it works.
Start the machine and let it run for the full 30 minutes. With about 5 minutes left in the churn, quickly lift the lid and sprinkle in the remaining crushed cookie pieces. Re-attach the lid and let the machine finish.
Once done, serve the ice cream straight from the mug or scoop it into a small bowl. Add a few extra cookie crumbs on top for a photo-worthy finish.
Nutrition Information (Per Serving)
Calories: ~310 | Fat: 28g | Net Carbs: 5g | Protein: 4g | Fiber: 1g
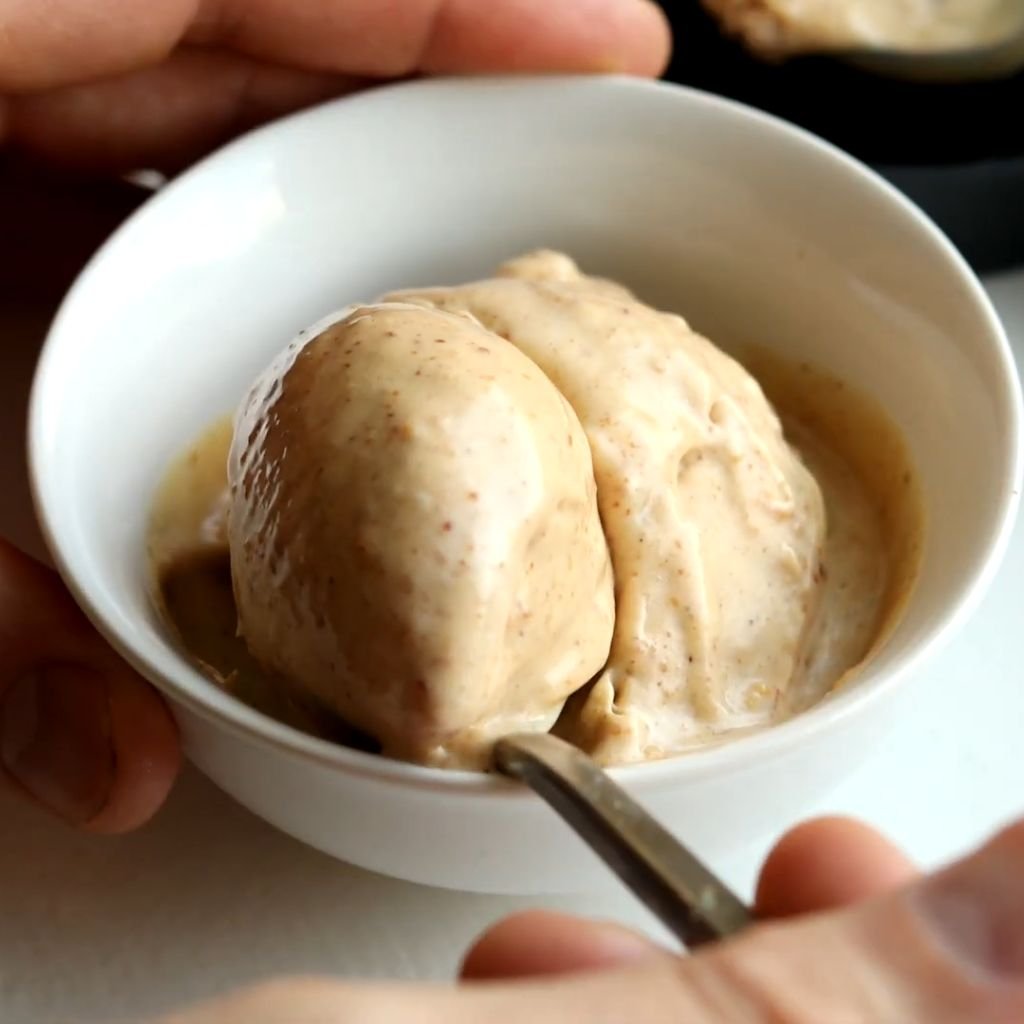
5. Keto Peanut Butter Cup Ice Cream
Prep Time: 5 min | Churn Time: 30 min | Serves: 1
Peanut butter and chocolate come together in a rich, creamy single-serve scoop that tastes like a frozen candy cup — without the sugar. Natural peanut butter makes this flavor bold and satisfying, with a swirl of chocolate that keeps every bite exciting.
Ingredients
- ½ cup heavy whipping cream
- 2 tablespoons natural peanut butter (no sugar added)
- 1 tablespoon cream cheese, softened
- 1 tablespoon powdered erythritol
- 1 teaspoon unsweetened cocoa powder
- ¼ teaspoon vanilla extract
- Pinch of salt
Instructions
Freeze the Dash My Mug bowl for 8 to 10 hours before starting. Peanut butter-based ice creams benefit greatly from a very cold bowl because the natural fats in peanut butter can slow the freezing process slightly.
In a small mixing bowl, combine the softened cream cheese and the natural peanut butter. Stir them together until fully blended into a thick, uniform paste. Use a fork and press firmly to make sure there are no streaks of cream cheese or unmixed peanut butter remaining.
Add the powdered erythritol and the pinch of salt. Mix again until the sweetener disappears into the peanut butter base. The salt is especially important in peanut butter recipes — it amplifies the nutty flavor and gives the ice cream that classic sweet-and-salty profile.
Add the vanilla extract and stir one more time. The vanilla rounds out the richness of the peanut butter and brings a slight warmth to the flavor that complements the chocolate element.
Pour the heavy whipping cream in slowly while whisking. The mixture will go from thick and pasty to creamy and pourable as the cream incorporates. Keep whisking until everything is smooth and you see no lumps or streaks.
In a tiny separate cup, stir the cocoa powder with a small splash of cream (about 1 teaspoon) to form a quick chocolate swirl paste.
Pour the peanut butter mixture into the frozen mug bowl. Drop small dots of the chocolate paste across the top. Use a toothpick or skewer to drag through the dots and create a loose swirl pattern.
Attach the lid and start the machine. Let it churn for 30 minutes. The chocolate swirl will break up slightly as it churns, creating little pockets of chocolate flavor throughout the peanut butter ice cream. Serve immediately or freeze for a firmer consistency.
Nutrition Information (Per Serving)
Calories: ~340 | Fat: 31g | Net Carbs: 4g | Protein: 7g | Fiber: 1g
6. Mint Chocolate Chip Keto Ice Cream
Prep Time: 5 min | Churn Time: 30 min | Serves: 1
Cool, refreshing mint with dark chocolate chips in a sugar-free, low-carb base — this recipe captures a timeless flavor combination and makes it completely keto. The mint is bright and clean, never artificial-tasting, and the chocolate chips add just the right amount of crunch.
Ingredients
- ½ cup heavy whipping cream
- 2 tablespoons cream cheese, softened
- 1 tablespoon powdered erythritol
- ¼ teaspoon pure peppermint extract
- 1–2 tablespoons sugar-free dark chocolate chips
- Pinch of salt
- 1–2 drops natural green food coloring (optional)
Instructions
Freeze your Dash My Mug bowl for at least 8 hours. Mint chocolate chip ice cream is one of those flavors where achieving a smooth, creamy texture is extra important — the contrast between the silky base and the crunchy chips is what makes this flavor so satisfying.
In a small bowl, beat the cream cheese until soft and completely lump-free. Smooth cream cheese is the foundation of this base, so do not rush this step. If the cream cheese is cold, let it sit at room temperature for 10 minutes before starting.
Add the powdered erythritol and the pinch of salt to the cream cheese and stir until combined. The sweetener should fully dissolve into the cream cheese, leaving no gritty texture.
Add the peppermint extract very carefully. Peppermint extract is strong — start with just ¼ teaspoon. You can always add a tiny bit more after tasting the base, but too much will make the ice cream taste like toothpaste. Stir the extract in well.
If you are using green food coloring for the classic mint look, add 1 to 2 drops now and stir until the color is evenly distributed throughout the base.
Pour the heavy whipping cream in slowly while whisking continuously. The mixture should come together into a smooth, pale green liquid with a creamy consistency.
Pour the base into the frozen mug bowl. Scatter about half of the sugar-free chocolate chips on top of the mixture. Place the lid on and start the machine.
Let the machine run for 25 minutes, then lift the lid carefully and add the remaining chocolate chips. Put the lid back and let the churn finish. This two-step chip addition ensures some chips are fully churned in while others stay on top and near the surface.
Serve immediately for a soft texture, or freeze for 15 minutes for firmer scoops. Top with a few extra chips for a finished look.
Nutrition Information (Per Serving)
Calories: ~305 | Fat: 28g | Net Carbs: 4g | Protein: 3g | Fiber: 0.5g
7. Keto Salted Caramel Ice Cream
Prep Time: 5 min | Churn Time: 30 min | Serves: 1
Rich, buttery caramel flavor balanced with a touch of sea salt — all in a single low-carb serving. Using sugar-free caramel syrup and real heavy cream, this recipe gives you that deep, indulgent caramel taste without knocking you out of ketosis.
Ingredients
- ½ cup heavy whipping cream
- 2 tablespoons cream cheese, softened
- 1½ tablespoons sugar-free caramel syrup
- 1 teaspoon powdered erythritol
- ¼ teaspoon vanilla extract
- ¼ teaspoon flaky sea salt, plus more for topping
Instructions
Begin by placing your Dash My Mug bowl in the freezer for at least 8 to 10 hours before making this recipe. Caramel-based flavors can be slightly softer than plain cream flavors due to the syrup content, so a fully frozen bowl is very important.
In a small bowl, beat the cream cheese until completely smooth and creamy. Caramel ice cream should have a silky texture throughout, which starts with making sure the cream cheese base is free of any lumps.
Add the powdered erythritol to the cream cheese and mix until the sweetener is fully incorporated. Even though you are also adding caramel syrup, the extra erythritol helps build the sweetness and structure of the base.
Pour in the sugar-free caramel syrup and stir thoroughly. The mixture will turn a light tan or golden color, which is a sign that the caramel is fully mixing into the cream cheese base. Give it a good stir for about 30 seconds to make sure everything is evenly distributed.
Add the vanilla extract and the quarter teaspoon of flaky sea salt. The salt is what makes this flavor truly special — it creates that classic salted caramel contrast that makes every bite taste complex and satisfying. Stir to combine.
Slowly pour in the heavy whipping cream while whisking gently. The mixture should come together into a smooth, caramel-colored liquid. Make sure there are no streaks of plain cream or unblended cream cheese remaining.
Pour the mixture into the frozen mug bowl and secure the lid. Turn on the machine and let it churn for the full 30-minute cycle without interruption.
When the churn is complete, the ice cream will be soft and ready to eat. Transfer to a small serving dish and sprinkle a pinch of extra flaky sea salt on top right before serving. The salt on top adds a final burst of flavor that elevates the whole experience.
Nutrition Information (Per Serving)
Calories: ~285 | Fat: 27g | Net Carbs: 3g | Protein: 3g | Fiber: 0g
8. Coconut Vanilla Keto Ice Cream
Prep Time: 5 min | Churn Time: 30 min | Serves: 1
Tropical, creamy, and completely dairy-optional — this coconut vanilla recipe is one of the most versatile dash my mug ice cream maker keto recipes you can make. Using full-fat coconut cream, it delivers a rich, smooth scoop with a subtle coconut sweetness that pairs well with almost any topping.
Ingredients
- ½ cup full-fat coconut cream (from a can, chilled)
- 1 tablespoon cream cheese or coconut cream extra (for dairy-free)
- 1 tablespoon powdered erythritol
- ½ teaspoon pure vanilla extract
- ¼ teaspoon coconut extract (optional, for stronger flavor)
- Pinch of salt
Instructions
The night before, chill your can of full-fat coconut cream in the refrigerator. When cold, the thick cream separates from the liquid and rises to the top. You only want the thick, solid part for this recipe — scoop that out carefully and discard or save the liquid for another use. Also freeze your Dash My Mug bowl for at least 8 hours.
Scoop the thick chilled coconut cream into a small mixing bowl. If it still feels too soft, place it in the freezer for 10 minutes to firm up slightly before mixing. You want it cold and thick, not melted.
Add the powdered erythritol and the pinch of salt to the coconut cream. Stir them in with a spoon until the sweetener is dissolved and no graininess remains.
Add the vanilla extract and the optional coconut extract. The coconut extract is optional but recommended — it intensifies the tropical flavor significantly. If you want a more mild, vanilla-forward flavor, skip it. Stir the extracts into the coconut cream base.
If you are including cream cheese for a dairy-based version, beat it separately until smooth and then stir it into the coconut cream mixture until fully combined. For a fully dairy-free version, use an extra tablespoon of coconut cream instead.
Pour the mixture into the frozen Dash My Mug bowl. Because coconut cream is already thick and cold, it may churn to a soft-serve texture faster than a cream-based mixture. Keep an eye on it around the 20-minute mark.
Let the machine run for 25 to 30 minutes. When done, the ice cream should be creamy, slightly golden or white, and hold its shape when scooped.
Serve topped with toasted unsweetened coconut flakes, a drizzle of sugar-free chocolate, or a few macadamia nuts for a Hawaiian-inspired presentation.
Nutrition Information (Per Serving)
Calories: ~265 | Fat: 25g | Net Carbs: 3g | Protein: 2g | Fiber: 0g
9. Keto Mocha Coffee Ice Cream
Prep Time: 5 min | Churn Time: 30 min | Serves: 1
Coffee and chocolate meet in a single, creamy, low-carb scoop that doubles as dessert and a pick-me-up. Made with real espresso powder and unsweetened cocoa, this mocha flavor is bold, smooth, and completely satisfying — no sugar required.
Ingredients
- ½ cup heavy whipping cream
- 2 tablespoons cream cheese, softened
- 1 teaspoon instant espresso powder
- 1 teaspoon unsweetened cocoa powder
- 1 tablespoon powdered erythritol
- ¼ teaspoon vanilla extract
- Pinch of salt
Instructions
Freeze your Dash My Mug bowl the night before or at least 8 hours in advance. Coffee-flavored ice creams often come out slightly softer than plain cream flavors due to the liquid nature of dissolved espresso, so starting with a very cold bowl gives you an advantage.
In a small cup, dissolve the instant espresso powder in just 1 teaspoon of warm water. Stir until the powder is fully dissolved and no granules remain. Set this aside to cool completely before adding it to the cream mixture. Adding hot liquid to cold cream can affect texture.
While the espresso cools, combine the softened cream cheese and the cocoa powder in a small bowl. Use a fork to mash them together into a smooth, dark paste. The cocoa powder tends to clump in liquid, so working it into the cream cheese first helps it blend evenly.
Add the powdered erythritol and the pinch of salt to the cream cheese and cocoa mixture. Stir well until the sweetener is fully incorporated. Then add the cooled espresso liquid and the vanilla extract. Stir everything together until you have a dark, glossy, smooth base.
Slowly pour in the heavy whipping cream while whisking. The mixture will lighten slightly as the cream blends in. Continue whisking until everything is smooth and uniform.
Taste the base before churning. Mocha ice cream should taste bold and slightly bitter — the sweetness should balance the coffee and cocoa, not overpower them. Add a tiny bit more erythritol if needed.
Pour the mixture into the frozen mug bowl and secure the lid. Start the machine and let it churn for the full 30 minutes.
When the cycle ends, you will have a rich, coffee-chocolate ice cream ready to serve. Scoop into a small cup and top with a few sugar-free chocolate chips, a light dusting of cocoa powder, or a single coffee bean as garnish.
Nutrition Information (Per Serving)
Calories: ~290 | Fat: 27g | Net Carbs: 2g | Protein: 4g | Fiber: 1g
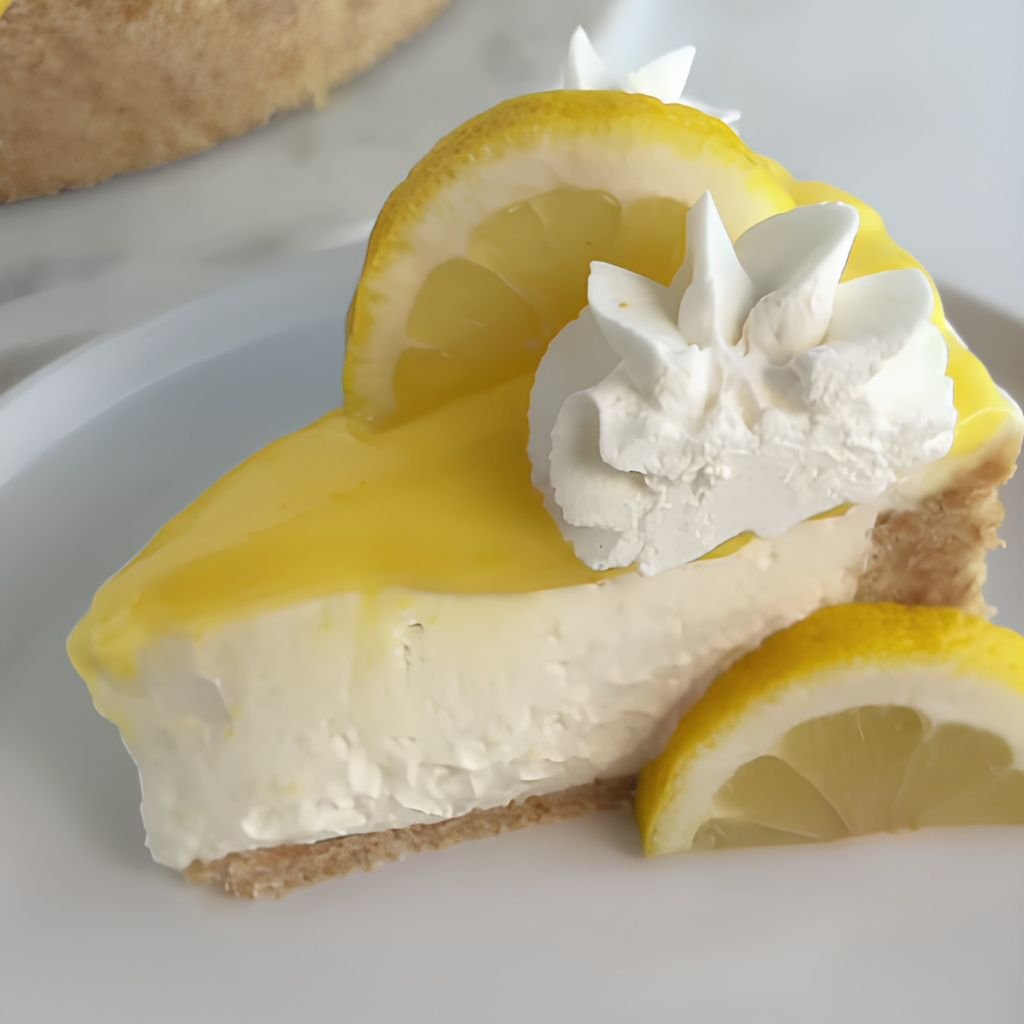
10. Lemon Cheesecake Keto Ice Cream
Prep Time: 5 min | Churn Time: 30 min | Serves: 1
Bright lemon meets the creamy richness of cheesecake in a single-serve, sugar-free scoop. Tangy, sweet, and incredibly refreshing — this flavor is perfect for warm days or any time you want something that feels light but still fills you up.
Ingredients
- ½ cup heavy whipping cream
- 3 tablespoons cream cheese, softened
- 1 tablespoon powdered erythritol
- 1½ teaspoons fresh lemon juice
- ½ teaspoon lemon zest
- ¼ teaspoon vanilla extract
- Pinch of salt
Instructions
Freeze your Dash My Mug bowl for at least 8 hours. Lemon cheesecake ice cream has a naturally lighter texture due to the acidity of the lemon juice, so a cold bowl is especially important for helping it set properly.
Zest the lemon before juicing it — it is much easier to zest a whole lemon. Use a fine grater or microplane to zest just the yellow outer layer, avoiding the white pith underneath, which can taste bitter. Measure out ½ teaspoon of zest and set it aside.
In a small bowl, beat the cream cheese until completely smooth. The cream cheese is the backbone of the cheesecake flavor here, and it needs to be smooth and fully softened before anything else is added.
Add the powdered erythritol and salt to the cream cheese and stir until dissolved. Then add the lemon juice and lemon zest. Stir well — the mixture will look slightly thickened as the acid in the lemon juice reacts with the cream cheese. This is normal and actually helps give the ice cream a denser, cheesecake-like texture.
Add the vanilla extract and stir one final time. The vanilla softens the sharp lemon edge and gives the flavor more depth.
Slowly pour the heavy whipping cream into the lemon cream cheese mixture while whisking. Whisk until smooth and uniform. The mixture should smell incredibly fresh and bright.
Pour it into the frozen Dash My Mug bowl and secure the lid. Let the machine run for 30 minutes. The lemon acids may cause this ice cream to freeze slightly faster than others, so check it around the 25-minute mark.
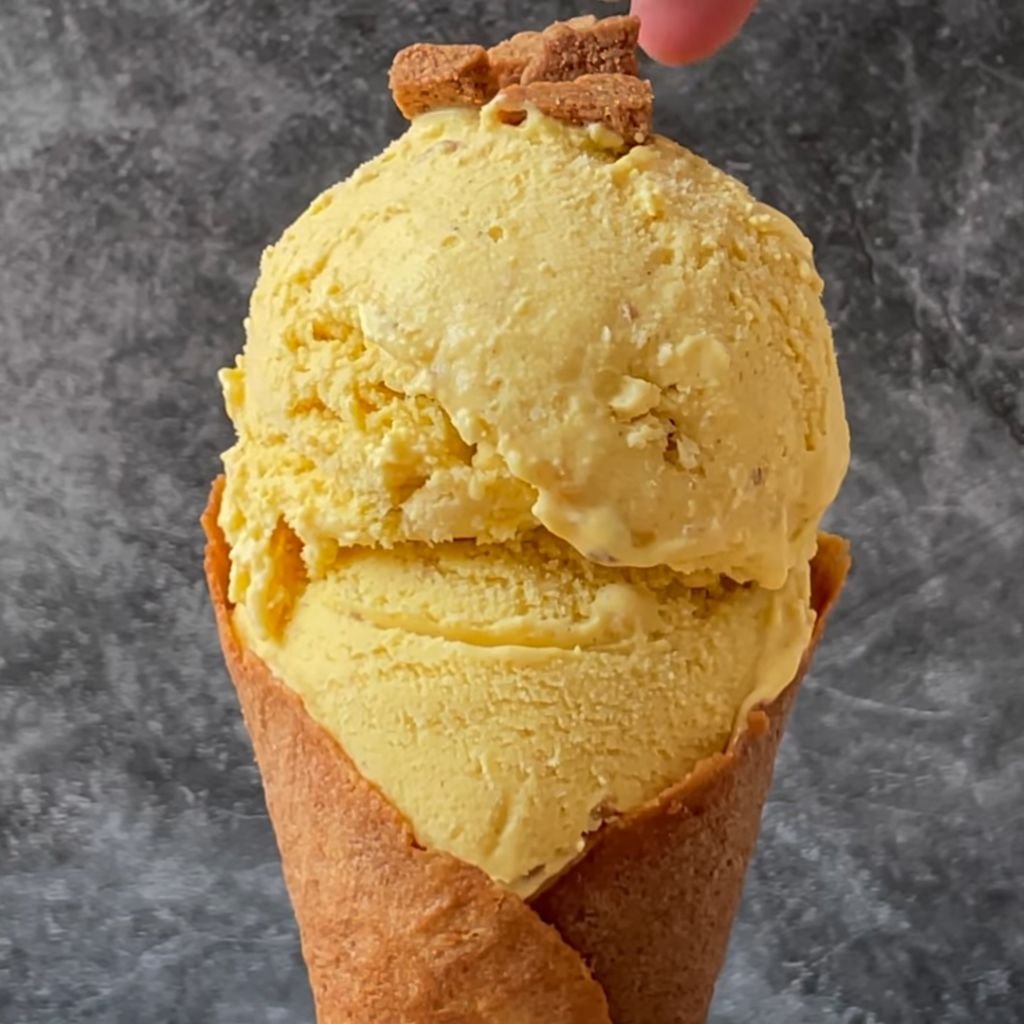
Serve topped with a small piece of lemon zest or a light sprinkle of crushed keto graham crackers for a true cheesecake experience.
Nutrition Information (Per Serving)
Calories: ~270 | Fat: 26g | Net Carbs: 3g | Protein: 4g | Fiber: 0g
11. Keto Blueberry Cream Ice Cream
Prep Time: 5 min | Churn Time: 30 min | Serves: 1
Fresh or frozen blueberries swirled into a creamy, low-carb base for a naturally sweet, berry-forward scoop. Blueberries bring a mild tartness that works beautifully with cream and a touch of lemon — a simple, wholesome flavor with natural color.
Ingredients
- ½ cup heavy whipping cream
- 2 tablespoons cream cheese, softened
- 3 tablespoons fresh or frozen blueberries
- 1 tablespoon powdered erythritol
- ¼ teaspoon vanilla extract
- A squeeze of fresh lemon juice
- Pinch of salt
Instructions
Freeze your Dash My Mug bowl for 8 to 10 hours before starting. Blueberry ice cream can be softer than cream-only recipes because of the fruit’s natural water content, so a properly frozen bowl will help it set correctly.
Prepare your blueberries first. If using fresh blueberries, rinse and pat them dry. If using frozen, let them thaw for about 10 minutes. Place the blueberries in a small bowl and mash them thoroughly with a fork until you get a chunky, deep purple puree. You want some texture in the puree, not a completely smooth liquid.
Squeeze out any excess liquid from the blueberry puree using a piece of cheesecloth or a paper towel. Too much moisture from the fruit can cause iciness in the final ice cream. Press gently and remove as much liquid as possible without losing all the pulp.
In a small mixing bowl, beat the cream cheese until smooth. Add the powdered erythritol, the squeeze of lemon juice, and the pinch of salt. Mix everything together until combined and smooth.
Add the blueberry puree to the cream cheese mixture. Stir until the purple color is fully distributed and the mixture looks uniform. The color will be a beautiful violet or deep lavender.
Add the vanilla extract and stir one more time. Slowly pour in the heavy whipping cream while whisking until the base is smooth and slightly thickened.
Pour the mixture into the frozen mug bowl and secure the lid. Start the machine and let it run for the full 30-minute cycle.
When done, the ice cream should have a soft, creamy, purple-hued texture. Scoop into a small bowl and top with a few whole fresh blueberries and a small sprig of mint for a colorful, natural presentation.
Nutrition Information (Per Serving)
Calories: ~270 | Fat: 25g | Net Carbs: 5g | Protein: 3g | Fiber: 1g
12. Cinnamon Roll Keto Ice Cream
Prep Time: 5 min | Churn Time: 30 min | Serves: 1
Everything you love about a warm cinnamon roll, frozen into a single-serve, keto-friendly scoop. The base is rich and slightly sweet, with a strong cinnamon note and a cream cheese ribbon swirl that makes it taste like a bakery treat — minus all the carbs.
Ingredients
- ½ cup heavy whipping cream
- 2 tablespoons cream cheese, softened
- 1 tablespoon powdered erythritol
- ¾ teaspoon ground cinnamon
- ¼ teaspoon vanilla extract
- Pinch of salt
- 1 teaspoon butter extract (optional, for bakery flavor)
Instructions
Make sure your Dash My Mug bowl is fully frozen — at least 8 hours in the freezer. Cinnamon-based ice cream can have a lighter texture than chocolate or coffee flavors, so the frozen bowl temperature matters a lot here.
In a small bowl, beat the cream cheese until it is completely smooth and soft. If it is still slightly firm, let it sit for another 5 minutes at room temperature before working with it. Smooth cream cheese gives you a better swirl and a silkier overall texture.
Add the powdered erythritol and pinch of salt to the cream cheese and stir until fully blended. Then add the ground cinnamon — all ¾ teaspoon of it. Stir the cinnamon into the cream cheese base vigorously. The mixture will look brown and spiced.
Add the vanilla extract and the optional butter extract. Butter extract gives this ice cream that unmistakable cinnamon roll bakery quality — slightly warm and rich. If you do not have it, the recipe still tastes great without it.
Slowly pour the heavy whipping cream into the cream cheese and cinnamon base while whisking. Whisk until the cream is fully incorporated and the mixture is smooth, evenly colored, and smells wonderful.
Now, take 1 teaspoon of extra softened cream cheese mixed with a pinch of cinnamon and a few drops of cream to make a quick swirl paste.
Pour the main mixture into the frozen mug bowl. Drop small dots of the cinnamon cream swirl on top and drag a toothpick through them to create a swirl pattern.
Attach the lid and run the machine for 30 minutes. The swirl will partially blend into the base as it churns, creating cinnamon ribbons throughout the ice cream. Serve hot out of the machine for a soft texture, or freeze for 15 more minutes for a firmer scoop.
Nutrition Information (Per Serving)
Calories: ~290 | Fat: 28g | Net Carbs: 2g | Protein: 3g | Fiber: 0.5g
13. Keto Butter Pecan Ice Cream
Prep Time: 5 min | Churn Time: 30 min | Serves: 1
Toasted pecans and a buttery, golden cream base come together in a single-serve keto scoop that feels luxurious and warming. Each bite has a satisfying crunch paired with smooth, rich cream — a classic Southern flavor, completely reimagined for low-carb eating.
Ingredients
- ½ cup heavy whipping cream
- 2 tablespoons cream cheese, softened
- 1 tablespoon powdered erythritol
- ¼ teaspoon butter extract
- ¼ teaspoon vanilla extract
- 2 tablespoons chopped pecans, toasted
- Pinch of salt
Instructions
Freeze your Dash My Mug bowl for at least 8 hours before starting. While the bowl freezes, toast your pecans for maximum flavor. Place the chopped pecans in a dry skillet over medium heat. Stir them constantly for 2 to 3 minutes until they smell nutty and turn slightly golden. Remove from heat immediately and let them cool completely on a plate. Toasting the pecans makes an enormous difference — raw pecans are fine, but toasted ones bring out a much deeper, richer flavor.
In a small bowl, beat the cream cheese until smooth. Add the powdered erythritol and the pinch of salt and mix until the sweetener is fully dissolved.
Add the butter extract and vanilla extract to the cream cheese base and stir until incorporated. Butter extract is what gives this ice cream its signature warm, slightly nutty quality that makes it taste like the real deal. Do not skip it.
Slowly pour the heavy whipping cream into the cream cheese mixture while whisking. Continue whisking until the base is smooth, slightly thickened, and uniform. The mixture should look pale ivory in color.
Pour the mixture into the frozen Dash My Mug bowl. Before attaching the lid, scatter about half the toasted pecan pieces across the top of the mixture.
Attach the lid and start the machine. Let it run for 25 minutes, then carefully open the lid and add the remaining pecans. Close the lid and let the final 5 minutes of churning finish. Adding the pecans in two stages means some are fully blended in while others remain near the surface, giving a better distribution of crunch throughout.
Serve the finished ice cream in a small bowl and top with a few extra pecan halves and a light drizzle of sugar-free caramel syrup for a beautiful finish.
Nutrition Information (Per Serving)
Calories: ~330 | Fat: 31g | Net Carbs: 3g | Protein: 4g | Fiber: 1g
14. Chocolate Almond Crunch Ice Cream
Prep Time: 5 min | Churn Time: 30 min | Serves: 1
A bold chocolate base loaded with crunchy almond pieces — this recipe brings texture and richness to your low-carb dessert routine. Almonds add healthy fat and a satisfying crunch that contrasts perfectly with the smooth, dark chocolate cream.
Ingredients
- ½ cup heavy whipping cream
- 2 tablespoons cream cheese, softened
- 1 tablespoon unsweetened cocoa powder
- 1 tablespoon powdered erythritol
- ¼ teaspoon vanilla extract
- 2 tablespoons sliced or slivered almonds, toasted
- Pinch of salt
Instructions
Start by freezing your Dash My Mug bowl for 8 to 10 hours. Toast your almonds in a dry skillet over medium heat for 2 to 3 minutes, stirring constantly. Watch them closely as they can burn quickly. Once they are golden and fragrant, transfer them to a plate and let them cool completely. Toasted almonds are crunchier and have a more developed, nutty flavor than raw ones.
In a small bowl, mash the cream cheese with a fork until smooth. Add the cocoa powder and work it into the cream cheese with the fork, pressing to eliminate any dry cocoa clumps. This step is important — cocoa that is not fully incorporated will cause streaks in the finished ice cream rather than a uniform chocolate color.
Add the powdered erythritol and salt to the cream cheese and cocoa mixture. Stir until everything is blended and no grittiness remains from the sweetener.
Add the vanilla extract and stir once more. The vanilla softens the bitterness of the cocoa and adds a warm undertone to the chocolate flavor. Stir until the base is dark, smooth, and fragrant.
Slowly pour the heavy whipping cream into the chocolate base while whisking. Continue whisking until the mixture is smooth, glossy, and uniform. The color should be a rich, deep chocolate brown.
Pour the base into the frozen mug bowl. Scatter about half of the toasted almonds across the top. Place the lid on and start the machine.
At the 25-minute mark, open the lid carefully and add the remaining almond pieces. Close and let the final minutes of churning finish. This staged addition ensures the almonds are distributed throughout rather than all sinking to the bottom.
Serve the finished ice cream with a few extra almond slices and a light dusting of cocoa powder on top for a clean, professional look.
Nutrition Information (Per Serving)
Calories: ~315 | Fat: 29g | Net Carbs: 3g | Protein: 6g | Fiber: 2g
15. Keto Pumpkin Spice Ice Cream
Prep Time: 5 min | Churn Time: 30 min | Serves: 1
Fall flavors in a frozen, low-carb scoop — pumpkin puree and warm spice blend into a creamy, seasonal treat that tastes like pumpkin pie filling transformed into ice cream. Cozy, spiced, and totally keto-friendly, this one is worth making all year long.
Ingredients
- ½ cup heavy whipping cream
- 2 tablespoons pure pumpkin puree (not pumpkin pie filling)
- 2 tablespoons cream cheese, softened
- 1 tablespoon powdered erythritol
- ½ teaspoon pumpkin pie spice
- ¼ teaspoon vanilla extract
- Pinch of salt
Instructions
Freeze the Dash My Mug bowl for 8 to 10 hours before starting. Pumpkin puree adds moisture to the base, which can slow the freezing process, so a very cold bowl is critical here. Make sure you are using plain pumpkin puree and not pumpkin pie filling — the filling has added sugar and spices that will throw off the recipe.
Place 2 tablespoons of pumpkin puree on a clean paper towel and press gently to remove some of the excess moisture. You do not need to squeeze it completely dry — just blot it. This small step reduces the water content and helps the ice cream set up more firmly.
In a small bowl, beat the cream cheese until smooth. Add the powdered erythritol, pumpkin pie spice, and pinch of salt. Mix well until everything is evenly combined and no lumps of cream cheese or clumps of spice remain.
Add the blotted pumpkin puree to the cream cheese mixture. Stir thoroughly until the pumpkin is fully incorporated and the mixture is an even orange-brown color throughout. The pumpkin pie spice will smell wonderful at this stage — warm, cinnamony, and inviting.
Add the vanilla extract and stir one final time. The vanilla ties all the spice notes together and gives the flavor more depth and sweetness without adding any extra carbs.
Pour the heavy whipping cream into the pumpkin mixture slowly while whisking. Whisk until the base is smooth, evenly spiced, and uniform in color. It should smell exactly like pumpkin pie filling — and taste even better.
Pour the mixture into the frozen mug bowl, attach the lid, and start the machine. Let it churn for the full 30 minutes.
When the cycle finishes, serve topped with a light dusting of cinnamon and a small swirl of sugar-free whipped cream for a pie-inspired presentation.
Nutrition Information (Per Serving)
Calories: ~270 | Fat: 25g | Net Carbs: 4g | Protein: 3g | Fiber: 1g
16. Raspberry Cheesecake Keto Ice Cream
Prep Time: 5 min | Churn Time: 30 min | Serves: 1
Tart raspberries and tangy cream cheese create a bright, bold flavor that is hard to resist. This single-serve keto recipe tastes like frozen raspberry cheesecake in every spoonful — and with barely any net carbs, you can enjoy it without a second thought.
Ingredients
- ½ cup heavy whipping cream
- 3 tablespoons cream cheese, softened
- 3 tablespoons fresh or frozen raspberries, mashed
- 1 tablespoon powdered erythritol
- ¼ teaspoon vanilla extract
- A small squeeze of lemon juice
- Pinch of salt
Instructions
Freeze the Dash My Mug bowl for at least 8 hours. Raspberries are more tart and slightly more watery than strawberries, so taking extra steps to reduce moisture in the fruit will make a big difference in the final texture.
Mash the raspberries thoroughly with a fork in a small bowl. If using frozen raspberries, let them thaw at room temperature for 10 minutes first. Once mashed, strain the puree through a fine mesh strainer or press it through a piece of cheesecloth to remove excess juice and seeds. You want the flavorful pulp without all the extra liquid.
In a separate small bowl, beat the cream cheese until completely smooth. Add the powdered erythritol, pinch of salt, and squeeze of lemon juice. Mix until combined. The lemon juice brightens the raspberry flavor and cuts through the richness of the cream cheese beautifully.
Add the strained raspberry puree to the cream cheese base and stir thoroughly. The mixture should turn a vivid deep pink or light red. Make sure the raspberry is evenly distributed and no cream cheese streaks remain visible.
Add the vanilla extract and give the mixture one final stir. Slowly pour the heavy whipping cream into the raspberry cream cheese base while whisking continuously. Whisk until the mixture is smooth and the color is uniform.
Pour into the frozen Dash My Mug bowl and secure the lid. Start the machine and let it churn for 30 minutes without opening the lid.
Once done, serve the ice cream garnished with 2 to 3 whole fresh raspberries on top and a light dusting of powdered erythritol for a polished, dessert-shop look.
Nutrition Information (Per Serving)
Calories: ~265 | Fat: 25g | Net Carbs: 4g | Protein: 4g | Fiber: 1.5g
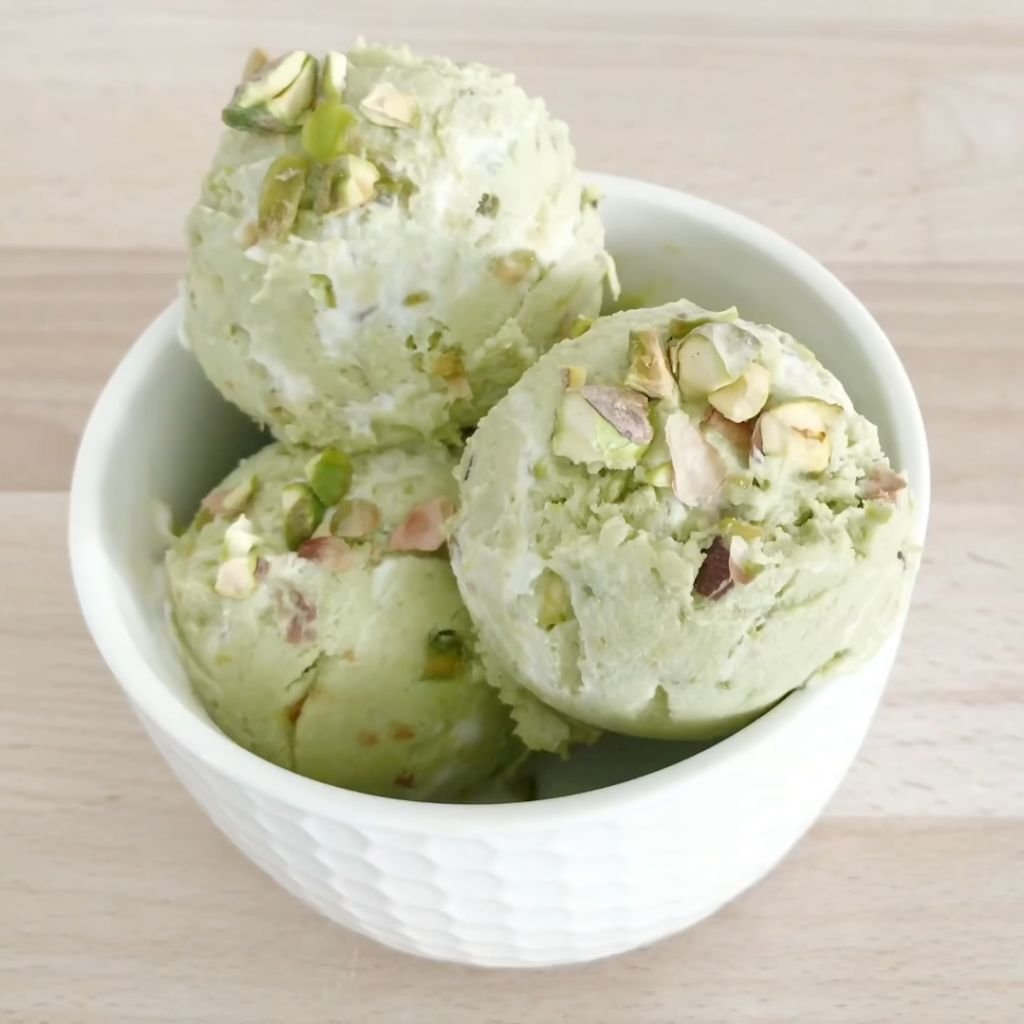
17. Keto Matcha Green Tea Ice Cream
Prep Time: 5 min | Churn Time: 30 min | Serves: 1
Earthy, slightly grassy matcha combined with creamy sweetness makes for a uniquely satisfying low-carb scoop. Matcha brings antioxidants and a calm energy boost to your dessert, making this one of the most interesting and nutritious dash my mug ice cream maker keto recipes in this collection.
Ingredients
- ½ cup heavy whipping cream
- 2 tablespoons cream cheese, softened
- 1 teaspoon culinary-grade matcha powder
- 1 tablespoon powdered erythritol
- ¼ teaspoon vanilla extract
- Pinch of salt
Instructions
Freeze your Dash My Mug bowl for 8 to 10 hours. Matcha ice cream has a delicate flavor that can be easily overwhelmed, so using high-quality culinary-grade matcha powder is important. Ceremonial-grade matcha works too, but it is more expensive and best saved for drinking.
In a small cup, mix the matcha powder with 1 to 2 teaspoons of warm (not hot) water. Stir vigorously with a small whisk or spoon until the matcha is fully dissolved and no clumps remain. Dissolved matcha distributes evenly throughout the ice cream base rather than sitting in bitter green pockets. Let the matcha mixture cool completely before using.
In a small bowl, beat the cream cheese until smooth. Add the powdered erythritol and the pinch of salt and mix until the sweetener is fully dissolved and incorporated.
Pour in the cooled matcha liquid and stir until the cream cheese base turns an even green color. The color will be subtle at first but will deepen as you continue mixing. Make sure no streaks of white cream cheese remain.
Add the vanilla extract and stir one more time. The vanilla gently softens the bitterness of the matcha without covering it up, making the flavor more balanced and approachable.
Slowly pour the heavy whipping cream into the matcha cream cheese base while whisking. Continue whisking until the mixture is smooth, light green, and uniform in texture.
Pour the matcha base into the frozen Dash My Mug bowl and secure the lid. Start the machine and let it churn for the full 30 minutes. The ice cream will come out a beautiful pale sage green.
Serve topped with a light dusting of extra matcha powder and a few sliced almonds or sesame seeds for a Japanese-inspired finishing touch.
Nutrition Information (Per Serving)
Calories: ~275 | Fat: 26g | Net Carbs: 2g | Protein: 3g | Fiber: 0.5g
18. Chocolate Coconut Keto Ice Cream
Prep Time: 5 min | Churn Time: 30 min | Serves: 1
Lush coconut cream meets deep, dark chocolate in a tropical-inspired keto scoop. The natural sweetness of coconut balances the bitterness of cocoa perfectly, and toasted coconut flakes on top add a layer of crunch that makes every bite feel complete.
Ingredients
- ½ cup chilled full-fat coconut cream
- 1 tablespoon cream cheese, softened
- 1 tablespoon unsweetened cocoa powder
- 1 tablespoon powdered erythritol
- ¼ teaspoon vanilla extract
- Pinch of salt
- 1 tablespoon toasted unsweetened coconut flakes (for topping)
Instructions
Chill a can of full-fat coconut cream in the refrigerator overnight. When you open it, the thick cream will have separated from the liquid — scoop out just the solid cream part and measure ½ cup. Also freeze your Dash My Mug bowl for at least 8 hours ahead of time.
In a small bowl, whisk the cocoa powder with 1 teaspoon of warm water until dissolved. Set it aside to cool. Dissolved cocoa blends more smoothly into the coconut cream base and prevents bitter spots of dry powder in the finished ice cream.
If using cream cheese, beat it until completely smooth. Stir in the powdered erythritol and the pinch of salt until fully incorporated.
Add the chilled coconut cream to the cream cheese base and stir until combined. The mixture should look thick and creamy. If your coconut cream is very firm, let it sit for 3 minutes at room temperature before stirring.
Add the cooled cocoa liquid and the vanilla extract. Stir everything together until the mixture is a uniform dark brown and smells of both chocolate and coconut. Taste the base and adjust sweetener if needed — coconut cream has a natural sweetness that may require slightly less erythritol than a heavy cream-based recipe.
Pour the mixture into the frozen Dash My Mug bowl, secure the lid, and start the machine. Let it churn for 30 minutes. Because coconut cream is already quite thick, the mixture may reach a soft-serve consistency slightly faster than usual — check at the 25-minute mark.
When done, scoop into a bowl and immediately top with toasted unsweetened coconut flakes. The contrast of the cold, smooth chocolate coconut ice cream with the warm crunch of toasted coconut is what makes this recipe so satisfying.
Nutrition Information (Per Serving)
Calories: ~285 | Fat: 26g | Net Carbs: 4g | Protein: 2g | Fiber: 1g
19. Keto Birthday Cake Ice Cream
Prep Time: 5 min | Churn Time: 30 min | Serves: 1
Celebrate any day with a single-serve birthday cake ice cream that is completely sugar-free and low-carb. Almond extract and vanilla give it that iconic cake flavor, while rainbow sugar-free sprinkles make it feel festive and fun — no birthday needed to enjoy this one.
Ingredients
- ½ cup heavy whipping cream
- 2 tablespoons cream cheese, softened
- 1 tablespoon powdered erythritol
- ½ teaspoon vanilla extract
- ¼ teaspoon almond extract
- 1 tablespoon sugar-free rainbow sprinkles (optional)
- Pinch of salt
Instructions
Freeze your Dash My Mug bowl for at least 8 hours. Birthday cake ice cream relies heavily on the balance of almond and vanilla extracts — together they create that signature bakery cake flavor that is instantly recognizable.
In a small mixing bowl, beat the cream cheese until soft and completely lump-free. Smooth cream cheese is particularly important in this recipe because the flavor is delicate and subtle — any texture issues will be more noticeable than in a stronger flavor like chocolate.
Add the powdered erythritol and the pinch of salt to the cream cheese. Mix well until the sweetener is fully dissolved. No gritty bits should remain — if you notice any, stir for another 30 seconds.
Add both the vanilla extract and the almond extract. The combination of these two extracts is what creates that birthday cake magic. The vanilla provides a warm, sweet base while the almond extract adds that faint, slightly floral note that makes it taste unmistakably like cake batter. Stir until the extracts are fully mixed in.
Slowly pour the heavy whipping cream into the cream cheese and extract base while whisking. Whisk until smooth and uniform. The mixture should look creamy white and smell incredible.
If using sugar-free rainbow sprinkles, add about half of them to the mixture now and stir them in gently. The sprinkles add a burst of visual color and a tiny bit of crunch to the base.
Pour the mixture into the frozen Dash My Mug bowl. Scatter the remaining sprinkles on top of the mixture before closing the lid. Churn for 30 minutes.
When the cycle finishes, serve in a small bowl with extra sprinkles on top. You can also top with a small swirl of sugar-free whipped cream for a fully festive presentation.
Nutrition Information (Per Serving)
Calories: ~280 | Fat: 27g | Net Carbs: 2g | Protein: 3g | Fiber: 0g
20. Keto Avocado Ice Cream
Prep Time: 5 min | Churn Time: 30 min | Serves: 1
Ripe avocado creates one of the creamiest, smoothest keto ice cream bases you will ever taste. Mild in flavor but rich in healthy fats, this green scoop is a nutritional powerhouse dressed up as dessert. A squeeze of lime and a touch of vanilla turn it into something truly special.
Ingredients
- ½ ripe avocado (about ¼ cup mashed)
- ¼ cup heavy whipping cream
- 1 tablespoon cream cheese, softened
- 1 tablespoon powdered erythritol
- 1 teaspoon fresh lime juice
- ¼ teaspoon vanilla extract
- Pinch of salt
Instructions
Freeze your Dash My Mug bowl for 8 to 10 hours. The avocado must be fully ripe for this recipe — press gently on the skin and it should give slightly without feeling mushy. Underripe avocado will taste bitter and grassy; overripe avocado can have an off flavor.
Cut the avocado in half and remove the pit. Scoop out exactly half of the avocado flesh into a small bowl. Mash it thoroughly with a fork until it is completely smooth. Any chunks of avocado in the base will not churn well and can create uneven frozen pockets.
After mashing, squeeze the fresh lime juice over the mashed avocado immediately. Lime juice does two things — it prevents the avocado from browning, and it adds a bright citrus note that lifts the otherwise mild avocado flavor.
In a separate small bowl, beat the cream cheese until smooth. Add the powdered erythritol and the pinch of salt and mix until the sweetener is fully incorporated.
Add the mashed, lime-drizzled avocado to the cream cheese base. Stir vigorously until the two are fully combined and no distinct green chunks or white cream cheese streaks remain. The mixture should look a uniform pale green.
Add the vanilla extract and stir one more time. The vanilla is subtle here but adds a gentle sweetness that rounds out the lime and avocado.
Pour the heavy whipping cream into the avocado base slowly while whisking. Whisk until smooth and creamy. The finished mixture should be a pale, beautiful green with a thick, rich consistency.
Pour into the frozen Dash My Mug bowl, secure the lid, and start the machine. Let it churn for the full 30 minutes. The high fat content of the avocado will create an exceptionally smooth, creamy texture.
Serve topped with a thin slice of lime, a sprinkle of flaky sea salt, or a few crushed pistachios for added crunch and visual contrast.
Nutrition Information (Per Serving)
Calories: ~255 | Fat: 24g | Net Carbs: 3g | Protein: 2g | Fiber: 2g
Customizing Your Keto Ice Cream Recipes
One of the best parts about making your own dash my mug ice cream maker keto recipes is how easy it is to make every flavor your own. Once you master the basic cream and sweetener base, the possibilities are endless. Here are four easy ways to take your recipes further:
1. Best Keto Toppings. Great toppings add texture and extra flavor without adding many carbs. Try crushed pecans, walnuts, or macadamia nuts for healthy fat and crunch. Sugar-free chocolate chips, a drizzle of melted almond butter, unsweetened shredded coconut, or a light dusting of cacao nibs all work beautifully. A spoonful of sugar-free whipped cream adds a classic finishing touch with almost zero carbs.
2. Adding Extra Protein. To turn your ice cream into a more filling snack or post-workout treat, add one tablespoon of unflavored or vanilla protein powder to your base. Collagen peptides also work well — they blend in smoothly and do not affect the flavor or texture noticeably. Adding protein helps you feel fuller longer and supports muscle recovery, all while keeping the recipe keto-compliant.
3. Dairy-Free Keto Variations. For those who are lactose-intolerant or prefer to avoid dairy, full-fat coconut cream is the best substitute for heavy whipping cream. Use coconut cream cheese or a small amount of soaked and blended raw cashews in place of regular cream cheese. The results are nearly as creamy and rich, with a mild coconut undertone that pairs well with most flavor profiles, especially tropical and chocolate combinations.
4. Nut-Free Alternatives. Many keto recipes rely on nut-based mix-ins for texture, but seed-based options work just as well. Toasted pumpkin seeds, sunflower seed butter, and hemp seeds are great alternatives for anyone with nut allergies. For crunch without nuts, try sugar-free granola made with seeds and coconut, or crushed keto-friendly seed crackers. These alternatives keep the texture interesting while staying completely nut-free and keto-safe.
Conclusion
Making keto ice cream at home with the Dash My Mug Ice Cream Maker gives you total control over what goes into your food. You choose the ingredients, you adjust the sweetness, you pick the flavors — and you do it all in about 30 minutes or less. No store-bought keto ice cream can match that level of freshness or customization. The machine is affordable, easy to clean, and perfectly sized for a single serving, which means less waste and better portion control.
These 20 dash my mug ice cream maker keto recipes are just the beginning. Once you get comfortable with the basic cream and sweetener base, start experimenting. Swap vanilla for rose water. Add a pinch of cayenne to your chocolate. Try black sesame paste for an Asian-inspired flavor. Blend in freeze-dried fruit for concentrated color and taste. The base formula is forgiving and flexible, which makes it a great canvas for creative flavor combinations.
Low-carb eating does not have to mean giving up the foods you love. With the right tools and simple recipes, you can make desserts that feel indulgent, taste amazing, and still support your health goals. The Dash My Mug Ice Cream Maker is one of the most practical small appliances a keto household can own — easy enough for a weeknight treat and impressive enough to serve to guests. So freeze that bowl, mix up a base, and start exploring all the delicious possibilities waiting for you.