
A waffle maker is one of those kitchen tools that earns its spot on the counter fast. Once you start using it, you keep finding new reasons to pull it out — not just for breakfast, but for lunch, dinner, and snacks too.
Bella waffle maker recipes cover a lot of ground. You can go sweet with chocolate chips and Nutella, or savory with cheddar cheese and crispy hash browns.
You can even make healthy versions with oats, whole wheat, or almond flour. The Bella waffle maker is small, easy to use, and heats up quickly — perfect for anyone cooking at home.
New cooks love it because there’s no complicated setup. Experienced cooks love it because of how much you can do with it.
Whether you’re feeding one person or a whole family, these Bella waffle maker recipes give you plenty of options to try.

Why Use a Bella Waffle Maker for Recipes
1. Convenience and speed. The Bella waffle maker heats up in just a few minutes. You don’t need to wait long before you start cooking. Most recipes are ready in under 10 minutes from start to finish, making it a great tool for busy mornings or quick weeknight meals.
2. Even cooking and crispy texture. The top and bottom plates heat at the same time. That means your food gets cooked evenly on both sides at once. You get a golden, crispy outside and a soft, fully cooked inside every time — without flipping or guessing.
3. Compact and beginner-friendly. The Bella waffle maker doesn’t take up much space. It’s easy to store in a cabinet or leave on the counter. There are no complicated buttons or settings. You plug it in, wait for the light, pour in your batter, and close the lid. That’s it.
4. Great for experimenting beyond traditional waffles. The waffle iron plates are not just for waffle batter. You can press hash browns, pizza dough, brownie batter, cake mix, and even instant noodles between the plates. The result is always crispy, golden, and cooked through — no matter what you put inside.
1. Classic Buttermilk Waffles
Prep Time: 10 minutes | Cook Time: 5 minutes per waffle | Serves: 4
Light and golden on the outside, soft and fluffy on the inside — classic buttermilk waffles are the kind of breakfast that makes the whole kitchen smell amazing. The buttermilk gives them a gentle tang that balances the sweetness perfectly. These are great topped with butter and maple syrup, fresh berries, or even a light dusting of powdered sugar.
Ingredients:
- 2 cups all-purpose flour
- 2 tablespoons granulated sugar
- 1 teaspoon baking powder
- ½ teaspoon baking soda
- ½ teaspoon salt
- 2 cups buttermilk
- 2 large eggs
- ⅓ cup melted unsalted butter
- 1 teaspoon vanilla extract
- Non-stick cooking spray
Instructions:
Start by plugging in your Bella waffle maker and letting it preheat. Most Bella models have an indicator light that turns green or red when the plates are hot enough. While the machine heats up, gather your dry ingredients.
In a large mixing bowl, add the all-purpose flour, granulated sugar, baking powder, baking soda, and salt. Whisk these together until they are evenly combined. Breaking up any small lumps now will help your batter come together smoothly later.
In a separate medium-sized bowl, crack in the two eggs and beat them lightly with a fork or whisk. Then add the buttermilk, melted butter, and vanilla extract. Stir everything together until the liquid mixture is fully blended. Make sure your melted butter has cooled slightly before adding it to the eggs — hot butter can cook the eggs and make the batter lumpy.
Now pour the wet ingredients into the bowl with the dry ingredients. Use a rubber spatula or wooden spoon to fold the two together gently. Stir just until you no longer see streaks of dry flour. Small lumps in the batter are completely fine and actually good — they mean you haven’t over-mixed it. Over-mixing develops gluten in the flour, which makes waffles tough and chewy instead of light and fluffy.
Let the batter rest for 3 to 5 minutes. This short rest allows the baking powder and baking soda to start working, giving your waffles more lift when they hit the hot plates.
Lightly spray the top and bottom plates of your Bella waffle maker with non-stick cooking spray. Even if your machine is non-stick, a light coat of spray helps achieve a crispier, more golden exterior. Pour enough batter to fill the plates without overflowing — this is usually about ¾ cup depending on your Bella model’s size. Close the lid gently and do not press down on it.
Cook for approximately 4 to 5 minutes. Do not open the lid before the timer is up or before the steam noticeably slows down. Opening early causes the waffle to tear apart because it hasn’t set yet. Once the waffle is golden and releases easily from the plates without sticking, it’s ready.
Carefully lift the waffle out using a fork or silicone tongs. Place it on a wire rack rather than a plate right away — this keeps the bottom crispy instead of steaming itself soft. Repeat with the remaining batter, re-spraying the plates between each waffle.
Serve warm with maple syrup, fresh fruit, or whipped cream.
2. Crispy Belgian Waffles
Prep Time: 15 minutes | Cook Time: 6 minutes per waffle | Serves: 4
Belgian waffles are thicker and crispier than regular waffles, with deeper pockets that hold toppings perfectly. The secret to their light, airy texture is separating the eggs and folding in whipped egg whites. It takes one extra step, but the result is absolutely worth it. Top them with strawberries and whipped cream for a classic treat.
Ingredients:
- 2 cups all-purpose flour
- 1 tablespoon baking powder
- 2 tablespoons sugar
- ½ teaspoon salt
- 2 eggs, separated
- 1¾ cups whole milk
- ½ cup melted butter
- 1 teaspoon vanilla extract
- Non-stick cooking spray
Instructions:
Preheat your Bella waffle maker and let it come to full temperature before you begin. This is especially important for Belgian-style waffles, as starting on a cool surface will prevent the outside from getting crispy.
Begin by separating the eggs carefully. Crack each egg and separate the yolk from the white, placing the whites in a clean, dry bowl and the yolks in a larger mixing bowl. Any trace of yolk in the whites will prevent them from whipping properly, so take your time with this step.
Add the milk, melted butter, and vanilla extract to the bowl with the egg yolks. Whisk until combined. In another bowl, mix together the flour, baking powder, sugar, and salt. Pour the wet yolk mixture into the dry ingredients and stir gently until a smooth batter forms. A few small lumps are fine — don’t over-stir.
Now take your egg whites and beat them with a hand mixer or stand mixer on medium-high speed. Beat until stiff peaks form — this means when you lift the beaters, the white holds its shape in a firm point without flopping over. This takes about 2 to 3 minutes depending on your mixer speed.
Using a rubber spatula, gently fold the whipped egg whites into the waffle batter in three additions. Use a light, sweeping motion — scoop from the bottom and fold over the top. Don’t stir aggressively; you want to keep as much air in the whites as possible. The batter will look slightly lumpy and airy when done. That’s exactly right.
Spray the preheated waffle plates generously with cooking spray. Pour batter onto the center of the lower plate, spreading slightly if needed. Close the lid and cook for 5 to 6 minutes. Belgian waffles need a full cook to develop their crispy shell — resist opening early.
When the waffle is deep golden and lifts freely from the plates, carefully remove it with silicone tongs. Rest on a wire rack for one minute before serving to keep the exterior crisp.
3. Vanilla Breakfast Waffles
Prep Time: 10 minutes | Cook Time: 5 minutes per waffle | Serves: 4
These waffles have a warm, sweet vanilla flavor that makes them taste like a special treat even on an ordinary morning. Made with simple pantry ingredients, they’re soft inside with just the right golden crisp on the edges. A drizzle of honey or a spoon of fruit preserves takes them to the next level.
Ingredients:
- 1¾ cups all-purpose flour
- 2 teaspoons baking powder
- 1 tablespoon sugar
- ¼ teaspoon salt
- 1½ cups whole milk
- 2 eggs
- ¼ cup vegetable oil
- 2 teaspoons pure vanilla extract
- Non-stick cooking spray
Instructions:
Plug in your Bella waffle maker and allow it to fully preheat while you prepare the batter. The machine needs to be fully hot before you add any batter — starting on a warm but not fully heated surface will result in pale, soft waffles that don’t crisp properly.
In a large bowl, whisk together the flour, baking powder, sugar, and salt. Stir until the dry ingredients are evenly distributed. In a separate bowl, whisk the eggs until lightly beaten. Add the milk, vegetable oil, and vanilla extract to the eggs and stir well to combine.
Pour the wet ingredients into the dry ingredients and stir gently until just combined. The batter should be smooth with a few small lumps remaining — this is totally normal. Set the batter aside for 3 to 4 minutes to rest. The resting time allows the baking powder to activate slightly before cooking, which helps the waffles rise and become fluffy rather than dense.
Spray the preheated plates with a light coat of non-stick cooking spray on both the top and bottom plates. Pour the appropriate amount of batter into the center of the lower plate. For most Bella waffle makers, this is around ¾ cup. Close the lid carefully and allow it to cook undisturbed.
Cook for 4 to 5 minutes or until steam has mostly stopped escaping from the sides of the machine. The waffles are done when they are golden brown and release cleanly from the plates. If you feel resistance when trying to open the lid, give it another 30 to 60 seconds — it’s not ready yet.
Remove the waffle using a fork or silicone tongs and place it on a wire rack. Serve with honey, jam, maple syrup, or fresh fruit. These vanilla waffles also taste great with a light dusting of powdered sugar.
4. Cinnamon Sugar Waffles
Prep Time: 10 minutes | Cook Time: 5 minutes per waffle | Serves: 4
Warm cinnamon baked right into every bite makes these waffles taste like a cross between a breakfast waffle and a churro. The cinnamon sugar sprinkle on top gives a slight crunch that pairs perfectly with the soft, spiced interior. These work great as a morning treat or an afternoon snack.
Ingredients:
- 2 cups all-purpose flour
- 1 tablespoon baking powder
- 3 tablespoons sugar
- 2 teaspoons ground cinnamon
- ¼ teaspoon nutmeg
- ½ teaspoon salt
- 2 eggs
- 1¾ cups milk
- ⅓ cup melted butter
- 1 teaspoon vanilla extract
- For topping: 2 tablespoons sugar + 1 teaspoon cinnamon mixed together
- Non-stick cooking spray
Instructions:
Preheat your Bella waffle maker fully before starting. While it heats up, make your cinnamon sugar topping by mixing 2 tablespoons of sugar with 1 teaspoon of ground cinnamon in a small bowl. Set this aside — you’ll use it as soon as the waffles come out of the machine while they’re still hot.
In a large bowl, combine the flour, baking powder, sugar, ground cinnamon, nutmeg, and salt. Stir well until the spices are evenly mixed throughout the dry ingredients. In a separate bowl, beat the eggs lightly, then whisk in the milk, melted butter, and vanilla extract.
Pour the wet ingredients into the dry ingredients and fold together with a spatula until just combined. Don’t over-mix — stop as soon as the large streaks of dry flour disappear. Some small lumps are expected and perfectly fine.
Let the batter sit for 3 minutes while you spray the hot waffle plates with cooking spray. Pour batter onto the lower plate and close the lid. Cook for 5 to 6 minutes until golden.
As soon as each waffle comes off the machine, immediately sprinkle the cinnamon sugar mixture over the top surface while it’s still hot. The heat from the waffle will slightly melt the sugar, giving it a light, caramelized crunch on top. This step makes a big difference in flavor and texture.
Serve on their own or with a drizzle of maple syrup, apple butter, or a dollop of whipped cream.
5. Chocolate Chip Waffles
Prep Time: 10 minutes | Cook Time: 5 minutes per waffle | Serves: 4
Melty chocolate chips folded into golden waffle batter — these are the kind of waffles that get kids running to the kitchen. The chips soften inside the waffle as it cooks, creating little pockets of chocolate in every bite. Drizzle with chocolate syrup or add a scoop of vanilla ice cream for a dessert-worthy version.
Ingredients:
- 2 cups all-purpose flour
- 2 tablespoons sugar
- 1 tablespoon baking powder
- ½ teaspoon salt
- 2 eggs
- 1¾ cups milk
- ⅓ cup melted butter
- 1 teaspoon vanilla extract
- ¾ cup semi-sweet chocolate chips
- Non-stick cooking spray
Instructions:
Preheat the Bella waffle maker and allow it to come to full cooking temperature before you add any batter. While it heats up, prepare your batter on the counter.
In a large mixing bowl, whisk together the flour, sugar, baking powder, and salt until the dry ingredients are evenly combined. In a separate smaller bowl, beat the eggs well, then add the milk, melted butter, and vanilla extract. Stir the wet ingredients until fully blended.
Pour the wet mixture into the bowl with the dry ingredients and fold gently with a rubber spatula or wooden spoon. Mix until the batter just comes together — you want to see no dry flour streaks, but don’t continue stirring beyond that point. The batter should look slightly lumpy, and that’s exactly what you want.
Now fold in the chocolate chips. Distribute them evenly throughout the batter by stirring gently two or three times. Using mini chocolate chips works especially well because they spread more evenly across each waffle section.
Let the batter rest for 3 minutes. While it rests, spray the top and bottom plates of your Bella waffle maker with a light coat of non-stick cooking spray. Chocolate chips can sometimes stick to the plates more than plain batter, so don’t skip the spray.
Pour the batter carefully onto the center of the lower plate. Try to keep the batter away from the outer edges so the chocolate chips don’t fall directly onto the hinge or outer trim of the machine. Close the lid firmly but without pressing down hard.
Cook for 5 minutes. Because the chocolate chips release some fat as they melt, the waffles may take just slightly longer to fully set. Wait until the steam slows down before opening. Remove the finished waffle with silicone tongs and place on a wire rack. Serve warm with maple syrup, chocolate drizzle, or powdered sugar.
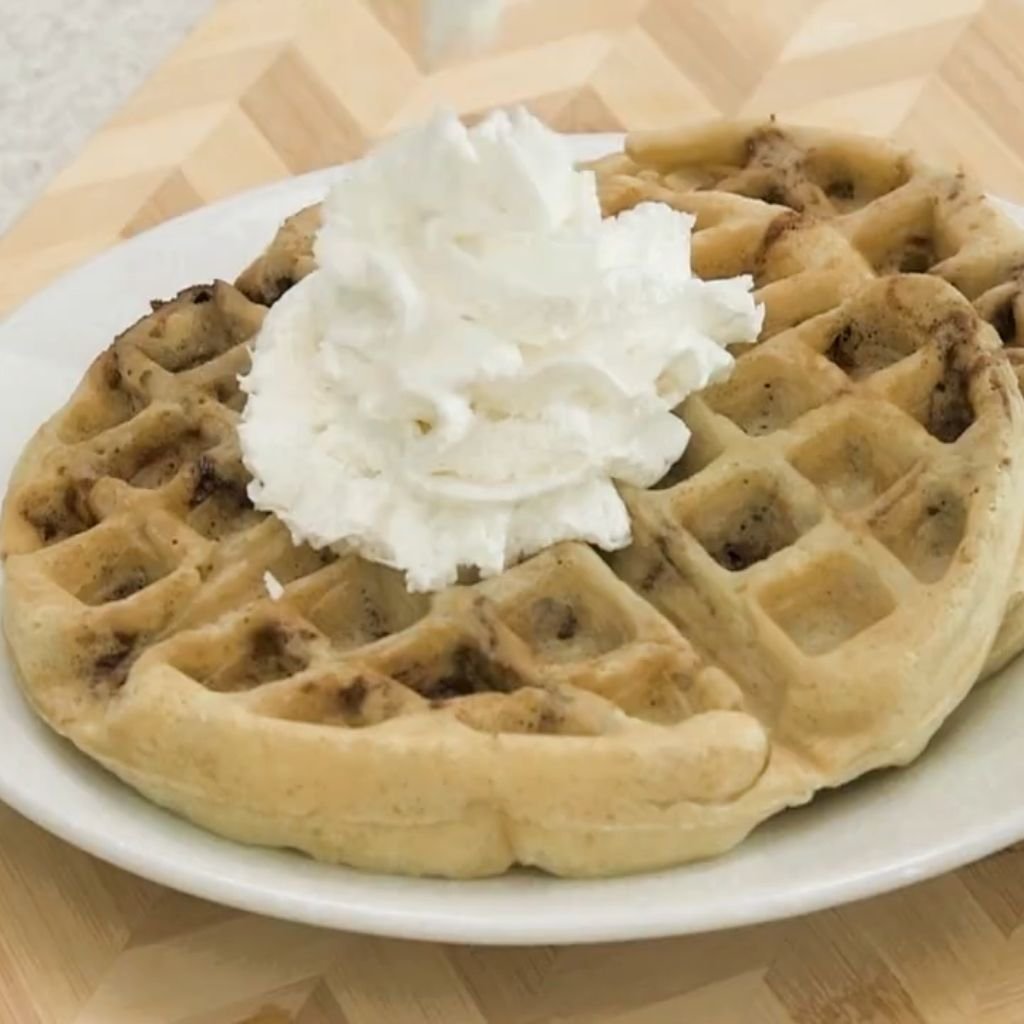
6. Nutella Stuffed Waffles
Prep Time: 15 minutes | Cook Time: 6 minutes per waffle | Serves: 4
Crispy golden waffles with a warm, melted Nutella center — these are as good as they sound. The trick is adding a layer of Nutella between two thin layers of batter so it gets fully sealed inside as the waffle cooks. Every bite has that rich chocolate-hazelnut filling melted right in the middle.
Ingredients:
- 2 cups all-purpose flour
- 1 tablespoon baking powder
- 2 tablespoons sugar
- ½ teaspoon salt
- 2 eggs
- 1¾ cups milk
- ⅓ cup melted butter
- 1 teaspoon vanilla extract
- ½ cup Nutella (approximately 2 tablespoons per waffle)
- Non-stick cooking spray
Instructions:
Begin by preheating your Bella waffle maker until the indicator light signals it’s ready. Before making the batter, spoon the Nutella into a small bowl and let it sit at room temperature — it’s much easier to spread when it’s soft and slightly warm. You can also microwave it for 10 to 15 seconds to loosen it up.
Make the waffle batter by combining the flour, baking powder, sugar, and salt in a large bowl. In a separate bowl, whisk together the eggs, milk, melted butter, and vanilla extract. Pour the wet mixture into the dry ingredients and stir gently until just combined. Let the batter rest for 3 minutes.
Spray the hot plates of the Bella waffle maker well with non-stick cooking spray. This recipe especially benefits from a generous coating because the Nutella filling can ooze slightly and stick to the plates.
Pour a thin first layer of batter onto the lower plate — about half of what you’d normally use for a full waffle. This first layer should just barely cover the surface of the lower plate. Close the lid for just 60 to 90 seconds to let this base layer begin to set. It won’t be fully cooked yet — you just want it to form a light skin on top.
Open the lid carefully and quickly drop 2 tablespoons of Nutella in small dollops across the center of the partially cooked batter. Work quickly and keep the Nutella away from the very edges so it doesn’t spill out. Pour another thin layer of batter on top of the Nutella, completely covering it. Close the lid fully.
Cook for 5 to 6 minutes until fully golden. The outer layers will cook through and seal the Nutella inside. Remove carefully and let cool for one minute before cutting — the Nutella center stays very hot. Serve with sliced bananas or a dusting of powdered sugar.
7. Banana Bread Waffles
Prep Time: 10 minutes | Cook Time: 5 minutes per waffle | Serves: 4
All the cozy flavor of banana bread, made in the waffle maker in under 30 minutes. Using overripe bananas gives these waffles the sweetest, most intense banana flavor. The outside gets crispy and golden while the inside stays moist and soft — like a portable slice of banana bread you can hold in your hand.
Ingredients:
- 2 very ripe bananas, mashed
- 1½ cups all-purpose flour
- 1 teaspoon baking powder
- ½ teaspoon baking soda
- 1 teaspoon cinnamon
- ¼ teaspoon salt
- 2 eggs
- ¾ cup milk
- ¼ cup melted butter or coconut oil
- 3 tablespoons brown sugar
- 1 teaspoon vanilla extract
- Non-stick cooking spray
Instructions:
Preheat the Bella waffle maker and allow it to fully heat up before you begin. While it heats, mash your bananas in a large bowl using a fork until they become a smooth, thick paste. A few small lumps are fine — they add texture. The riper your bananas are, the sweeter and more flavorful your waffles will be. Bananas with plenty of dark spots on the skin are ideal.
To the mashed bananas, add the eggs, milk, melted butter (or coconut oil), brown sugar, and vanilla extract. Stir well until everything is combined into a smooth wet mixture.
In a separate bowl, whisk together the flour, baking powder, baking soda, cinnamon, and salt. Pour the banana wet mixture into the dry ingredients and fold gently until just combined. The batter will be slightly thicker than regular waffle batter because of the bananas — this is normal. Do not over-mix.
Let the batter rest for 3 to 4 minutes. During this time, spray the preheated plates of the Bella waffle maker generously with non-stick cooking spray. Because this batter is denser than standard waffle batter, it benefits from a good coat of spray to ensure easy release.
Pour the batter onto the lower plate. Banana bread waffles tend to be thicker, so you may use slightly less batter than usual to avoid overflow. Close the lid and cook for 5 to 6 minutes.
Check by opening the lid slowly. The waffle should be deep golden brown and pull away from the plates without tearing. If it sticks, give it another 30 to 45 seconds. Remove and serve warm with sliced bananas on top, a drizzle of honey, or a smear of peanut butter.
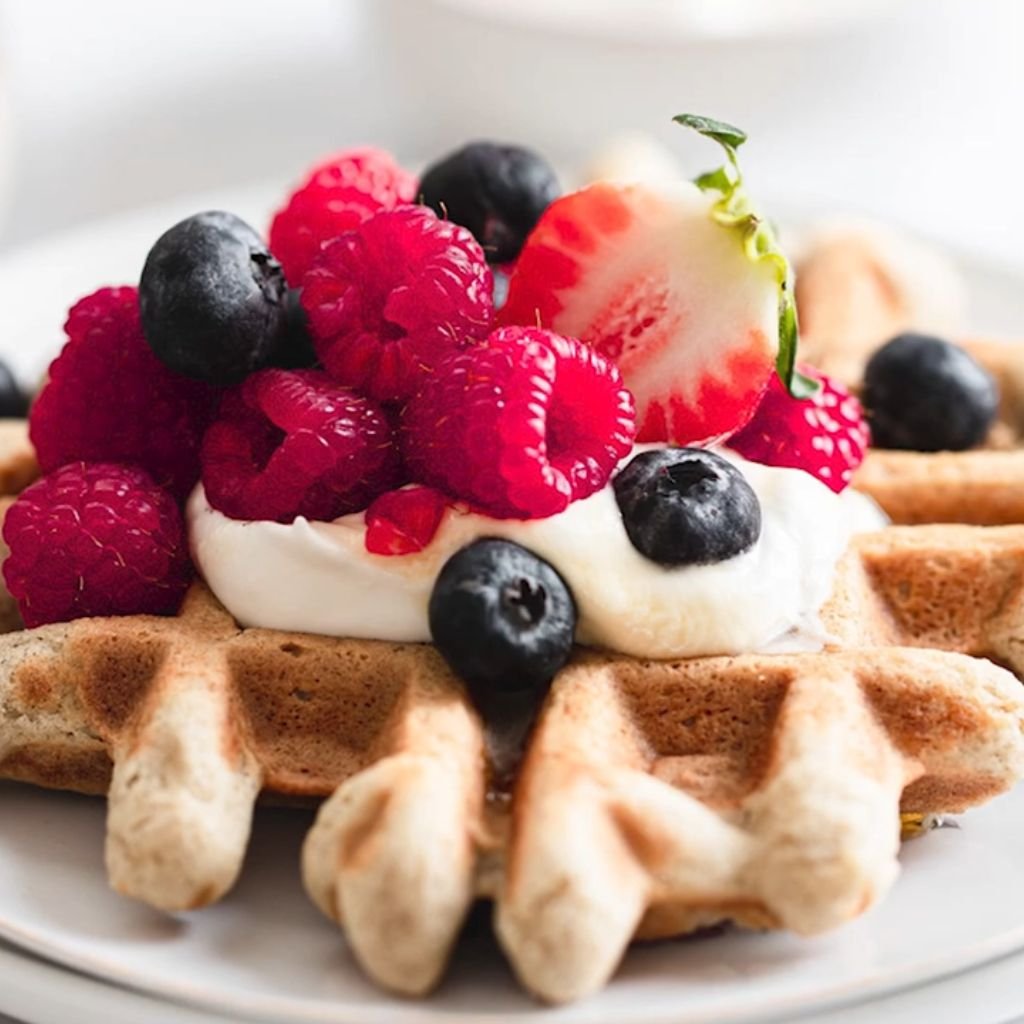
8. Strawberry Shortcake Waffles
Prep Time: 15 minutes | Cook Time: 5 minutes per waffle | Serves: 4
Golden, slightly sweet waffles topped with fresh macerated strawberries and a cloud of whipped cream — this is a dessert that also works beautifully as a special breakfast. The macerated strawberries soften in sugar and release their natural juices, making a bright, fruity topping that soaks into every waffle pocket.
Ingredients:
- 2 cups all-purpose flour
- 2 tablespoons sugar
- 1 tablespoon baking powder
- ½ teaspoon salt
- 2 eggs
- 1¾ cups milk
- ⅓ cup melted butter
- 1 teaspoon vanilla extract
- For topping: 2 cups fresh strawberries, sliced + 2 tablespoons sugar + whipped cream
- Non-stick cooking spray
Instructions:
Before making the waffle batter, prepare your strawberries. Wash, hull, and slice the strawberries into thin pieces. Place them in a bowl, sprinkle with 2 tablespoons of sugar, and stir gently. Set aside on the counter for at least 10 to 15 minutes. During this time, the sugar draws out the strawberry juices and makes the berries soft, sweet, and syrupy. This process is called maceration and makes a huge difference in the topping’s flavor compared to plain sliced berries.
While the strawberries macerate, preheat your Bella waffle maker. In a large bowl, whisk together the flour, sugar, baking powder, and salt. In a separate bowl, beat the eggs and stir in the milk, melted butter, and vanilla extract. Pour the wet ingredients into the dry and fold together until just combined.
Spray the hot plates with cooking spray. Pour batter onto the lower plate and close the lid. Cook for 5 minutes until golden. Remove the waffle to a plate.
Top each waffle immediately with a generous spoonful of the macerated strawberries, letting the juices drip into the waffle pockets. Add a dollop or spray of whipped cream on top. Serve right away while the waffle is still warm and the cream is still cold — the contrast in temperature makes every bite really enjoyable.
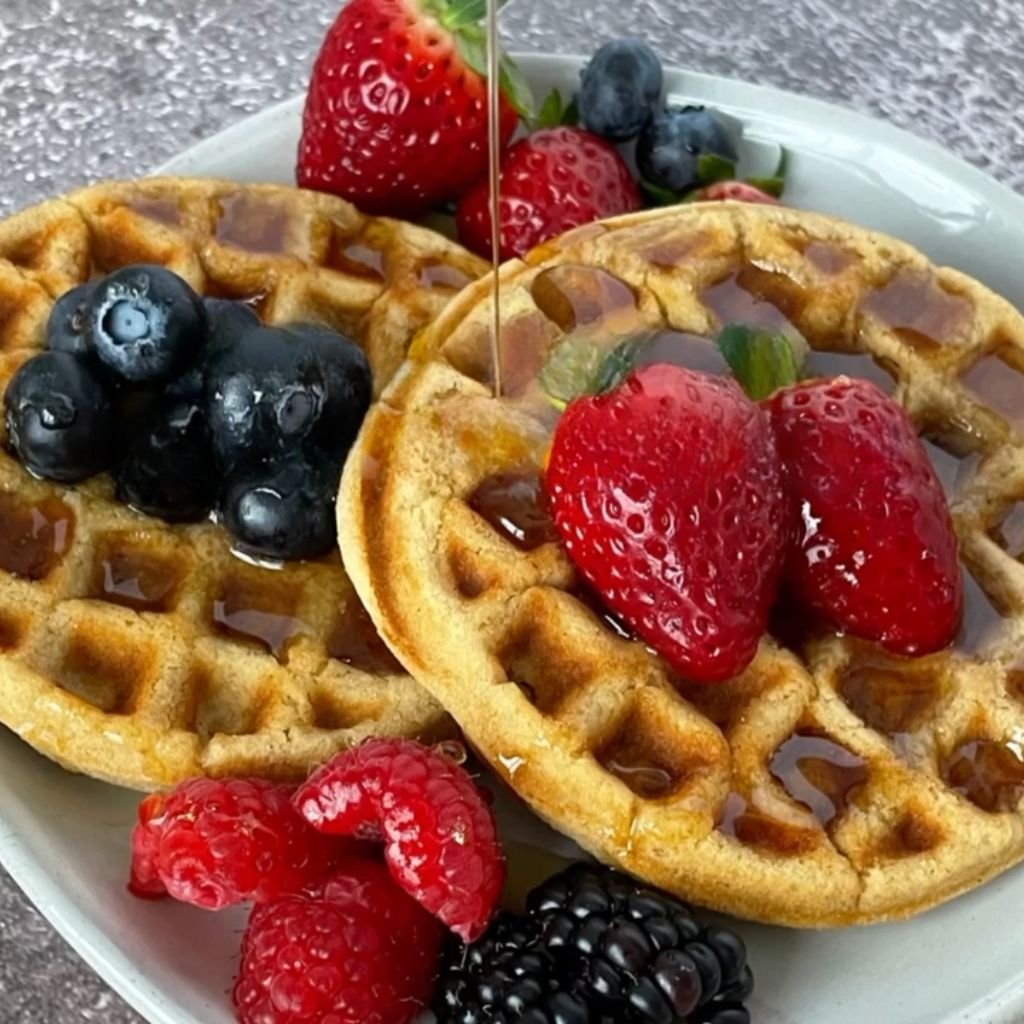
9. Blueberry Lemon Waffles
Prep Time: 10 minutes | Cook Time: 5 minutes per waffle | Serves: 4
Fresh lemon zest brightens up the batter, and juicy blueberries burst as the waffle cooks — this is a bright, fresh-tasting waffle that feels light and summery. The lemon cuts through the sweetness and the blueberries add little pops of flavor throughout. Great with a simple lemon glaze drizzled on top.
Ingredients:
- 2 cups all-purpose flour
- 2 tablespoons sugar
- 1 tablespoon baking powder
- ½ teaspoon salt
- 2 eggs
- 1¾ cups buttermilk
- ⅓ cup melted butter
- Zest of 1 large lemon
- 1 tablespoon fresh lemon juice
- 1 cup fresh or frozen blueberries
- Non-stick cooking spray
- Optional glaze: ½ cup powdered sugar + 1 tablespoon lemon juice
Instructions:
Preheat your Bella waffle maker. If using frozen blueberries, keep them frozen until you’re ready to fold them into the batter — thawed blueberries release too much juice and can make the batter soggy and turn it purple.
In a large bowl, whisk together the flour, sugar, baking powder, and salt. In a separate bowl, whisk the eggs until lightly beaten. Add the buttermilk, melted butter, lemon zest, and lemon juice to the eggs and stir well to combine. The buttermilk adds a slight tang that pairs beautifully with the lemon.
Pour the wet mixture into the dry ingredients and fold together until just combined — stop mixing as soon as the flour streaks disappear. Now gently fold in the blueberries using only 2 or 3 slow folds. Over-folding will crush the berries and turn the batter blue.
Let the batter rest for 3 minutes. Spray the preheated plates with non-stick cooking spray. Blueberries can stick more than plain batter, so make sure the coating is thorough on both the top and bottom plates.
Pour batter carefully onto the lower plate. Close the lid and cook for 5 to 6 minutes. Blueberries release moisture as they cook, so the waffle may need a little extra time to fully set. Wait until the steam fully subsides before opening the lid.
Remove with silicone tongs. For the optional lemon glaze, mix powdered sugar with fresh lemon juice until smooth and drizzle over the warm waffles right before serving.
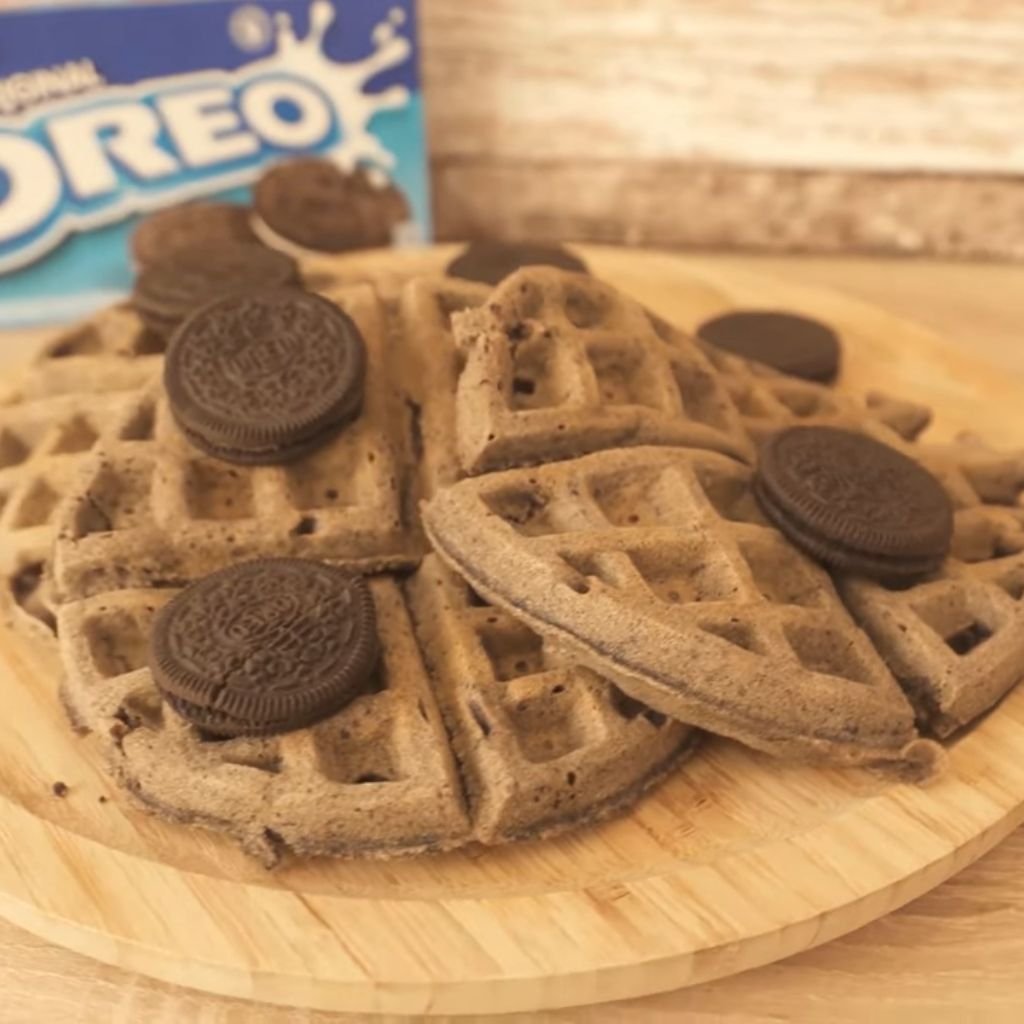
10. Oreo Waffles
Prep Time: 10 minutes | Cook Time: 5 minutes per waffle | Serves: 4
Crushed Oreo cookies folded into a sweet waffle batter create a cookies-and-cream waffle that’s crispy, indulgent, and completely fun to make. The Oreo pieces get baked right into the waffle, and the cream filling melts slightly into the batter. Top with whipped cream and extra crushed Oreos for the full effect.
Ingredients:
- 2 cups all-purpose flour
- 2 tablespoons sugar
- 1 tablespoon baking powder
- ½ teaspoon salt
- 2 eggs
- 1¾ cups milk
- ⅓ cup melted butter
- 1 teaspoon vanilla extract
- 15 Oreo cookies, roughly crushed
- Non-stick cooking spray
- Topping: whipped cream and extra crushed Oreos
Instructions:
Before making the batter, crush the Oreo cookies. Place them in a zip-lock bag and use a rolling pin to break them into uneven pieces — some small crumbs and some larger chunks. Don’t crush them to a fine powder; you want real texture in the batter. Set the crushed Oreos aside.
Preheat your Bella waffle maker fully. In a large mixing bowl, whisk together the flour, sugar, baking powder, and salt. In a separate bowl, beat the eggs, then stir in the milk, melted butter, and vanilla extract until fully blended.
Pour the wet mixture into the dry ingredients and fold gently until just combined. Then add the crushed Oreos and fold them in with 3 to 4 gentle strokes. You want the Oreo pieces distributed evenly without over-mixing the batter.
Spray the hot plates of the Bella waffle maker generously with non-stick cooking spray. Oreo pieces can stick to the surface, especially the chocolate cookie portions, so coat the plates well on both sides.
Pour batter onto the lower plate. Close the lid and cook for 5 minutes. Because of the Oreo pieces in the batter, the waffle surface may look a little darker in spots — this is the Oreo cookie portions getting crispy, not burnt. Open the lid once steam has slowed down and the waffle lifts without sticking.
Remove and place on a wire rack. Top with fresh whipped cream and a handful of additional crushed Oreos sprinkled over the top. Serve immediately while the waffle is still warm.
11. Cheddar Cheese Waffles
Prep Time: 10 minutes | Cook Time: 5 minutes per waffle | Serves: 4
Sharp cheddar melted right into a savory waffle batter creates something completely different from your typical sweet waffle. These cheese waffles are crispy on the outside, cheesy in the middle, and perfect on their own or as a base for fried eggs, pulled pork, or chili. The cheese also creates little crispy edges where it meets the hot plates.
Ingredients:
- 1¾ cups all-purpose flour
- 1 tablespoon baking powder
- 1 teaspoon sugar
- ½ teaspoon salt
- ½ teaspoon garlic powder
- ¼ teaspoon black pepper
- 2 eggs
- 1½ cups milk
- ¼ cup melted butter
- 1½ cups shredded sharp cheddar cheese
- Non-stick cooking spray
Instructions:
Preheat your Bella waffle maker. While it heats up, start building the batter. In a large mixing bowl, whisk together the flour, baking powder, sugar, salt, garlic powder, and black pepper. These seasonings give the waffles a savory, slightly aromatic flavor that complements the sharp cheddar well. If you like more garlic flavor, you can increase the garlic powder to ¾ teaspoon.
In a separate bowl, beat the eggs and then add the milk and melted butter. Stir until the wet ingredients are fully blended. Pour the wet mixture into the dry ingredients and fold together until just combined.
Add the shredded cheddar cheese and fold it into the batter evenly. Try to distribute the cheese throughout the batter as evenly as possible so that every section of the waffle has cheese in it. Using freshly shredded cheese works better than pre-packaged shredded cheese because it melts more smoothly and creates less clumping.
Spray the hot plates of the Bella waffle maker well with cooking spray. Cheese naturally releases oils as it heats, but cheese can also stick and burn if the plates aren’t prepped properly. Be especially thorough in coating the outer corners of the plates.
Pour the batter onto the lower plate. Cheese waffles tend to be slightly heavier than regular waffles, so close the lid gently without forcing it. Cook for 5 to 6 minutes. When you open the lid, you’ll notice the edges of the waffle where the cheese met the hot plates will have crisped into golden, lacy edges. That’s the best part.
Remove the waffle and serve hot. These are excellent topped with a fried egg, a drizzle of hot sauce, or served alongside tomato soup as a savory dip.
12. Bacon & Egg Breakfast Waffles
Prep Time: 15 minutes | Cook Time: 6 minutes per waffle | Serves: 4
A complete breakfast cooked all at once — bacon pieces and scrambled egg folded directly into the waffle batter. These are hearty, filling, and surprisingly easy to make. They’re great for mornings when you want something substantial without making multiple dishes. Everything cooks together in the waffle maker at the same time.
Ingredients:
- 1¾ cups all-purpose flour
- 1 tablespoon baking powder
- ½ teaspoon salt
- ¼ teaspoon black pepper
- 3 eggs (1 for batter, 2 lightly scrambled and cooked for mixing in)
- 1½ cups milk
- ¼ cup melted butter
- 6 slices bacon, cooked and crumbled
- ½ cup shredded cheddar cheese
- Non-stick cooking spray
Instructions:
Start by cooking the bacon. Place the bacon strips in a skillet over medium heat and cook until fully crispy. Drain on paper towels and let cool for 2 minutes, then crumble into small pieces. Set aside.
Next, lightly scramble 2 of the eggs. Crack them into a small bowl, beat with a fork, add a pinch of salt and pepper, and cook in a small non-stick pan over medium-low heat, stirring frequently. Remove the eggs from the heat when they are just set — slightly underdone is fine because they’ll finish cooking inside the waffle. Let them cool slightly and chop into small pieces.
Preheat your Bella waffle maker. In a large bowl, whisk together the flour, baking powder, salt, and pepper. In a separate bowl, beat the remaining 1 egg, then add the milk and melted butter and stir to combine.
Pour the wet mixture into the dry ingredients and fold until just combined. Add the crumbled bacon, chopped scrambled eggs, and shredded cheddar cheese. Fold everything in gently with 3 to 4 strokes, distributing the mix-ins throughout the batter.
Spray the preheated plates generously with cooking spray. Pour the batter onto the lower plate. Because this batter has solid mix-ins, it may be slightly thicker. Close the lid and cook for 5 to 6 minutes until golden and fully set.
Remove carefully and serve hot. A drizzle of hot sauce or a side of ketchup pairs well with these savory breakfast waffles.
13. Hash Brown Waffles
Prep Time: 15 minutes | Cook Time: 8 minutes per waffle | Serves: 4
Shredded potatoes pressed into the waffle iron come out with the most perfectly crispy exterior and a soft, cooked-through interior. Hash brown waffles are one of the best uses for a Bella waffle maker — the flat, even pressure gives potatoes the crunch that’s hard to achieve in a skillet. Serve with sour cream, eggs, or smoked salmon.
Ingredients:
- 3 large russet potatoes, peeled and grated
- 1 small onion, finely grated
- 2 eggs
- 2 tablespoons all-purpose flour
- ½ teaspoon garlic powder
- ½ teaspoon salt
- ¼ teaspoon black pepper
- 2 tablespoons butter, melted
- Non-stick cooking spray
Instructions:
The most important step in making great hash brown waffles is removing as much moisture from the grated potatoes as possible. After grating the potatoes and onion, place them together in the center of a clean kitchen towel or several layers of paper towels. Gather the towel around the potato mixture and squeeze as hard as you can over the sink. Repeat this squeezing several times — you’ll be surprised how much liquid comes out. The drier your potato mixture, the crispier your waffles will be. Wet potatoes steam instead of crisp.
Transfer the dried potato and onion mixture to a large bowl. Add the eggs, flour, garlic powder, salt, pepper, and melted butter. Mix everything together until the potatoes are evenly coated and the egg and flour hold everything together. The mixture should look like shredded hash browns with a light binding — not a wet batter.
Preheat your Bella waffle maker and spray the plates generously with non-stick cooking spray. Because these are potatoes rather than batter, they need more oil to get properly crispy. Don’t be shy with the spray.
Scoop the potato mixture onto the lower plate and spread it out to fill the plate evenly. Press it down slightly with the back of a spoon. Close the lid firmly and apply a small amount of gentle downward pressure — unlike regular waffles, pressing hash browns helps compact them and ensures good contact with both hot plates.
Cook for 7 to 8 minutes without opening the lid. Hash brown waffles need a full cook to become properly crispy. When they’re ready, they’ll release from the plates without sticking. Remove carefully and serve immediately — they lose some crispness as they sit.
14. Pizza Waffles
Prep Time: 10 minutes | Cook Time: 5 minutes per waffle | Serves: 4
Pizza toppings pressed between layers of waffle batter — this is a dinner idea that the whole family will get excited about. Mozzarella, pepperoni, and pizza sauce get sealed inside a crispy golden waffle. You can customize the fillings completely, making it a great way to use up whatever toppings you have in the fridge.
Ingredients:
- 1¾ cups all-purpose flour
- 1 tablespoon baking powder
- ½ teaspoon salt
- ½ teaspoon dried oregano
- ½ teaspoon garlic powder
- 2 eggs
- 1½ cups milk
- ¼ cup olive oil
- ¼ cup pizza sauce (for inside)
- ¾ cup shredded mozzarella cheese
- ½ cup mini pepperoni or sliced pepperoni, chopped
- Extra pizza sauce for dipping
- Non-stick cooking spray
Instructions:
Preheat your Bella waffle maker. In a large bowl, whisk together the flour, baking powder, salt, dried oregano, and garlic powder. The oregano and garlic powder season the waffle batter itself so that even the outer shell of the waffle tastes like pizza crust.
In a separate bowl, beat the eggs, then add the milk and olive oil and stir well. Pour the wet mixture into the dry ingredients and fold until just combined.
Spray the hot plates well with cooking spray. Pour a thin first layer of batter onto the lower plate — just enough to cover the surface. Close the lid for 60 to 90 seconds to let this base layer start setting slightly. Open the lid carefully.
Quickly spread 1 tablespoon of pizza sauce over the center of the partially set batter. Sprinkle a portion of shredded mozzarella and a handful of pepperoni pieces on top. Work fast — the first layer is hot and you want to seal everything in before it overcooks.
Pour another thin layer of batter over the top of the filling, covering it completely. Close the lid and cook for 5 minutes until golden and fully set. The mozzarella will melt inside and the pepperoni will heat through. Open carefully — melted cheese near the hinge can stick.
Remove and serve with a bowl of warm pizza sauce on the side for dipping. These are messy in the best way.
15. Chicken and Waffles
Prep Time: 20 minutes | Cook Time: 5 minutes per waffle | Serves: 4
A classic Southern-inspired combination — crispy fried chicken served on top of a golden waffle with a drizzle of hot sauce and maple syrup. The sweet and savory contrast is what makes this dish so special. For the easiest version, use pre-cooked crispy chicken strips and focus your effort on making perfect waffles.

Ingredients:
- For waffles: 2 cups all-purpose flour, 1 tablespoon baking powder, 1 tablespoon sugar, ½ teaspoon salt, 2 eggs, 1¾ cups buttermilk, ⅓ cup melted butter, 1 teaspoon vanilla extract
- For chicken: 4 crispy chicken strips or thighs (store-bought or homemade)
- For serving: maple syrup, hot sauce, butter
- Non-stick cooking spray
Instructions:
If making homemade fried chicken, season boneless chicken thighs or strips with salt, pepper, garlic powder, and paprika. Dredge in flour, dip in egg, then coat in seasoned breadcrumbs or flour again. Fry in oil at 350°F until fully cooked through and deeply golden — about 6 to 8 minutes per side depending on thickness. Drain on paper towels. Alternatively, use good-quality store-bought crispy chicken strips reheated in the oven at 375°F for 10 minutes until hot and crispy.
Preheat your Bella waffle maker. Make the waffle batter by whisking together the flour, baking powder, sugar, and salt in a large bowl. In a separate bowl, beat the eggs and stir in the buttermilk, melted butter, and vanilla extract. Pour the wet into the dry and fold until just combined. Let rest for 3 minutes.
Spray the hot plates with cooking spray. Pour batter onto the lower plate and close the lid. Cook for 5 minutes until golden and crispy. The buttermilk batter makes these waffles slightly tangy, which is the perfect base for the savory chicken.
To serve, place a waffle on a plate. Set one or two pieces of crispy chicken directly on top of the waffle. Drizzle lightly with maple syrup first, then add a few shakes of hot sauce over the top. The maple syrup runs into the waffle pockets and the hot sauce adds heat to balance the sweetness. Serve immediately while everything is hot and crispy.
16. Garlic Bread Waffles
Prep Time: 10 minutes | Cook Time: 5 minutes per waffle | Serves: 4
All the flavor of buttery garlic bread made in the waffle maker — golden, garlicky, crispy, and absolutely addictive. These savory waffles are great as a side dish for pasta, soup, or a salad. The garlic butter soaks right into the batter as it cooks, and the Parmesan cheese on top adds a salty, nutty crust.
Ingredients:
- 1¾ cups all-purpose flour
- 1 tablespoon baking powder
- ½ teaspoon salt
- 1 teaspoon garlic powder
- ½ teaspoon onion powder
- ½ teaspoon dried parsley
- 2 eggs
- 1½ cups milk
- ⅓ cup melted garlic butter (or regular butter + 2 minced garlic cloves)
- ½ cup grated Parmesan cheese
- Non-stick cooking spray
Instructions:
Preheat your Bella waffle maker. To make garlic butter, melt unsalted butter in a small saucepan over low heat and add the minced garlic. Let it cook gently for 1 to 2 minutes until the garlic is fragrant but not browned. Remove from heat and let cool slightly before using in the batter. You can also use store-bought garlic butter and melt it directly.
In a large bowl, combine the flour, baking powder, salt, garlic powder, onion powder, and dried parsley. Whisk until the herbs and spices are evenly distributed. In a separate bowl, beat the eggs, then add the milk and the cooled garlic butter. Stir well.
Pour the wet mixture into the dry ingredients and fold together until just combined. Add the grated Parmesan cheese and stir it in gently. Parmesan adds both flavor and helps create a slightly firmer, crispier surface on the waffle.
Spray the hot plates generously with cooking spray. Pour batter onto the lower plate and close the lid. Cook for 5 to 6 minutes. The waffles are done when they are deep golden and smell intensely of garlic and Parmesan.
Remove from the machine and serve immediately. These are best eaten fresh while still hot and crispy. Serve alongside spaghetti and marinara, a bowl of tomato soup, or a simple green salad. You can also brush them with a little additional garlic butter right after they come out of the machine for extra richness.
17. Oatmeal Waffles
Prep Time: 10 minutes | Cook Time: 5 minutes per waffle | Serves: 4
Hearty, filling, and full of fiber — oatmeal waffles are a great way to start the day with sustained energy. Rolled oats blended into the batter give these waffles a slightly nutty flavor and a chewier texture compared to regular waffles. They hold up well under heavy toppings like fresh fruit, nut butter, and honey.
Ingredients:
- 1 cup rolled oats
- 1 cup all-purpose flour
- 2 teaspoons baking powder
- ½ teaspoon cinnamon
- ¼ teaspoon salt
- 1 tablespoon sugar or honey
- 2 eggs
- 1½ cups milk or oat milk
- ¼ cup melted coconut oil or butter
- 1 teaspoon vanilla extract
- Non-stick cooking spray
Instructions:
Preheat your Bella waffle maker. For the best texture, begin by blending the rolled oats in a blender or food processor for 20 to 30 seconds until they reach a coarse, flour-like consistency. You don’t want fine oat flour — a slightly coarse texture adds a pleasant chewiness to the finished waffle. If you don’t have a blender, you can use the oats whole, but the texture will be chunkier.
In a large mixing bowl, combine the blended oats, all-purpose flour, baking powder, cinnamon, and salt. Stir well. In a separate bowl, beat the eggs and then add the milk, melted coconut oil, sugar (or honey), and vanilla extract. Mix until smooth.
Pour the wet ingredients into the dry ingredients and fold together until just combined. The batter will be slightly thicker than standard waffle batter because of the oats absorbing liquid. If it seems too thick to pour, add an extra 2 tablespoons of milk and stir gently.
Let the batter rest for 4 to 5 minutes. Oats continue to absorb liquid as they sit, so resting the batter lets you see the true final consistency before cooking. Spray the hot plates with cooking spray.
Pour batter onto the lower plate and close the lid. Cook for 5 to 6 minutes. Oatmeal waffles may take slightly longer than regular waffles because the oats hold moisture. Wait until the steam fully stops before opening the lid. Remove and serve with fresh berries, a spoonful of almond butter, or a drizzle of honey.
18. Whole Wheat Waffles
Prep Time: 10 minutes | Cook Time: 5 minutes per waffle | Serves: 4
Swapping all-purpose flour for whole wheat flour adds fiber, a slightly nutty flavor, and more nutritional value to your waffles. These waffles are heartier than the classic version but still light enough to enjoy with your favorite toppings. The key is not over-mixing — whole wheat batter can become dense quickly.
Ingredients:
- 2 cups whole wheat flour
- 2 teaspoons baking powder
- 1 tablespoon sugar or maple syrup
- ½ teaspoon cinnamon
- ½ teaspoon salt
- 2 eggs
- 1¾ cups milk
- ⅓ cup melted coconut oil or butter
- 1 teaspoon vanilla extract
- Non-stick cooking spray
Instructions:
Preheat your Bella waffle maker. In a large bowl, whisk together the whole wheat flour, baking powder, sugar, cinnamon, and salt. Whole wheat flour is denser than all-purpose flour and has a slightly earthy, nutty aroma — that’s completely normal.
In a separate bowl, beat the eggs and add the milk, melted coconut oil, and vanilla extract. Stir until fully combined. If you’re using maple syrup instead of sugar, add it to the wet ingredients and mix well before combining.
Pour the wet mixture into the dry ingredients. Fold together gently and stop as soon as the large streaks of flour disappear. Whole wheat batter develops gluten faster than all-purpose batter, so over-mixing results in tough, chewy waffles. A few lumps are completely fine.
Let the batter rest for 5 minutes — this is especially important with whole wheat flour, as the resting time allows the flour to fully hydrate and the baking powder to begin activating. The batter will look slightly thicker after resting.
Spray the hot plates with cooking spray. Pour the batter onto the lower plate and close the lid. Cook for 5 to 6 minutes until the waffle is golden brown and releases easily. Whole wheat waffles won’t be as pale golden as all-purpose waffles — they’ll have a deeper, more toasted color, which is normal.
Serve with fruit and a light drizzle of honey or maple syrup.
19. Keto Almond Flour Waffles
Prep Time: 10 minutes | Cook Time: 6 minutes per waffle | Serves: 3
Low-carb and grain-free, these almond flour waffles are a great option for anyone following a keto or gluten-free diet. They have a tender, slightly dense texture and a lightly nutty flavor. The cream cheese in the batter adds richness and helps the waffles hold together well. Top with berries and sugar-free syrup to keep the carb count low.
Ingredients:
- 1½ cups almond flour (blanched, finely ground)
- 1 teaspoon baking powder
- 1 tablespoon erythritol or sweetener of choice
- ¼ teaspoon salt
- 3 eggs
- 2 oz cream cheese, softened
- 3 tablespoons melted butter
- 1 teaspoon vanilla extract
- Non-stick cooking spray
Instructions:
Preheat your Bella waffle maker fully before starting. Almond flour waffles are more delicate than regular waffles, so starting on a fully hot surface is essential for getting them to crisp properly and release cleanly without tearing.
Make sure your cream cheese is at room temperature before starting. Cold cream cheese won’t blend smoothly and will leave lumps in the batter. If you forgot to take it out ahead of time, microwave it for 10 to 15 seconds until just softened.
In a large mixing bowl, combine the almond flour, baking powder, erythritol, and salt. Stir well to distribute the ingredients evenly. Because almond flour has no gluten, it doesn’t bind the same way regular flour does, so the eggs and cream cheese play a crucial structural role.
In a separate bowl, beat the eggs until frothy — about 1 minute with a hand whisk. A slightly frothy egg helps add lift to the batter since there’s no gluten for structure. Add the softened cream cheese, melted butter, and vanilla extract to the eggs. Whisk everything together until the cream cheese is fully incorporated and the mixture is smooth. This step is important — any lumps of cream cheese will create uneven spots in the waffle.
Pour the wet mixture into the almond flour mixture and stir well to fully combine. The batter will be thicker and denser than a regular flour batter. Let it sit for 2 minutes.
Spray the hot plates of the Bella waffle maker very generously with cooking spray — more generously than you would for a regular waffle. Almond flour waffles are very prone to sticking because almond flour lacks the gluten structure that helps regular waffles release cleanly.
Pour the batter onto the lower plate and close the lid. Cook for 6 to 7 minutes. Do not open early — keto waffles need the full cook time to firm up inside. When ready, they’ll feel solid when you gently press the lid and should release with minimal resistance. Let cool for 1 minute before serving. They will firm up slightly as they cool.
20. Protein Waffles
Prep Time: 10 minutes | Cook Time: 5 minutes per waffle | Serves: 3
High in protein and low in refined sugar, these waffles are great for a post-workout breakfast or any time you want a meal that keeps you full for hours. Protein powder replaces part of the flour, and Greek yogurt adds extra protein while keeping the batter moist. Choose a vanilla protein powder for the best flavor.
Ingredients:
- 1 cup all-purpose flour
- ½ cup vanilla protein powder
- 1 teaspoon baking powder
- ¼ teaspoon salt
- 2 eggs
- ¾ cup Greek yogurt (plain, full-fat or low-fat)
- ½ cup milk
- 2 tablespoons honey or maple syrup
- 1 teaspoon vanilla extract
- Non-stick cooking spray
Instructions:
Preheat your Bella waffle maker. In a large bowl, whisk together the all-purpose flour, protein powder, baking powder, and salt. Not all protein powders behave the same way — some are very dry and absorb a lot of liquid, while others blend more smoothly. If your batter seems too thick after combining, add a splash more milk.
In a separate bowl, whisk the eggs until lightly beaten. Add the Greek yogurt, milk, honey (or maple syrup), and vanilla extract. Mix until smooth. The Greek yogurt makes the batter slightly thicker than standard waffle batter and adds a slight tang that balances the sweetness from the honey.
Pour the wet ingredients into the dry ingredients and fold until just combined. Protein powder can cause batter to thicken quickly, so check the consistency right away. The batter should be thick but pourable — like a thick pancake batter. If it seems very stiff, add milk one tablespoon at a time until it loosens slightly.
Let the batter rest for 3 minutes. Spray the hot plates generously with cooking spray. Pour batter onto the lower plate and close the lid. Cook for 5 to 6 minutes. Protein waffles can brown faster than regular waffles because protein powders often contain sugars that caramelize quickly. Check at the 4-minute mark by opening the lid briefly.
Remove the waffle and serve warm. Top with banana slices, a spoonful of almond butter, or a light drizzle of honey for a complete post-workout meal that actually tastes great.
21. Vegan Waffles
Prep Time: 10 minutes | Cook Time: 5 minutes per waffle | Serves: 4
No eggs, no dairy — these waffles are 100% plant-based and still come out light, golden, and crispy. The flax egg binds the batter together while the plant-based milk keeps everything moist. These are perfect for anyone who follows a vegan diet or has dairy or egg allergies.
Ingredients:
- 2 cups all-purpose flour
- 2 tablespoons sugar
- 1 tablespoon baking powder
- ½ teaspoon salt
- 1 flax egg (1 tablespoon ground flaxseed + 3 tablespoons water, rested 5 min)
- 1¾ cups oat milk or almond milk
- ⅓ cup melted coconut oil
- 1 teaspoon vanilla extract
- Non-stick cooking spray (use oil spray to keep it vegan)
Instructions:
Start by making your flax egg. In a small bowl, stir together 1 tablespoon of ground flaxseed with 3 tablespoons of water. Let this mixture sit for 5 minutes until it thickens into a gel-like consistency. This acts as a binding agent in place of regular eggs, holding the batter together as it cooks. Don’t skip the resting time — a fully gelled flax egg works much better than one that’s just been mixed.
While the flax egg sets, preheat your Bella waffle maker. In a large bowl, whisk together the flour, sugar, baking powder, and salt. In a separate bowl, combine the plant-based milk, melted coconut oil, and vanilla extract. Add the flax egg to this bowl and stir everything together until smooth.
Pour the wet mixture into the dry ingredients and fold together gently until just combined. Avoid over-mixing. The batter should be smooth and pourable. If it seems too thick, add a splash more plant-based milk.
Let the batter rest for 3 minutes. Spray the hot plates with a plant-based oil spray. Pour batter onto the lower plate and close the lid. Cook for 5 minutes until golden. Vegan waffles may be slightly less crispy on the edges than egg-based waffles, but they should be fully golden and hold together well.
Remove carefully using silicone tongs. Serve with fresh fruit, maple syrup, and coconut whipped cream for a fully vegan topping setup.
22. Cake Mix Waffles
Prep Time: 5 minutes | Cook Time: 5 minutes per waffle | Serves: 6
One box of boxed cake mix turns into an entire batch of fluffy, dessert-flavored waffles with almost no effort. Vanilla, funfetti, red velvet, or lemon — any cake mix flavor works. These are a favorite for birthday morning breakfasts, or any time you want something special without a lot of work.
Ingredients:
- 1 box (15.25 oz) cake mix (any flavor)
- 2 eggs
- ½ cup vegetable oil
- 1 cup water (or as directed on box)
- Non-stick cooking spray
Instructions:
Preheat your Bella waffle maker. Making cake mix waffles is genuinely one of the easiest things you can do in a waffle maker, but there are a few small adjustments from the cake box directions that make the batter work better in the waffle iron rather than in a cake pan.
Open the box of cake mix and pour the dry contents into a large mixing bowl. In a separate bowl, crack the two eggs and beat them lightly. Add the vegetable oil and water to the eggs and stir well. Note: you’ll be using less water than the box may call for. Using less water creates a slightly thicker batter that holds together better in the waffle maker and produces a crispier result. The standard waffle maker batter consistency should be pourable but not runny — similar to thick pancake batter.
Pour the wet ingredients into the cake mix powder. Use a spatula or wooden spoon to fold the batter together until just combined. Don’t use an electric mixer here — the waffle maker does the work, and you want to keep the batter from getting too airy or thin. A few small dry pockets are fine.
Let the batter rest for 2 minutes. Spray the hot plates generously with non-stick cooking spray. Cake mix batters contain sugar which can cause sticking, so a thorough spray is important.
Pour batter onto the lower plate — only about ¾ of the amount you’d use for regular waffles, as cake batter tends to expand and overflow more than standard batter. Close the lid and cook for 5 minutes. The waffles will be pale gold with a slightly soft interior — they won’t be as crispy as regular waffles, but the flavor is fantastic.
Remove from the machine and serve with whipped cream, fruit, or a drizzle of icing made from powdered sugar and milk.
23. Brownie Waffles
Prep Time: 5 minutes | Cook Time: 4 minutes per waffle | Serves: 4
Rich, chocolatey brownie batter cooked in the waffle maker comes out as a crispy-edged, fudgy-centered chocolate dessert waffle. Use a box of brownie mix for the fastest version, or make a simple homemade brownie batter. Top with a scoop of vanilla ice cream and hot fudge sauce for a dessert that’s hard to beat.
Ingredients:
- 1 box (18 oz) brownie mix
- 2 eggs
- ⅓ cup vegetable oil
- 3 tablespoons water (less than the box calls for)
- Non-stick cooking spray
- Topping: vanilla ice cream, chocolate sauce, powdered sugar
Instructions:
Preheat your Bella waffle maker. In a large bowl, combine the brownie mix, eggs, vegetable oil, and water. Stir together until fully combined and smooth. Brownie batter is much thicker and denser than waffle batter — this is what you want. The thickness creates a fudgy interior after cooking.
The key adjustment from the standard brownie box directions is to use less water. The box typically calls for 2 to 3 tablespoons; use only 3 tablespoons maximum. This keeps the batter thick enough to stay in place on the waffle plate without spreading out too much. Thin brownie batter will overflow and create a mess.
Let the batter sit for 2 minutes after mixing. This short rest allows the dry mix to fully absorb the wet ingredients and ensures the batter cooks evenly.
Spray the hot plates of your Bella waffle maker very generously with non-stick cooking spray on both the top and bottom plates. Brownie batter is extremely prone to sticking because of its high sugar and cocoa content. Use a generous amount of spray, and consider spraying again between each waffle.
Scoop about ⅓ cup of brownie batter onto the center of the lower plate. Because brownie batter is thick, it won’t spread on its own — use the back of a spoon to spread it gently to the edges. Close the lid and cook for 3 to 4 minutes only. Brownie waffles cook much faster than regular waffles and can go from perfect to overcooked quickly. At 3 minutes, the edges should be set and slightly crispy while the center remains fudgy. If you prefer a firmer brownie waffle, add one more minute.
Remove very carefully — the sugar content means these are more fragile than regular waffles. Use a silicone spatula to gently lift from the plate. Serve warm with ice cream and hot fudge for a restaurant-worthy dessert.
24. Pancake Mix Waffles
Prep Time: 5 minutes | Cook Time: 5 minutes per waffle | Serves: 4
Pancake mix makes surprisingly great waffles — all you need to do is add a little extra fat to help the batter get crispy on the outside. Most pancake mix already contains all the leavening and seasoning you need, so this is as close to a no-prep waffle recipe as it gets.
Ingredients:
- 2 cups pancake mix
- 1½ cups water or milk
- 2 eggs
- 3 tablespoons vegetable oil or melted butter
- Non-stick cooking spray
Instructions:
Preheat your Bella waffle maker. Pour the pancake mix into a large bowl. Add the eggs, milk (or water), and vegetable oil. The extra oil is the key difference from making pancakes — in a skillet, pancakes cook in a flat pool of batter with external oil in the pan. In a waffle maker, the batter needs its own fat to develop a crispy exterior, so adding extra oil directly to the batter is necessary. Without it, the waffles will come out soft rather than crispy.
Stir the batter together until just combined. The batter should be slightly lumpy — that’s the sign of a properly mixed waffle batter. Over-mixing develops gluten and makes the waffles tough. A few dry lumps are fine; they’ll incorporate fully as the batter rests.
Let the batter rest for 3 to 4 minutes. During this time, the baking powder in the pancake mix activates, making the batter slightly thicker and giving the finished waffles a fluffier interior.
Spray the hot plates with cooking spray. Pour the batter onto the lower plate. The batter should be pourable — if it seems too thick, stir in a splash more milk. Close the lid and cook for 5 minutes.
Remove and serve with butter and maple syrup, or use these as a base for savory toppings. The simplicity of this recipe makes it perfect for camping, vacation kitchens, or any morning when you want waffles with minimal cleanup.
25. Frozen Waffle Hacks
Prep Time: 1 minute | Cook Time: 3 minutes | Serves: 2
Store-bought frozen waffles cooked in the Bella waffle maker come out crispier, hotter, and more evenly heated than anything you’ll get from a toaster. The waffle iron’s direct contact on both sides makes the surface properly golden and gives the inside a fresh-cooked feel. The best part: it takes under 5 minutes from freezer to plate.
Ingredients:
- 4 frozen waffles (any brand, any flavor)
- Non-stick cooking spray
- Toppings of your choice
Instructions:
Preheat your Bella waffle maker. This is one of the quickest things you can do in a waffle maker, but the results are noticeably better than using a toaster.
The key to using the Bella waffle maker with frozen waffles is to make sure the plates are fully preheated before you place the frozen waffle inside. A fully hot surface immediately begins crisping the exterior of the frozen waffle on contact. Starting on a warm-but-not-hot surface leads to steaming rather than crisping, which makes the waffle soggy.
Lightly spray the top and bottom plates with non-stick cooking spray. Take the frozen waffles directly from the freezer — don’t thaw them first. Place one or two frozen waffles flat on the lower plate. Depending on the size of your Bella waffle maker and the size of the frozen waffles, you may be able to fit two at once. Place them side by side without overlapping.
Close the lid. The frozen waffle will compress slightly between the plates — that’s fine. Cook for 2 to 3 minutes. You’ll hear a light sizzling sound as the ice crystals in the waffle hit the hot plates. When you open the lid, the waffle should be deeply golden, hot all the way through, and crispy on both sides.
Remove and serve immediately with your choice of toppings. For a dessert version, add Nutella, sliced bananas, and honey. For a savory morning, top with a fried egg and hot sauce. For a classic version, serve with butter and maple syrup.
26. Grilled Cheese Waffles
Prep Time: 5 minutes | Cook Time: 4 minutes per waffle | Serves: 2
Buttered bread with melted cheese pressed in the waffle maker makes a grilled cheese sandwich with the crispiest, most evenly golden surface you’ve ever had. The waffle grid pattern creates a crispy exterior while the inside cheese melts completely. This takes 5 minutes and is one of those snacks you’ll come back to again and again.
Ingredients:
- 4 slices of sandwich bread (white, sourdough, or your choice)
- 4 tablespoons softened butter
- 1½ cups shredded or sliced cheese (cheddar, American, mozzarella, or a mix)
- Non-stick cooking spray
Instructions:
Preheat your Bella waffle maker. Spread a generous layer of softened butter on one side of each bread slice. Make sure the butter goes all the way to the edges — this is what creates the golden, crispy crust. Soft butter is much easier to spread without tearing the bread; cold butter straight from the fridge will tear the bread.
Build your sandwiches: place one slice of bread butter-side down on the counter. Add the cheese in an even layer — don’t pile it too thick in the center or it will overflow when pressed. Place the second slice of bread on top, butter-side up.
Lightly spray the hot plates of the Bella waffle maker with cooking spray. Gently place the assembled sandwich onto the lower plate, butter-side down on the plate. Close the lid. The lid will press down on the sandwich and flatten it slightly — this is what creates the crispy exterior and helps the cheese melt fully in the middle.
Cook for 3 to 4 minutes. Don’t open the lid early — you want the cheese to fully melt and the bread to develop a deep golden color. When ready, open the lid carefully. The waffle grid pattern will be pressed into the surface of the bread, giving each square section its own crispy golden area.
Use a silicone spatula to remove the grilled cheese carefully. The cheese inside is very hot. Let it cool for 30 seconds before cutting or biting into it. Serve with tomato soup for dipping, or on its own as a quick snack.
27. Instant Noodle Waffles
Prep Time: 10 minutes | Cook Time: 5 minutes per waffle | Serves: 2
Cooked instant noodles pressed into the waffle maker come out as a crispy, golden noodle cake with crunchy edges and a chewy center. This is one of the more unexpected Bella waffle maker recipes — but once you try it, it makes complete sense. Season with soy sauce, sesame oil, and a soft-boiled egg for a satisfying savory snack.
Ingredients:
- 2 packs instant ramen noodles (discard or save the flavor packets)
- 2 eggs
- 2 tablespoons soy sauce
- 1 tablespoon sesame oil
- 1 tablespoon green onion, finely sliced
- ½ teaspoon garlic powder
- ½ teaspoon ginger powder
- Non-stick cooking spray
- Optional toppings: soft-boiled egg, sriracha, sesame seeds, extra green onion
Instructions:
Start by cooking the instant noodles according to the package directions — usually 2 to 3 minutes in boiling water. Cook them until just tender but not overly soft. You want the noodles to still have some firmness because they’ll cook again in the waffle maker. Drain the noodles very thoroughly and let them cool for 3 to 4 minutes. Transfer to a large bowl.
Add the two eggs to the drained noodles and mix well so that the egg coats every strand. The egg is the binding agent here — it holds the noodles together into a cohesive patty inside the waffle maker. Without the egg, the noodles will fall apart when you try to remove them.
Add the soy sauce, sesame oil, sliced green onions, garlic powder, and ginger powder to the noodle and egg mixture. Toss everything together until the noodles are evenly seasoned. Taste the mixture and adjust seasoning if needed — add more soy sauce for saltiness or more sesame oil for depth.
Preheat your Bella waffle maker fully. Spray both plates very generously with non-stick cooking spray. Noodles have a tendency to stick to the plates, especially in the waffle grid channels where noodle strands can get caught. A thorough coat of spray is essential.
Scoop the noodle mixture onto the lower plate and use the back of a spoon to press and spread it into an even layer across the plate. The noodles should fill the entire lower plate surface. Close the lid firmly and press down gently to help compact the noodles into the waffle shape.
Cook for 5 minutes. The eggs will set, binding the noodles together, and the exterior of the noodle patty will become golden and crispy from contact with the hot plates. When you open the lid, the noodle waffle should hold together as one piece and release from the plates with the help of a silicone spatula.
Remove carefully and serve immediately. Top with a soft-boiled egg cut in half, a drizzle of sriracha, a sprinkle of sesame seeds, and extra green onions. These are best eaten right away while still hot and crispy.
Cleaning and Maintenance Tips
1. Always unplug the machine before cleaning. Never clean the Bella waffle maker while it’s still plugged in or hot. Wait at least 20 to 30 minutes after use before wiping down the plates.
2. Use a damp cloth or soft sponge. Wipe the non-stick plates with a lightly dampened cloth or non-abrasive sponge. Never use steel wool, metal scrubbers, or harsh abrasive cleaners — these scratch and damage the non-stick coating, which will cause batter to stick in every future use.
3. Don’t submerge in water. The Bella waffle maker should never be placed in water or run under the tap. It’s an electrical appliance, and submerging it even without the cord attached can damage the internal components and ruin the machine.
4. For stubborn batter residue, apply a small amount of dish soap to a damp cloth and gently rub the stuck spot in a circular motion. Let the soapy cloth sit on the residue for 1 to 2 minutes to loosen it before wiping. For very stubborn spots, place a damp cloth inside the closed machine for a few minutes — the residual heat will help steam the residue loose.
5. Clean the exterior with a dry or slightly damp cloth. The outer shell of the machine can be wiped clean with a dry cloth to remove any drips, splatters, or grease marks from the outside surface.
6. Store flat or upright with a cloth between the plates. Once fully clean and completely dry, store the waffle maker flat on a shelf or stand it upright with a folded cloth or paper towel between the top and bottom plates. This prevents the plates from pressing against each other during storage, which can affect the coating over time.
7. Check the hinge and cord regularly. Periodically inspect the hinge area and cord for any batter buildup or damage. A soft toothbrush works well for cleaning around the hinge without scratching any surfaces.
Conclusion
The Bella waffle maker is far more than a one-trick breakfast tool. These Bella waffle maker recipes show just how much variety a small, simple kitchen appliance can produce — from fluffy buttermilk waffles on a slow Sunday morning to crispy pizza waffles on a busy Tuesday night. Sweet, savory, healthy, or completely indulgent, there’s a recipe here for every craving, every meal, and every kind of cook.
The best way to get comfortable with your Bella waffle maker is to start simple and then experiment. Try the classic buttermilk waffles first to get a feel for your machine’s timing and how much batter to pour. Then work your way toward something more creative — stuff them with Nutella, press hash browns, or try the noodle waffles and surprise yourself with how good they are.
Don’t be afraid to mix things up. Add different spices to the batter, swap in your favorite cheese, or try a different protein powder flavor. Every recipe in this list is a starting point, not a set of rules. The Bella waffle maker is designed to be flexible, and the more you use it, the more ideas you’ll come up with on your own. Have fun with it, share your creations with the people you love, and keep experimenting until every meal feels like something worth sitting down for.