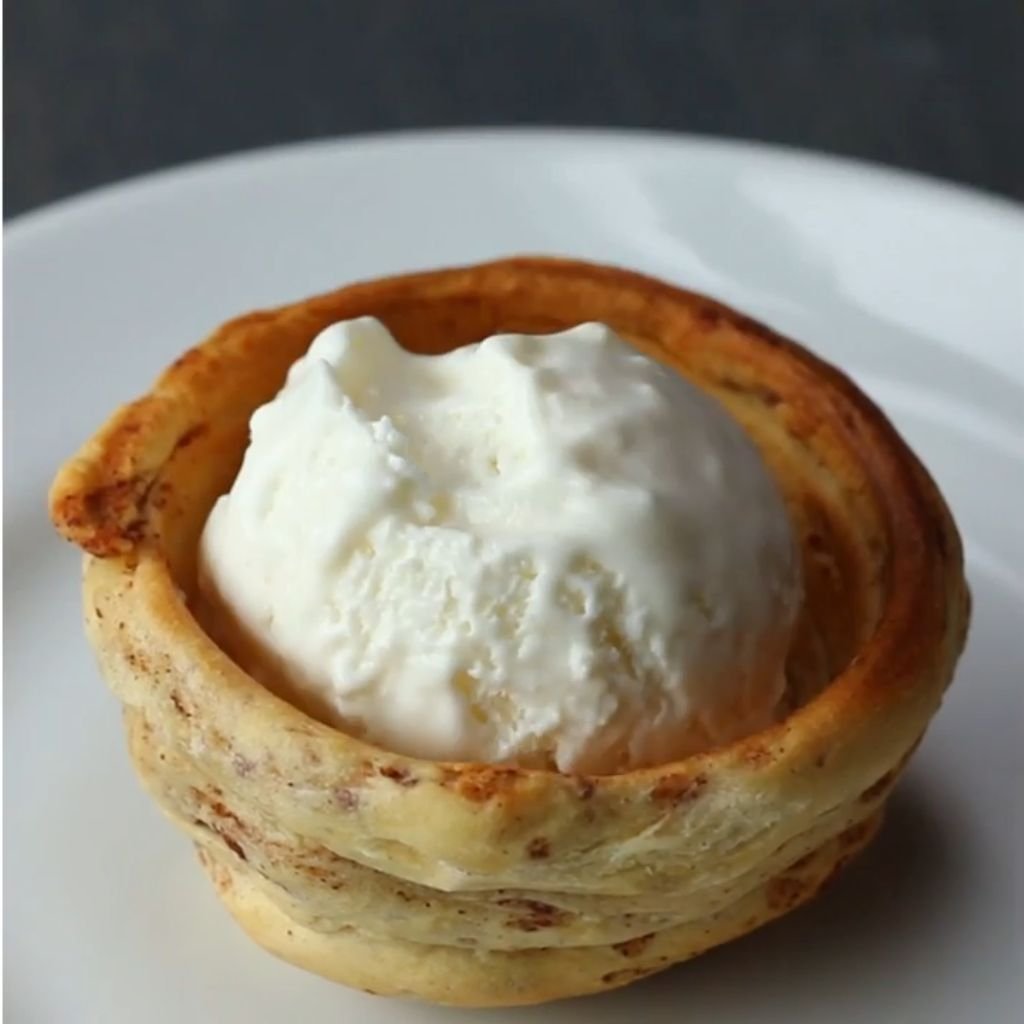
Homemade ice cream has become one of the most loved treats to make at home. More and more people are skipping the store-bought cartons and making their own creamy, fresh scoops right in their kitchen.
With Cuisinart 1 Pint Ice Cream Maker Recipes, you get to enjoy small, just-right batches that are perfect for one person, a couple, or a small family.
The Cuisinart 1 Pint Ice Cream Maker is a great tool for anyone who wants fresh desserts without making a huge amount. It is small, easy to use, and gets the job done fast.
Making ice cream at home means you pick every single ingredient — no mystery additives, no preservatives, just real, fresh flavors you love.
Whether you want something classic or something totally new, these recipes will help you make the best homemade ice cream every single time.

Why Choose the Cuisinart 1 Pint Ice Cream Maker?
There are many reasons to love this little machine. Here is why it works so well for home use:
1. Compact Size Perfect for Small Kitchens — The Cuisinart 1 Pint Ice Cream Maker takes up very little counter space. It fits easily in a small kitchen, apartment, or dorm room. You do not need a big freezer or a huge mixing bowl. Just plug it in and go.
2. Easy Homemade Desserts in Under 30 Minutes — Most recipes churn in 20 to 25 minutes. That means you can have fresh, creamy ice cream ready in less time than it takes to watch a TV show episode.
3. Control Over Ingredients and Flavors — You choose what goes in. Use less sugar, pick dairy-free milk, add real fruit, or go keto. The choices are all yours. No fillers, no artificial flavors — just good, honest ingredients.
4. Ideal for Beginners and Families — The machine is super simple to use. There are no complicated settings or buttons. Kids love watching it churn. It is a great weekend activity for the whole family and makes a wonderful gift for anyone who loves dessert.
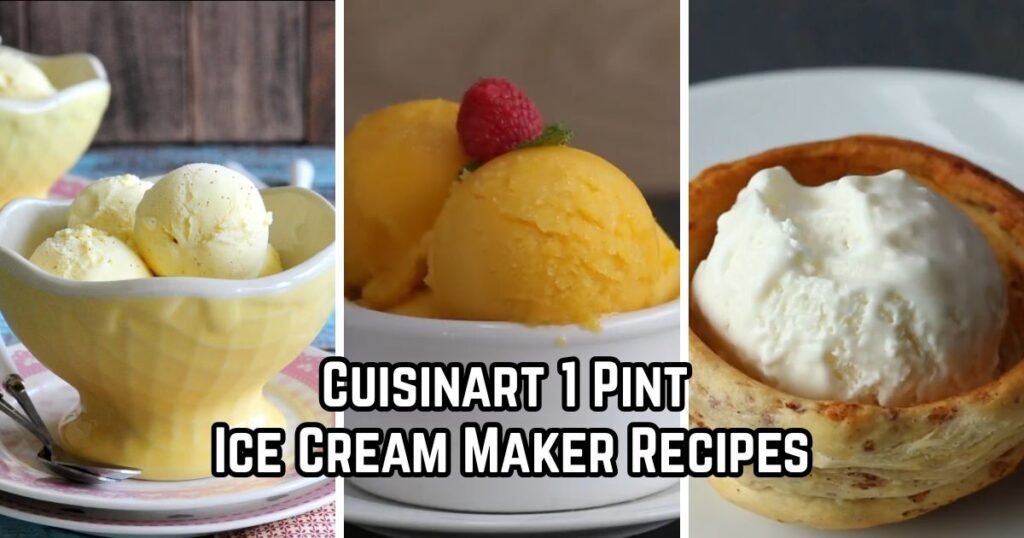
1. Classic Vanilla Bean Ice Cream
Prep Time: 10 minutes | Cook Time: 25 minutes | Serves: 2–3
Real vanilla bean gives this ice cream a deep, rich flavor that no extract can match. Each scoop is creamy, smooth, and packed with tiny vanilla specks that look beautiful and taste even better. It pairs perfectly with warm pie, brownies, or just a simple cone.
Ingredients
- 1 cup heavy whipping cream
- ½ cup whole milk
- ⅓ cup granulated sugar
- 1 vanilla bean, split and scraped (or 1 tsp pure vanilla extract)
- Pinch of salt
Instructions
Start by preparing your vanilla base. Take the vanilla bean and lay it flat on a cutting board. Use a small sharp knife to cut it down the center lengthwise. Open the bean up and use the back of the knife to scrape out all the tiny black seeds inside. Set those seeds aside. Do not throw away the pod — it will be used too.
Pour the whole milk and heavy whipping cream into a small saucepan. Add the scraped vanilla seeds and drop the empty vanilla pod into the mixture as well. Place the saucepan on the stove over medium-low heat. Stir the mixture gently as it heats up. You want it to get warm and steamy but not bubbling. This gentle heat helps pull the full vanilla flavor out of the pod and seeds. This step should take about 4 to 5 minutes. Once you see small wisps of steam rising from the surface, take the pan off the heat.
Add the granulated sugar and the pinch of salt into the warm cream mixture. Stir slowly and consistently until every grain of sugar has completely dissolved. This usually takes about 2 minutes of steady stirring. You will know it is ready when the liquid looks smooth and clear — no gritty texture at the bottom.
Remove the vanilla pod from the mixture and discard it or rinse it and save it for another use, like flavoring sugar. Let the mixture cool down to room temperature. Once it is no longer hot, cover the saucepan or transfer the mixture to a bowl or jar with a lid and place it in the refrigerator. Let it chill for at least 1 to 2 hours. The mixture should be very cold before it goes into the machine — this helps it churn into a creamier, smoother texture.
Take your Cuisinart 1 Pint Ice Cream Maker bowl out of the freezer. Make sure it has been frozen solid for at least 12 to 24 hours before use. Assemble the machine and turn it on. Pour the cold vanilla mixture into the running machine through the top opening. Let it churn for 20 to 25 minutes. During this time, the machine will spin the mixture and work air into it, turning it from liquid into a soft, creamy frozen dessert. You will see the volume grow slightly as it churns.
Once churning is done, the ice cream will have a soft-serve texture. At this point, you can eat it right away if you like a softer scoop, or you can transfer it to an airtight container and place it in the freezer for another 1 to 2 hours to firm it up to a traditional scoop-able texture.
When ready to serve, let it sit at room temperature for 2 to 3 minutes before scooping. Serve in bowls or cones and enjoy every creamy, vanilla-packed bite.
2. Rich Chocolate Ice Cream
Prep Time: 10 minutes | Cook Time: 25 minutes | Serves: 2–3
Deep, dark, and completely satisfying — this chocolate ice cream is for anyone who loves bold chocolate flavor in every bite. The cocoa powder gives it a rich base, and a touch of cream makes it silky smooth. Great on its own or topped with hot fudge sauce.
Ingredients
- 1 cup heavy whipping cream
- ½ cup whole milk
- ⅓ cup granulated sugar
- 3 tablespoons unsweetened cocoa powder
- 1 teaspoon pure vanilla extract
- Pinch of salt
Instructions
Before starting anything else, make sure your ice cream maker bowl has been in the freezer for at least 12 to 24 hours. A fully frozen bowl is the key to getting thick, creamy ice cream from the machine.
Begin making the chocolate base by combining the cocoa powder and sugar in a small mixing bowl. Stir them together until the cocoa and sugar are fully mixed. This dry blend step helps the cocoa mix more smoothly into the liquid later and prevents clumping.
Pour the whole milk into a small saucepan and set it over medium-low heat. Add the cocoa-sugar mixture to the milk and stir with a whisk right away. Keep stirring constantly as the mixture heats up. The heat will help dissolve the sugar and hydrate the cocoa powder fully. This is important — cocoa powder needs liquid and gentle heat to release its full flavor and become smooth. Keep stirring for about 3 to 4 minutes until the mixture becomes slightly thicker and fully combined. Do not let it boil.
Remove the pan from heat and stir in the heavy whipping cream, vanilla extract, and pinch of salt. Mix everything together well. The cream will cool the mixture down a little bit. Taste a small spoonful at this point — the base should smell and taste deeply chocolatey. If you want a stronger chocolate flavor, you can add another half tablespoon of cocoa powder and stir it in now.
Let the mixture cool to room temperature, then transfer it to a container with a lid and refrigerate for at least 1 to 2 hours until it is very cold. Cold mix makes better ice cream — do not skip this step.
When you are ready to churn, assemble the Cuisinart 1 Pint Ice Cream Maker with the frozen bowl. Turn the machine on first, then slowly pour the cold chocolate mixture into the bowl. The machine will start churning right away. Let it run for 20 to 25 minutes without stopping or lifting the lid too much. You will notice the mixture getting thicker, paler in color, and creamy as air works its way in.
After churning, scoop the soft ice cream into a freezer-safe container. Press a piece of plastic wrap directly onto the surface of the ice cream before putting the lid on — this prevents ice crystals from forming on top. Freeze for 1 to 2 hours for a firmer scoop or eat it right away as soft-serve.
Serve with extra cocoa powder dusted on top or a drizzle of warm chocolate sauce for a fully indulgent bowl.
3. Strawberry Homemade Ice Cream
Prep Time: 15 minutes | Cook Time: 25 minutes | Serves: 2–3
Fresh strawberries make this ice cream taste like summer in every single spoonful. The fruit is mashed and folded right into the creamy base for a bright pink color and natural strawberry flavor. Perfect for warm afternoons and simple enough to make any day of the week.
Ingredients
- ¾ cup fresh strawberries, hulled and sliced
- 2 tablespoons sugar (for the strawberries)
- ¾ cup heavy whipping cream
- ½ cup whole milk
- 3 tablespoons granulated sugar
- ½ teaspoon vanilla extract
- Pinch of salt
Instructions
Start with the strawberries. Place the hulled and sliced strawberries into a small bowl and sprinkle 2 tablespoons of sugar over them. Toss the berries gently with a spoon so all the pieces are coated in sugar. Let them sit at room temperature for about 15 minutes. During this time, the sugar will pull the natural juices out of the strawberries, creating a sweet, syrupy coating. This process is called macerating, and it builds a deeper, more concentrated strawberry flavor.
After 15 minutes, use a fork or potato masher to mash the strawberries. You can mash them completely smooth or leave some small chunks for texture — both ways taste great. Set the mashed strawberries aside.
In a separate mixing bowl, combine the heavy whipping cream, whole milk, 3 tablespoons of granulated sugar, vanilla extract, and pinch of salt. Whisk everything together until the sugar has dissolved into the liquid. This takes about 1 to 2 minutes of steady whisking. The mixture should look smooth and uniform.
Add the mashed strawberries with all their juices into the cream mixture. Stir everything together gently until combined. The mixture will turn a beautiful light pink color. Taste it — it should be sweet with a clear strawberry flavor coming through. Adjust sweetness with a little more sugar if the berries were tart.
Transfer the strawberry cream mixture into a sealed container or cover the bowl with plastic wrap and refrigerate for at least 1 hour. The colder the mixture, the better the ice cream will churn.
Retrieve the frozen bowl from your freezer and assemble the Cuisinart 1 Pint Ice Cream Maker. Turn it on and pour the cold strawberry mixture in steadily. Let the machine churn for 20 to 25 minutes. As it churns, the soft fruit pieces will spread evenly throughout the ice cream. Keep an eye on the texture — you want it to look thick, creamy, and soft like frozen yogurt by the end.
Transfer to a container and freeze for an additional 1 hour if you prefer firmer scoops. Serve with a fresh strawberry slice on top for a beautiful presentation.
4. Cookies and Cream Ice Cream
Prep Time: 10 minutes | Cook Time: 25 minutes | Serves: 2–3
Crushed chocolate sandwich cookies mixed into a sweet vanilla cream base — this one is a crowd-pleaser every single time. The cookies stay slightly crunchy in the ice cream, which makes the texture absolutely wonderful. Kids and adults both go back for a second scoop.
Ingredients
- 1 cup heavy whipping cream
- ½ cup whole milk
- 3 tablespoons granulated sugar
- 1 teaspoon vanilla extract
- Pinch of salt
- 6–7 chocolate sandwich cookies, roughly crushed
Instructions
Begin by making the vanilla base for this ice cream. In a medium mixing bowl, combine the heavy whipping cream, whole milk, granulated sugar, vanilla extract, and pinch of salt. Use a hand whisk to stir the mixture together until the sugar has fully dissolved. This will take about 1 to 2 minutes. Taste the base — it should be lightly sweet with a clean vanilla scent.
Cover the bowl and refrigerate the base for at least 1 hour. While the base chills, prepare the cookies. Take 6 to 7 chocolate sandwich cookies and place them in a zip-lock bag. Seal the bag and use a rolling pin or the flat bottom of a cup to crush the cookies into rough pieces. You want a mix of small crumbs and medium-sized chunks — not a fine powder. The variety in size gives a better texture in the finished ice cream. Set the crushed cookies aside at room temperature.
When the base is fully chilled, take your Cuisinart 1 Pint Ice Cream Maker out and make sure the bowl is fully frozen. Turn the machine on and pour the cold base in. Let it churn for 18 to 20 minutes until it reaches a thick, soft-serve consistency.
During the last 2 to 3 minutes of churning, add the crushed cookies into the machine through the top opening. Let them churn in just long enough to get distributed throughout the ice cream without breaking down completely. The cookies will mix in naturally and hold their texture well.
Scoop the ice cream into a freezer-safe container. For extra texture, sprinkle a small handful of additional crushed cookies on top before sealing the container. Press plastic wrap against the surface and freeze for 1 hour before serving.
Scoop into bowls and top with extra crushed cookies if desired. Each bite will have creamy ice cream and a satisfying crunch from the cookie pieces.
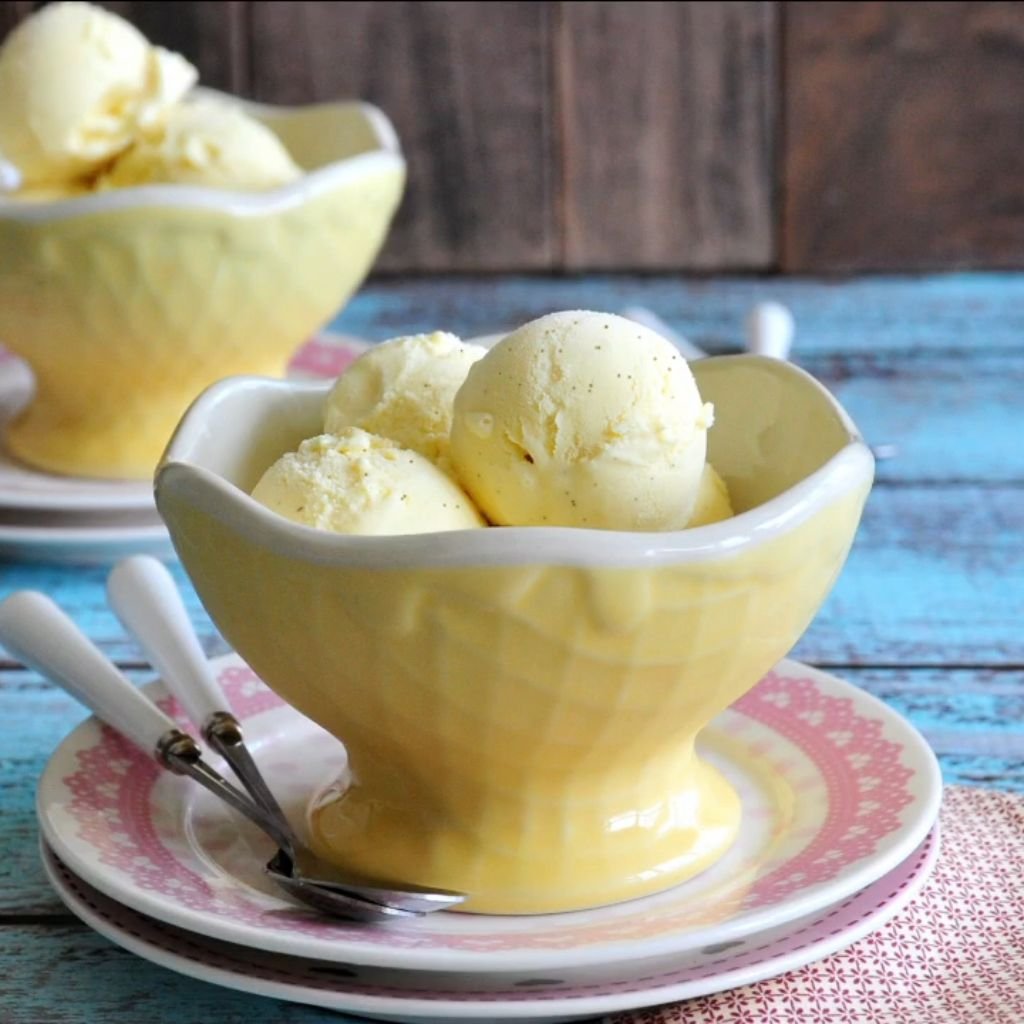
5. Mint Chocolate Chip Ice Cream
Prep Time: 10 minutes | Cook Time: 25 minutes | Serves: 2–3
Cool mint flavor with little chocolate chips scattered throughout — mint chocolate chip is one of the most popular ice cream flavors for a reason. Made at home, you get a fresher, cleaner mint taste without the artificial green color. A perfect balance of refreshing and sweet.
Ingredients
- 1 cup heavy whipping cream
- ½ cup whole milk
- 3 tablespoons granulated sugar
- ¾ teaspoon peppermint extract
- ½ teaspoon vanilla extract
- Pinch of salt
- 3 tablespoons mini chocolate chips
Instructions
Make sure the Cuisinart 1 Pint Ice Cream Maker bowl has been in the freezer for a full 12 to 24 hours before you start. A properly frozen bowl is essential for this recipe.
In a mixing bowl, combine the heavy whipping cream, whole milk, granulated sugar, peppermint extract, vanilla extract, and pinch of salt. Whisk until the sugar fully dissolves and everything is blended together smoothly. Taste the base at this point — the mint flavor should be clear but not overpowering. If you want a stronger mint taste, add another ¼ teaspoon of peppermint extract. Be careful not to add too much — peppermint extract is very potent and a little extra goes a long way.
Cover the bowl and refrigerate the mint base for 1 to 2 hours until very cold. Cold ingredients churn much better and produce a creamier result.
When the base is fully chilled, assemble the ice cream maker and turn it on before pouring the mixture in. Pour the cold mint base slowly and steadily into the running machine. Let it churn for about 20 to 22 minutes. Watch the texture as it churns — the liquid will gradually thicken and become a pale, soft ice cream.
When there are about 2 minutes of churn time remaining, open the top of the machine and sprinkle in the mini chocolate chips. Let them churn for those final 2 minutes so they mix evenly throughout the ice cream without all sinking to the bottom.
Once churning is complete, scoop the soft mint chip ice cream into an airtight container. If you want, scatter a few extra chocolate chips across the top layer for a pretty finish. Press plastic wrap directly onto the surface, seal the container, and freeze for 1 to 1.5 hours until firm enough to scoop cleanly.
Serve in bowls or waffle cones. The combination of cool mint and little bites of chocolate is incredibly refreshing, especially on warm days.
6. Mango Ice Cream
Prep Time: 15 minutes | Cook Time: 25 minutes | Serves: 2–3
Sweet, tropical mango blended into a rich cream base creates an ice cream that feels like a mini getaway in every scoop. Using ripe mango gives this recipe its bright orange color and naturally sweet flavor. No artificial colors or flavors needed — the real fruit does all the work.
Ingredients
- ¾ cup ripe mango, peeled and diced (fresh or frozen, thawed)
- ¾ cup heavy whipping cream
- ¼ cup whole milk
- 3 tablespoons granulated sugar
- 1 teaspoon lime juice
- Pinch of salt
Instructions
Begin with the mango. If using fresh mango, peel and dice it into small chunks. If using frozen mango, let it thaw completely at room temperature first, then drain any excess liquid. Place the mango chunks into a blender or food processor and blend until completely smooth. You should have about ½ cup of smooth mango puree. Set it aside.
In a medium mixing bowl, combine the heavy whipping cream, whole milk, granulated sugar, lime juice, and salt. Whisk together until the sugar dissolves and the mixture is smooth. Add the mango puree to this bowl and stir everything together until fully combined. The mixture will turn a gorgeous golden-orange color.
Taste the mango base. It should be sweet, fruity, and slightly tangy from the lime juice. The lime brightens the mango flavor and keeps it tasting fresh. Adjust sweetness or lime to your preference.
Cover the bowl and refrigerate the mango base for at least 1 hour. It needs to be very cold before churning.
Set up your Cuisinart 1 Pint Ice Cream Maker with the frozen bowl. Turn it on and pour the chilled mango mixture in. Let the machine churn for 20 to 25 minutes. The fruit puree in the base makes it slightly denser than a plain cream base, so give it the full churn time to develop proper texture.
Once done, the ice cream will be a soft, creamy consistency. Scoop it into a freezer container, press plastic wrap on top, and freeze for 1 hour for firmer scoops. The finished ice cream is smooth, tropical, and absolutely refreshing.
Serve with a small wedge of fresh mango or a drizzle of honey for extra indulgence.
7. Banana Caramel Ice Cream
Prep Time: 15 minutes | Cook Time: 25 minutes | Serves: 2–3
Ripe banana and buttery caramel come together in this creamy, dreamy ice cream. The bananas add natural sweetness, so you do not need a lot of extra sugar. The caramel swirl gives every scoop a golden, rich flavor that makes this one feel extra special.
Ingredients
- 1 very ripe banana, mashed
- ¾ cup heavy whipping cream
- ¼ cup whole milk
- 2 tablespoons granulated sugar
- 2 tablespoons caramel sauce (store-bought or homemade)
- ½ teaspoon vanilla extract
- Pinch of salt
Instructions
The riper the banana, the better this recipe turns out. A banana with lots of brown spots on the skin will be naturally sweeter and much easier to mash smooth. Peel the banana and place it in a mixing bowl. Use a fork to mash it thoroughly until no large lumps remain. The mashed banana should be a smooth, almost paste-like consistency. Set it aside.
In a separate bowl, combine the heavy whipping cream, whole milk, granulated sugar, vanilla extract, and salt. Whisk until the sugar dissolves completely. Add the mashed banana to this mixture and stir everything together until well combined. The base will be slightly thick from the banana.
Do not add the caramel sauce to the base yet — it will be swirled in after churning for the best visual and flavor effect.
Refrigerate the banana cream base for 1 hour until cold. When ready, assemble the ice cream maker with the frozen bowl and turn it on. Pour the cold base into the running machine. Let it churn for 20 to 22 minutes until thick and creamy.
Once churning is done, transfer half the ice cream into a freezer container. Drizzle 1 tablespoon of caramel sauce over it. Add the remaining ice cream on top and drizzle the last tablespoon of caramel on top of that. Use a butter knife or a skewer to gently swirl the caramel through the layers with a few light strokes. Do not over-mix — you want visible ribbons of caramel running through the ice cream.
Seal the container and freeze for 1 to 1.5 hours. When serving, let it sit for 2 minutes to soften slightly, then scoop and drizzle with a little extra caramel sauce for an irresistible finish.
8. Blueberry Cheesecake Ice Cream
Prep Time: 15 minutes | Cook Time: 25 minutes | Serves: 2–3
Creamy cheesecake flavor meets sweet blueberry swirls in this show-stopping ice cream. The cream cheese base gives it that signature tangy cheesecake taste, and the blueberry sauce adds bursts of fruity color throughout. Crumbled graham crackers on top make it complete.
Ingredients
- 2 oz cream cheese, softened
- ¾ cup heavy whipping cream
- ¼ cup whole milk
- 3 tablespoons granulated sugar
- ½ teaspoon vanilla extract
- Pinch of salt
- ¼ cup blueberry jam or blueberry compote
- 2–3 graham crackers, crushed (for topping)
Instructions
Start by softening the cream cheese. Leave it at room temperature for about 20 to 30 minutes before starting. Soft cream cheese blends much more smoothly and prevents lumps in the ice cream base.
Place the softened cream cheese in a mixing bowl and beat it with a hand mixer or a whisk until it is completely smooth and fluffy — no lumps at all. This step is important because any lumps of cream cheese will freeze into hard pieces in the ice cream.
Add the granulated sugar to the cream cheese and beat again until fully incorporated. Then slowly add the heavy whipping cream a little at a time, whisking continuously. Adding it slowly prevents the base from becoming lumpy. Once all the cream is mixed in, add the whole milk, vanilla extract, and salt. Whisk everything together until the base is perfectly smooth and creamy.
Taste the base — it should taste like a lightly sweetened cheesecake filling. Refrigerate the mixture for at least 1 hour until cold.
When ready, set up the Cuisinart 1 Pint Ice Cream Maker and turn it on. Pour the cold cheesecake base in and let it churn for 20 to 25 minutes until thick and creamy.
Scoop half the churned ice cream into a freezer container. Dollop half the blueberry jam in small spoonfuls over the top. Add the remaining ice cream and dollop the rest of the jam on top. Swirl gently with a knife for a marbled blueberry-cheesecake effect.
Scatter crushed graham crackers across the very top. Seal with plastic wrap and freeze for 1 to 2 hours. Each scoop will look beautiful and taste like a perfect cheesecake slice.
9. Pineapple Coconut Ice Cream
Prep Time: 10 minutes | Cook Time: 25 minutes | Serves: 2–3
A tropical combination that feels fresh and light. Pineapple brings a bright tang, and coconut milk adds a naturally creamy, lightly sweet base. Together they create an ice cream that is completely dairy-free and incredibly flavorful. Perfect for anyone looking for a lighter frozen treat.
Ingredients
- ½ cup crushed pineapple, drained well
- ¾ cup full-fat canned coconut milk
- ¼ cup coconut cream
- 3 tablespoons sugar
- ½ teaspoon vanilla extract
- Pinch of salt
Instructions
Begin by draining the crushed pineapple very well. Spread it on a clean kitchen towel or paper towels and press down gently to remove as much liquid as possible. Too much pineapple juice in the base can make the ice cream icy rather than creamy, so thorough draining is important.
In a mixing bowl, combine the full-fat coconut milk, coconut cream, sugar, vanilla extract, and salt. Whisk together until the sugar is fully dissolved. Shake or stir the canned coconut milk well before measuring, as the fat and liquid separate when stored.
Add the drained crushed pineapple to the coconut mixture and stir to combine. The base will have a slightly chunky texture from the pineapple pieces, which is perfect. Taste the mixture — it should be sweet with a clear coconut and pineapple flavor. Add a tiny squeeze of fresh lime juice if you want a little extra brightness.
Refrigerate the mixture for at least 1 to 2 hours until very cold. The coconut cream base benefits from extra chill time.
Assemble the Cuisinart 1 Pint Ice Cream Maker and turn it on. Pour the cold pineapple coconut mixture in and churn for 20 to 25 minutes. The coconut fat in the base helps the ice cream develop a wonderfully creamy texture as it churns.
Transfer to a container and freeze for 1 hour for a firmer scoop. Serve with a sprinkle of toasted coconut flakes on top for a beautiful, tropical finish. This ice cream pairs wonderfully with fresh pineapple slices.
10. Peach Ice Cream
Prep Time: 15 minutes | Cook Time: 25 minutes | Serves: 2–3
Ripe summer peaches make this ice cream one of the most naturally sweet and fragrant flavors you can make at home. The soft fruit blends right into the creamy base, and tiny pieces of peach throughout every scoop make it taste completely fresh and homemade.
Ingredients
- ¾ cup ripe peaches, peeled and diced
- 2 tablespoons sugar (for the peaches)
- ¾ cup heavy whipping cream
- ¼ cup whole milk
- 2 tablespoons granulated sugar
- ½ teaspoon vanilla extract
- 1 teaspoon lemon juice
- Pinch of salt
Instructions
Start by preparing the peaches. Peel them by scoring the bottom with an X, dropping them into boiling water for 30 seconds, then transferring them immediately into ice water. The skin will slip right off. Dice the peeled peaches into small chunks and place them in a bowl. Sprinkle 2 tablespoons of sugar over the peaches and stir to coat. Let them sit for 15 minutes to macerate and release their natural juices.
After 15 minutes, take about half the peach mixture and blend or mash it smooth. Leave the other half as small chunks. This combination of pureed and chunky peaches gives the best texture — smooth ice cream with little bursts of real fruit throughout.
In a mixing bowl, combine the heavy whipping cream, whole milk, 2 tablespoons granulated sugar, vanilla extract, lemon juice, and salt. Whisk together until the sugar dissolves. Add both the pureed and chunky peach mixture to the bowl and stir everything together gently.
Refrigerate the peach base for 1 hour until fully chilled. When ready, set up the ice cream maker and turn it on. Pour the cold peach mixture in and churn for 20 to 25 minutes. The fruit chunks will distribute evenly throughout as the machine works.
After churning, transfer the ice cream to a freezer container and freeze for 1 hour. Serve with a fresh peach slice or a light drizzle of honey. This ice cream tastes best in summer when fresh peaches are at their sweetest, but frozen peaches work great year-round too.
11. Brownie Batter Ice Cream
Prep Time: 15 minutes | Cook Time: 25 minutes | Serves: 2–3
Love brownie batter? Now you can eat it frozen. This ice cream tastes just like the inside of a warm, gooey brownie — rich, chocolatey, and deeply satisfying. Small brownie pieces folded in make every spoonful a little extra special.
Ingredients
- 1 cup heavy whipping cream
- ½ cup whole milk
- 3 tablespoons granulated sugar
- 3 tablespoons unsweetened cocoa powder
- 1 teaspoon vanilla extract
- Pinch of salt
- ¼ cup brownie pieces, cut small (store-bought or homemade, cooled)
Instructions
This recipe starts with a rich chocolate base that mimics real brownie batter flavor. In a small saucepan, combine the whole milk and cocoa powder over low heat. Whisk constantly as the milk warms up — the cocoa needs heat and movement to dissolve completely without leaving dry clumps. Once the cocoa is fully dissolved and the milk is steaming (but not boiling), remove from heat and stir in the sugar and salt. Keep stirring until the sugar dissolves completely.
Let this chocolate milk mixture cool for 10 minutes, then pour it into a larger mixing bowl. Add the heavy whipping cream and vanilla extract and whisk everything together until combined and smooth. The base should smell exactly like brownie batter — intensely chocolatey and slightly sweet.
Cover the bowl and refrigerate the mixture for at least 1 to 2 hours until completely cold. While it chills, prepare the brownie pieces. Cut baked brownies into small, bite-sized chunks — about the size of a marble. If the brownies are very gooey, freeze them for 10 minutes first to firm them up so they hold their shape better when mixed into the ice cream.
When the base is cold, turn on the Cuisinart 1 Pint Ice Cream Maker and pour the mixture in. Churn for 20 to 22 minutes until thick and creamy.
In the last 2 to 3 minutes of churning, drop in the brownie pieces through the top. Let them mix in just enough to distribute without completely breaking down. Once churning is done, transfer the ice cream to a freezer-safe container. You can add a few extra brownie chunks on top before sealing. Freeze for 1 hour before serving. Each scoop tastes like a dessert inside a dessert.
12. Salted Caramel Ice Cream
Prep Time: 10 minutes | Cook Time: 25 minutes | Serves: 2–3
Sweet caramel with a pinch of flaky sea salt takes ice cream to a whole new level. The contrast of sweet and salty in every spoonful is absolutely addictive. Made with real caramel sauce, this recipe has a deep, buttery richness that you just cannot get from store-bought ice cream.
Ingredients
- 1 cup heavy whipping cream
- ¼ cup whole milk
- ¼ cup caramel sauce (store-bought or homemade)
- 2 tablespoons granulated sugar
- ½ teaspoon vanilla extract
- ¼ teaspoon fine sea salt
- Extra flaky sea salt for topping
Instructions
Combine the heavy whipping cream, whole milk, caramel sauce, granulated sugar, vanilla extract, and fine sea salt in a mixing bowl. Whisk everything together until the sugar and caramel sauce have fully blended into the cream. The mixture should be a warm golden-brown color and smell incredibly rich and buttery.
Taste the base before refrigerating. The caramel flavor should be prominent, and you should clearly taste the salt in the background. It should not taste overwhelmingly salty — just enough to make the sweetness pop. If you want more salt presence, add a tiny pinch more. If it needs more sweetness, add another half tablespoon of caramel sauce.
Cover the mixture and refrigerate for at least 1 to 2 hours until very cold. The caramel sauce in the base makes it slightly thicker than plain cream, so it benefits from extra chill time.
When ready, set up the ice cream maker with the fully frozen bowl. Turn the machine on and pour the cold caramel base in steadily. Let it churn for 22 to 25 minutes. Caramel ice cream sometimes needs slightly longer churn time because of its density.
Once the churning is complete, transfer the ice cream to a freezer container. Press plastic wrap directly onto the surface of the ice cream. Before sealing the container, scatter a small amount of flaky sea salt across the top. The flakes will remain visible and deliver little bursts of saltiness in every scoop.
Freeze for 1 to 2 hours until firm. Serve topped with an extra pinch of flaky sea salt and a drizzle of warm caramel sauce. This is one of those flavors that every single person at the table asks for a second scoop of.
13. Peanut Butter Cup Ice Cream
Prep Time: 10 minutes | Cook Time: 25 minutes | Serves: 2–3
Creamy peanut butter blended into a sweet vanilla base with chunks of chocolate peanut butter cups throughout — this flavor is impossible to resist. Every bite gives you peanut butter, chocolate, and cream all at once. Perfect for peanut butter lovers of any age.
Ingredients
- 1 cup heavy whipping cream
- ¼ cup whole milk
- 3 tablespoons granulated sugar
- 3 tablespoons creamy peanut butter
- ½ teaspoon vanilla extract
- Pinch of salt
- 4–5 mini peanut butter cups, chopped
Instructions
Place the peanut butter in a small microwave-safe bowl and warm it for 15 to 20 seconds until it is soft and easy to stir. Warm peanut butter blends into the cream base much more smoothly than cold, stiff peanut butter.
In a mixing bowl, combine the whole milk and warm peanut butter first. Whisk them together vigorously until the peanut butter is fully dissolved into the milk with no streaks remaining. This step is key — fully incorporating the peanut butter into a small amount of liquid first makes it much easier to blend with the rest of the ingredients without lumps.
Once the peanut butter and milk are smooth, add the heavy whipping cream, granulated sugar, vanilla extract, and salt. Whisk everything together until the sugar dissolves and the base is silky smooth. The base should taste like a drinkable peanut butter milkshake at this point.
Cover and refrigerate for 1 to 2 hours until cold. While the base chills, chop the mini peanut butter cups into small pieces. Place them in the freezer until you are ready to add them — cold, firm candy pieces hold their shape better in ice cream.
When the base is chilled, turn on the Cuisinart 1 Pint Ice Cream Maker and pour the peanut butter base in. Churn for 20 to 22 minutes until thick and creamy.
With about 2 minutes left of churning, add the frozen chopped peanut butter cup pieces through the top. They will mix in evenly without melting.
Scoop into a container and freeze for 1 hour. Serve with an extra peanut butter cup cut in half on top for presentation. Every scoop is pure peanut butter and chocolate bliss.
14. Coffee Mocha Ice Cream
Prep Time: 10 minutes | Cook Time: 25 minutes | Serves: 2–3
Bold coffee flavor meets rich chocolate in this mocha ice cream made for coffee lovers. Strong brewed espresso or instant espresso powder gives it a deep, authentic coffee taste. A little cocoa rounds out the flavor and makes it smooth and intensely satisfying.
Ingredients
- 1 cup heavy whipping cream
- ½ cup whole milk
- 3 tablespoons granulated sugar
- 1½ teaspoons instant espresso powder (or 2 tablespoons cooled strong brewed coffee)
- 1½ tablespoons unsweetened cocoa powder
- ½ teaspoon vanilla extract
- Pinch of salt
Instructions
Start by dissolving the espresso powder in a small amount of warm milk. Pour 2 tablespoons of the whole milk into a small cup, add the espresso powder, and stir until it dissolves completely. This ensures the coffee flavor distributes evenly through the base without leaving undissolved specks.
In a mixing bowl, combine the remaining whole milk with the cocoa powder. Whisk well until the cocoa is fully blended in with no dry clumps. Then add the espresso-milk mixture and whisk again. The combination of coffee and cocoa is what creates the signature mocha flavor.
Add the heavy whipping cream, granulated sugar, vanilla extract, and salt to the bowl. Whisk everything together until the sugar is dissolved and the base is smooth. The mixture should look dark tan and smell richly of coffee and chocolate together.
Taste the base. The coffee should come through clearly and the chocolate should be present but subtle. If you want a stronger coffee taste, add another ½ teaspoon of espresso powder dissolved in a bit of warm milk. If you want more chocolate, add another ½ tablespoon of cocoa.
Refrigerate the mocha base for 1 to 2 hours until thoroughly cold. Then assemble the ice cream maker, turn it on, and pour the base in. Churn for 20 to 25 minutes until thick and creamy.
Transfer to a freezer container and freeze for 1 hour. Serve in small espresso cups or regular bowls with a light dusting of cocoa powder on top. For extra indulgence, add a drizzle of chocolate sauce. Coffee and chocolate in frozen form — absolutely perfect.
15. Cinnamon Roll Ice Cream
Prep Time: 10 minutes | Cook Time: 25 minutes | Serves: 2–3
Warm cinnamon and sweet brown sugar swirled into a creamy vanilla base — this ice cream captures everything you love about a fresh cinnamon roll, but frozen and scoopable. The cinnamon swirl ribbon running through each scoop makes it look and taste bakery-level special.
Ingredients
- 1 cup heavy whipping cream
- ½ cup whole milk
- 3 tablespoons granulated sugar
- 1 teaspoon vanilla extract
- ¾ teaspoon ground cinnamon
- Pinch of salt
For the cinnamon swirl:
- 1 tablespoon brown sugar
- ½ teaspoon ground cinnamon
- 1 teaspoon melted butter
Instructions
Begin with the cinnamon swirl topping first so it has time to cool. In a very small bowl, mix together the brown sugar, ½ teaspoon cinnamon, and melted butter until it forms a thick, paste-like mixture. Spread it thinly on a small piece of parchment paper and place it in the freezer for about 20 minutes. Once frozen, break it into small pieces or crumbles. These will be layered into the finished ice cream for a sweet cinnamon ribbon effect.
Now make the base. Combine the heavy whipping cream, whole milk, granulated sugar, vanilla extract, ¾ teaspoon cinnamon, and pinch of salt in a mixing bowl. Whisk until the sugar dissolves completely and the cinnamon is evenly distributed throughout the liquid. The base will smell warmly spiced and inviting.
Refrigerate the cinnamon base for at least 1 hour until cold. When ready, assemble the ice cream maker and turn it on. Pour the cold base in and churn for 20 to 25 minutes until thick and creamy.
Scoop half the finished ice cream into a freezer container. Scatter half the frozen cinnamon swirl crumbles over it. Add the remaining ice cream on top and scatter the rest of the crumbles over that layer. Use a skewer to gently swirl them into the ice cream with a few light strokes for a ribbon effect.
Freeze for 1 to 1.5 hours. Each scoop will have golden cinnamon swirls throughout and taste exactly like a cinnamon roll in ice cream form.
16. Low-Sugar Vanilla Ice Cream
Prep Time: 10 minutes | Cook Time: 25 minutes | Serves: 2–3
All the creamy, delicious flavor of classic vanilla ice cream but with much less sugar. Using a natural sweetener keeps the taste clean and smooth without the heavy sweetness. Great for people watching their sugar intake who still want to enjoy a satisfying frozen treat.
Ingredients
- 1 cup heavy whipping cream
- ½ cup whole milk
- 2 tablespoons honey or maple syrup (or 2 tablespoons erythritol for even lower sugar)
- 1 teaspoon pure vanilla extract
- Pinch of salt
Instructions
This recipe works beautifully because heavy cream has enough natural fat to create a creamy, satisfying ice cream even without a large amount of sweetener. The key is using a sweetener that blends smoothly without crystallizing.
In a mixing bowl, combine the heavy whipping cream and whole milk. Add the honey or maple syrup to the bowl. If using honey, make sure it is liquid and pourable — warm it for a few seconds in the microwave if it has become thick or crystallized. Whisk the cream, milk, and sweetener together until the sweetener is fully dissolved and evenly distributed throughout the liquid.
Add the vanilla extract and pinch of salt. Whisk again for another minute until the base is smooth. Taste it — the sweetness should be present but not overpowering. With honey or maple syrup, the flavor will have a slightly warm, natural sweetness that is very pleasant and different from granulated sugar.
If using erythritol, dissolve it in the milk first by warming the milk slightly, then cooling it before mixing with the cream. Erythritol needs a little encouragement to dissolve completely.
Refrigerate the base for 1 to 2 hours until very cold. Set up the Cuisinart 1 Pint Ice Cream Maker with the frozen bowl, turn it on, and pour the chilled base in. Churn for 22 to 25 minutes. Because this base has less sugar, it may take just a minute or two longer to reach the right creamy texture.
Transfer to a freezer container and freeze for 1 hour. Serve with fresh berries or a tiny drizzle of honey. Clean, light, and completely delicious.
17. Keto Chocolate Ice Cream
Prep Time: 10 minutes | Cook Time: 25 minutes | Serves: 2–3
Rich chocolate flavor with zero guilt for anyone following a keto or low-carb lifestyle. Sweetened with powdered erythritol, this chocolate ice cream is creamy, smooth, and deeply chocolatey without spiking your blood sugar. You truly will not miss the regular version.
Ingredients
- 1 cup heavy whipping cream
- ¼ cup unsweetened almond milk
- 3 tablespoons powdered erythritol (or Swerve confectioners)
- 3 tablespoons unsweetened cocoa powder
- 1 teaspoon vanilla extract
- Pinch of salt
Instructions
Using powdered erythritol instead of granulated is critical in this recipe. Powdered erythritol dissolves much more easily in cold liquid and does not leave a gritty texture in the finished ice cream. If you only have granulated erythritol, process it in a blender or spice grinder for 30 seconds to turn it into a powder before using.
In a small saucepan, combine the almond milk and cocoa powder. Warm over low heat and whisk constantly until the cocoa is fully dissolved in the milk. Do not bring it to a boil — just get it warm enough for the cocoa to blend in smoothly, about 2 to 3 minutes. Remove from heat and let cool for 10 minutes.
In a mixing bowl, combine the heavy whipping cream and powdered erythritol. Whisk together until the erythritol is dissolved. Add the cooled chocolate milk mixture, vanilla extract, and salt. Whisk everything together until the base is smooth, dark, and uniform. Taste it — the chocolate flavor should be strong and the sweetness should be pleasant without any bitter aftertaste.
If you notice any slight cooling sensation from the erythritol, that is normal and will be less noticeable once the ice cream is frozen.
Refrigerate the keto chocolate base for 1 to 2 hours until cold. Assemble the ice cream maker, turn it on, and pour the base in. Churn for 22 to 25 minutes. The almond milk and erythritol combination will produce a slightly icier texture than traditional ice cream, so giving it the full churn time is important for the best results.
Transfer to a freezer container and freeze for 1 hour before serving. The texture improves significantly with proper freezing. Serve topped with a few unsweetened chocolate chips or a sprinkle of cocoa powder.
18. Vegan Coconut Milk Ice Cream
Prep Time: 10 minutes | Cook Time: 25 minutes | Serves: 2–3
Completely dairy-free and made entirely with coconut milk, this vegan ice cream is every bit as creamy and satisfying as the traditional kind. The full-fat coconut milk creates a luxuriously smooth texture, and the vanilla gives it a flavor that works beautifully on its own or as a base for other add-ins.
Ingredients
- 1 cup full-fat canned coconut milk (shaken well before measuring)
- ¼ cup coconut cream
- 3 tablespoons maple syrup or agave nectar
- 1 teaspoon vanilla extract
- Pinch of salt
Instructions
The quality of the coconut milk makes a big difference in this recipe. Always use full-fat canned coconut milk, not the carton kind sold for drinking. The fat content in canned full-fat coconut milk is what gives this ice cream its creamy, rich texture. Light coconut milk will produce a much icier, less satisfying result.
Before opening the can, shake it vigorously to combine the coconut fat and liquid, which tend to separate during storage. Open the can and measure out 1 cup. If the fat has solidified at the top, scoop it out and warm the can briefly in a bowl of hot water for a few minutes to melt it, then shake and measure.
In a mixing bowl, combine the full-fat coconut milk, coconut cream, maple syrup, vanilla extract, and pinch of salt. Whisk together until everything is smooth and the sweetener is fully dissolved. Coconut cream adds extra richness and helps the ice cream freeze to a creamier consistency.
Taste the base. It should taste like a lightly sweet, warm vanilla coconut cream — very pleasant on its own. Adjust sweetness with a little more maple syrup if needed.
Refrigerate the mixture for at least 2 hours. Coconut milk ice cream benefits from thorough chilling because the coconut fat needs to be cold before churning for the best texture.
Set up the ice cream maker with the frozen bowl. Turn it on and pour the cold coconut mixture in. Churn for 22 to 25 minutes. Transfer to a container and freeze for 1 to 2 hours. Serve topped with toasted coconut shavings for a beautiful, all-natural dessert.
19. Protein Ice Cream Recipe
Prep Time: 10 minutes | Cook Time: 25 minutes | Serves: 2–3
A creamy, high-protein ice cream that actually tastes good and keeps you full. Made with vanilla protein powder, Greek yogurt, and a small amount of cream, each serving packs a satisfying protein punch. Great as a post-workout treat or a healthy dessert option any day.
Ingredients
- ½ cup plain Greek yogurt (full-fat or 2%)
- ½ cup whole milk
- ¼ cup heavy whipping cream
- 2 tablespoons vanilla protein powder
- 2 tablespoons honey or maple syrup
- ½ teaspoon vanilla extract
- Pinch of salt
Instructions
Protein ice cream can sometimes turn out chalky or icy if the ingredients are not combined correctly. Following these steps carefully will give you a smooth, creamy result every time.
Start by whisking the protein powder with the whole milk in a mixing bowl. Add the milk a little at a time and whisk constantly to prevent the protein powder from clumping. Once the protein powder is fully dissolved in the milk — with no lumps — add the Greek yogurt and whisk again until smooth. Greek yogurt adds a natural tang, a boost of protein, and a creamy body that regular milk cannot provide.
Add the heavy whipping cream, honey or maple syrup, vanilla extract, and pinch of salt. Whisk everything together until the base is completely smooth. The mixture will be slightly thicker than a regular ice cream base because of the protein powder and yogurt.
Taste the base. It should taste like a very thick, sweet vanilla smoothie. If the protein powder makes the base taste slightly grainy, let the mixture rest in the refrigerator for 30 minutes before churning — the liquid will absorb more of the powder and improve the texture.
Refrigerate the protein base for at least 1 hour until cold. Assemble the ice cream maker and turn it on. Pour the cold base in and churn for 18 to 22 minutes. Protein-based ice cream can get thick quickly, so keep an eye on the texture and stop churning when it looks creamy and soft-serve thick.
Transfer to a freezer container and freeze for 30 to 45 minutes — not too long, as this type freezes harder than traditional ice cream. Let it sit for 3 to 4 minutes at room temperature before scooping. Top with fresh berries or a drizzle of nut butter.
20. Dairy-Free Mango Sorbet
Prep Time: 10 minutes | Cook Time: 20 minutes | Serves: 2–3
Bright, fresh mango blended into a smooth sorbet base — this one is 100% dairy-free, naturally vegan, and incredibly refreshing. Just three main ingredients and you have a beautiful frozen dessert that lets the real fruit shine. Light, clean, and perfect for a hot day.

Ingredients
- 1½ cups ripe mango, peeled and diced (fresh or frozen, fully thawed)
- 3 tablespoons sugar
- 2 tablespoons water
- 1 tablespoon fresh lime juice
- Pinch of salt
Instructions
The secret to a great sorbet is a perfectly smooth fruit puree and a proper simple syrup to add the right amount of sweetness and smooth texture. Doing both steps correctly means the difference between a silky, scoopable sorbet and a chunky, icy block.
Begin by making a small simple syrup. Combine the sugar and water in a small saucepan over medium heat. Stir constantly until the sugar is completely dissolved. This only takes 1 to 2 minutes. The mixture should look completely clear with no visible sugar crystals. Remove from heat and let the syrup cool to room temperature. Simple syrup blends into fruit puree much more evenly than granulated sugar, and it also helps the sorbet have a smoother, less icy texture when frozen.
While the syrup cools, prepare the mango. Place the ripe mango pieces in a blender or food processor. Add the lime juice and pinch of salt. Blend on high speed until completely smooth — no chunks remaining. The puree should be silky and vibrant in color. If your blender struggles, add 1 tablespoon of water to help it move.
Pour the cooled simple syrup into the blender with the mango puree and blend together for another 30 seconds until fully combined. Taste the sorbet base. It should be sweet, tangy from the lime, and brightly fruity. The lime juice is not optional — it elevates the mango flavor and keeps the sorbet from tasting flat. Adjust lime or sugar to your preference.
Transfer the mango sorbet base to a bowl or sealed container and refrigerate for at least 1 to 2 hours until very cold. Cold fruit puree produces a much smoother sorbet than room-temperature puree.
When ready, assemble the Cuisinart 1 Pint Ice Cream Maker with the fully frozen bowl. Turn the machine on and pour the cold mango sorbet base in. Churn for 18 to 20 minutes. Sorbet churns a little faster than cream-based ice cream, so check the texture at the 18-minute mark. It should look thick, smooth, and frozen with a soft sorbet consistency.
Transfer to a freezer container and freeze for 1 hour before serving. The sorbet will firm up to a perfectly scoopable texture. Serve in chilled glasses or bowls with a fresh lime wedge on the side and a few mango cubes for garnish. This is pure fruit goodness in every single spoonful.
Best Toppings for Homemade Ice Cream
The right topping can take a simple scoop of ice cream and turn it into something truly special. Here are some great topping ideas:
1. Fresh Fruit Toppings — Sliced strawberries, blueberries, raspberries, diced mango, or peach slices bring bright color and natural sweetness. Fresh fruit also adds a light, refreshing contrast to rich, creamy ice cream flavors.
2. Chocolate Sauces and Syrups — A warm drizzle of hot fudge sauce, salted caramel, or dark chocolate ganache adds indulgence and a beautiful glossy finish to any bowl or cone. These pair especially well with vanilla, coffee, and peanut butter flavors.
3. Nuts and Crunchy Additions — Chopped walnuts, roasted peanuts, toasted almonds, granola, or crushed graham crackers give every bite a satisfying crunch. The texture contrast between smooth ice cream and crunchy nuts is one of the best combinations in dessert.
4. Whipped Cream and Sprinkles — A swirl of fresh whipped cream and a scatter of rainbow or chocolate sprinkles makes any bowl of ice cream feel like a party. Kids especially love this combination, and it takes only seconds to add.
Conclusion
These 20 Cuisinart 1 Pint Ice Cream Maker Recipes cover every craving you could possibly have — from classic vanilla and rich chocolate to tropical mango sorbet and protein-packed healthy options. Making ice cream at home is one of the most rewarding kitchen activities there is. You get to control exactly what goes into each batch, adjust flavors to your taste, and enjoy fresher results than anything from a store shelf.
Do not be afraid to get creative. Once you have tried a few of these recipes, start mixing things up. Swap ingredients, add different mix-ins, or combine flavors you love. Your next favorite ice cream might be one experiment away. The beauty of making small batches with the Cuisinart 1 Pint Ice Cream Maker is that you can try something new every single week without wasting ingredients or space.
The machine makes the whole process simple, fast, and genuinely enjoyable. In under 30 minutes, you go from mixing bowl to creamy frozen dessert. That kind of speed and ease makes homemade ice cream a real everyday option, not just a special occasion treat. Pick your favorite recipe from this list and give it a try today. Once you taste the difference that fresh, homemade ingredients make, there is a good chance the store-bought tubs will stay on the shelf.